How to Edit the WordPress htaccess File
by
7-layers of Security for Your WordPress Site
Your website needs the most comprehensive security to protect it from the constant attacks it faces everyday.

Editing the WordPress .htaccess file can be very complicated.
Finding the right file can be difficult and editing it can be even harder. But don’t worry, we’re here to help.
In this article, we’ll guide you through the process of finding and editing the .htaccess file in a way that’s easy to understand. Whether you’re facing issues with your website’s security, loading speed, or functionality, editing the .htaccess file can be the solution you’re looking for.
We’ll show you how to use the .htaccess file to redirect users to https, add security rules, blocking an IP address, and configure caching.
And if you’re not familiar with the .htaccess file, don’t worry. Our step-by-step guide will make the process straightforward and stress-free.
So, if you’re ready to get your website running smoothly, let’s get started!
Check if Your Server Supports .htaccess Files
It’s important to note that not every web host supports .htaccess files. Before you start making any changes to your .htaccess file, you’ll want to make sure that your server actually supports them. This can be done by trying to locate the file in the root directory of your website. If you are unable to find the file, it is a good indicator that your server does not support .htaccess files and you will not be able to proceed with editing it.
Another way to check if your server supports .htaccess files is to contact your web hosting provider. They will be able to confirm whether or not your server supports .htaccess and if there are any other steps that you’ll need to take in order to use them.
So, before you start making any changes to your .htaccess file, it’s a good idea to check if your server actually supports them. And don’t worry, we’ll walk you through the process so that you can move forward with confidence.
We Tested Support for htaccess in Popular Webosts
Vast majority of websites are hosted on one of the popular webhosts. Hence we tested htaccess files on all the these. This will save you the trouble of doing this process yourself. Here is our findings.
Support htaccess: GoDaddy, SiteGround, BlueHost, Nexcess, LiquidWeb, Cloudways, Dreamhost. Also many of the smaller hosts around the world which use cPanel(Apache) based hosting or LiteSpeed based hosting.
Do not Support htaccess: WP Engine, Flywheel, Pantheon. Many of the new generation managed hosts do not support htaccess files as they use another type of webserver called nginx. These are higher performance, but do not have some of these flexibilities.
3 Tools for Editing Your .htaccess File
When it comes to editing the .htaccess file, there are a few tools that you’ll need to have on hand. The first tool is a FTP client like FileZilla. This is a free and popular tool that makes it easy to upload and download files to and from your website. It is easy to use and can be downloaded for free.
The second tool is the file browser that comes with your web host. Not all web hosts provide this, but many popular ones do. It is usually located in the hosting account panel. It allows you to access and edit files on your website directly from your web host’s control panel.
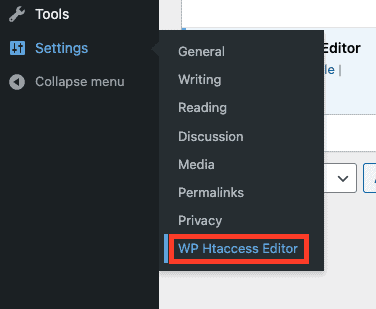
Finally, a third tool that could come in handy is a WordPress plugin like Htaccess File Editor. This allows you to edit your .htaccess file directly from the WordPress backend, which can be very convenient if you’re not comfortable working with code.
With these tools in hand, you’ll be able to make changes to your .htaccess file with confidence. We’ll be showing you how to use each of these tools in this guide, so you’ll be able to follow along and make any changes that you need to.
Where to Locate Your .htaccess File on Your Site
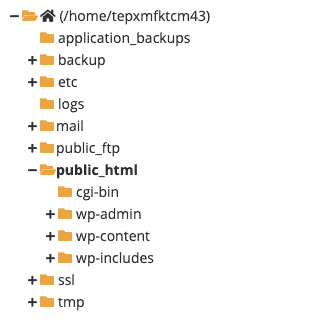
The .htaccess file is usually located in the root directory of your website. The root directory is the topmost folder that contains all the files and folders of your website.
For example, if you are using a web host like Bluehost, you can find the .htaccess file in the “public_html” folder. And if you are using SiteGround, the .htaccess file is typically located in the “root” folder. Similarly, if you are using GoDaddy, you can find the .htaccess file in the “httpdocs” folder.
In some cases, the .htaccess file might not be visible in your root folder. In that case, you should check if there is an option to show hidden files in your file manager. If you still can’t find the file, you can also contact your web host’s support team for assistance in finding the file.
It’s important to note that some web hosts may have different file structures or may use different names for the root directory. However, in most cases, the .htaccess file will be located in the root directory.
If you cannot find .htaccess file and if your web hosting supports it, you can create a new one by creating a new file and naming it .htaccess. Once you’ve located or created the .htaccess file, you’ll be ready to start making changes to it.
Editing Your .htaccess File on Windows Using Notepad
Editing your .htaccess file on Windows using Notepad is a simple process. First, you’ll need to download the .htaccess file from your website using an FTP client like FileZilla. Once you’ve downloaded the file, you can open it using Notepad.
Make the necessary changes to the file and save it. Once you’ve saved the file, you’ll need to upload it back to the root directory of your website using the FTP client. And that’s it, you’re done!
However, there are a couple of minor issues that you may run into. Sometimes, the file that you’ve downloaded may be named “htaccess” without the dot in the beginning, in that case, you will need to rename it and add the dot before uploading it back to the server.
Another issue you might face is that the file might be hidden, you will need to unhide it before editing it.
By following these steps, you’ll be able to edit your .htaccess file on Windows using Notepad with ease.
Editing Your .htaccess File on Mac Using TextEdit
Editing your .htaccess file on Mac using TextEdit is similar to editing on windows using Notepad. First, you’ll need to download the .htaccess file from your website using an FTP client like FileZilla. Once you’ve downloaded the file, you can open it using TextEdit.
Make the necessary changes to the file and save it. Once you’ve saved the file, you’ll need to upload it back to the root directory of your website using the FTP client.
However, there are a couple of minor issues that you may run into. Sometimes, the file that you’ve downloaded may be named “htaccess” without the dot in the beginning, in that case, you will need to rename it and add the dot before uploading it back to the server.
Another issue you might face is that the file might be hidden, you will need to unhide it before editing it.
It’s important to note that TextEdit, by default, saves files in rich text format (RTF) with a .rtf extension. To save the file as plain text, you should select “Make Plain Text” from the Format menu before saving.
By following these steps, you’ll be able to edit your .htaccess file on Mac using TextEdit with ease.
Things to Keep in Mind While Editing Your .htaccess File
When it comes to editing your .htaccess file, it’s important to proceed with caution. One wrong move and your website could crash. If you’ve read another article or have instructions for changes to make, be extra careful and ensure that you understand what each line of code is doing before making any changes.
Here are a few things to keep in mind to help prevent any mishaps:
Take a Backup of Your Whole Site
Before making any changes, it’s a good idea to take a full backup of your website. This way, if things go wrong, you can restore your site to a previous working state.
Make a Backup of Your .htaccess File
In addition to taking a full backup of your site, it’s also a good idea to make a backup of your .htaccess file before making any changes. This way, if you get a 500 server error or something else goes wrong, you can quickly restore your original .htaccess file and get your site back up and running.
Pay Attention to the Position of Your Edits
The position of your edits in the .htaccess file can have a big impact on the final outcome. If you’re not sure where to make your changes, it’s best to add them to the end of the file.
Be Careful with Spacing and Formatting
Each line in the .htaccess file follows a strict format, and spacing is important. Be sure to double-check your changes for accuracy and ensure that the spacing and formatting are correct before saving the file.
By keeping these things in mind, you’ll be able to edit your htaccess file without any major issues.
Use a Staging Site to Test The Changes First
Use a staging site to test changes first. A staging site is a replica of your live site where you can make and test changes without any risk. Once you’re happy with the changes, you can push those to your live site.
Generating the Default .htaccess File for a WordPress Site
One of the most common uses of editing the .htaccess file for a WordPress site is to generate the default .htaccess file. This file is used to control various aspects of your website, such as redirects, permalinks, and security settings.
To generate the default .htaccess file for a WordPress site, you’ll first need to log in to your WordPress backend. Once logged in, navigate to “Settings” and then “Permalinks”. On the “Permalinks” page, you’ll see a button labeled “Save Changes” at the bottom of the page.
When you click on “Save Changes,” WordPress will automatically generate the default .htaccess file for your site. If your website is running on Apache server, WordPress will update the file with the correct rewrite rules for permalinks.
An example of the default .htaccess file contents for a WordPress site might look like this:
# BEGIN WordPress
<IfModule mod_rewrite.c>
RewriteEngine On
RewriteBase /
RewriteRule ^index\.php$ - [L]
RewriteCond %{REQUEST_FILENAME} !-f
RewriteCond %{REQUEST_FILENAME} !-d
RewriteRule . /index.php [L]
</IfModule>
# END WordPress
It’s important to note that this file is critical to the function of many features on your website.
Solving Common .htaccess File Problems: A Guide with Examples
You’re probably trying to solve some common problems with your .htaccess file. We’ve gone ahead and compiled a list of the top issues we’ve seen, along with solutions and examples that you can use directly. In a few cases, we’ve even included links to more in-depth articles to help you out.
Simple Redirects with .htaccess
If you’re looking to redirect URLs or traffic using your .htaccess file, we’ve got some examples and tips to help you out with a few of the most common redirects you may need to set up.
301 Redirect (Permanent)
Let’s say you’ve changed the domain of your site or moved it from a subdomain or a subdirectory. In order to keep your SEO intact, you’ll want to make sure visitors are pointed to your new site if they happen to visit the old one. You can use a plugin like Easy Redirect Manager, or you can use the following code in your .htaccess file:
RedirectMatch 301 / https://www.newdomain.com/For page-level redirects, you can use the following example:
RedirectMatch 301 /oldpage https://www.newdomain.com/newpageAnd to redirect a media or PDF file, say if you’ve moved it to a new folder on your site:
Redirect 301 /oldfile.pdf /folder/newfile.pdf302 Redirect (Temporary)
Sometimes, you may need to set up a temporary redirect, that’s where the 302 redirect comes in. It’s identical to the 301 redirect as far as users are concerned, but it signals to search engines that the redirect is temporary. For example, you can use the following code:
RedirectMatch 302 /oldpage.html http://www.yourwebsite.com/newpage.htmlAdding ‘www’ to Your URL
If you want to make sure your website’s URL always includes “www,” we’ve got a quick and easy fix for you. With the .htaccess file, you can set up a redirect so that if someone enters your domain without the “www,” they’ll be taken to the version with “www” in the URL.
Here’s an example of the code you’ll want to add to your .htaccess file to make it happen:
RewriteCond %{HTTP_HOST} !^www\.
RewriteRule ^(.*)$ https://www.%{HTTP_HOST}/$1 [R=301,L]
Just paste this code into your .htaccess file, replacing HTTP_HOST with your own domain, and you’re good to go! Now, every time someone enters your website without the “www,” they’ll be automatically taken to the version with “www” in the URL.
Securing Your Website: How to Disable Directory Browsing
By default, if someone visits a directory on your website through their browser, they’ll be able to see a list of all the files and directories contained within. Not only is this a security hazard, but it also doesn’t look professional. So, let’s show you how to quickly and easily disable directory browsing using .htaccess.
Here’s the snippet of code you’ll want to add to your .htaccess file:
Options All -IndexesOnce you add this line of code, it will prevent visitors from being able to see the contents of a directory if they navigate to it.
It’s a small step, but it goes a long way in securing your website and making sure it looks professional.
Blocking Access to Your Website: How to Blacklist IPs
Sometimes you may need to block certain IPs or domains from accessing your website. This can be done through your .htaccess file. But keep in mind that it’s not recommended to use this feature frequently, as it can quickly get overwhelming.
Here’s an example of how you can block the IP address 172.128.67.34 and any traffic from example.com from accessing your site:
<Limit GET POST PUT>
Order allow,deny
Allow from all
Deny from 172.128.67.34
Deny from example\.com
</Limit>
Securing Your Website: How to Whitelist IPs
Whitelisting IPs allows you to control who can access your website by only allowing certain IPs or domains. This can be a useful tool when you need to limit access to your site for security reasons.
Here’s an example of how you can whitelist the IP address 172.128.67.34 and any traffic from example.com so that they can access your site while denying access to everyone else:
<Limit GET POST PUT>
Order deny,allow
Deny from all
Allow from 172.128.67.34
Allow from example\.com
</Limit>
It’s important to note that this feature should be used with caution and it is recommended to keep a list of the IPs or domains that are whitelisted.
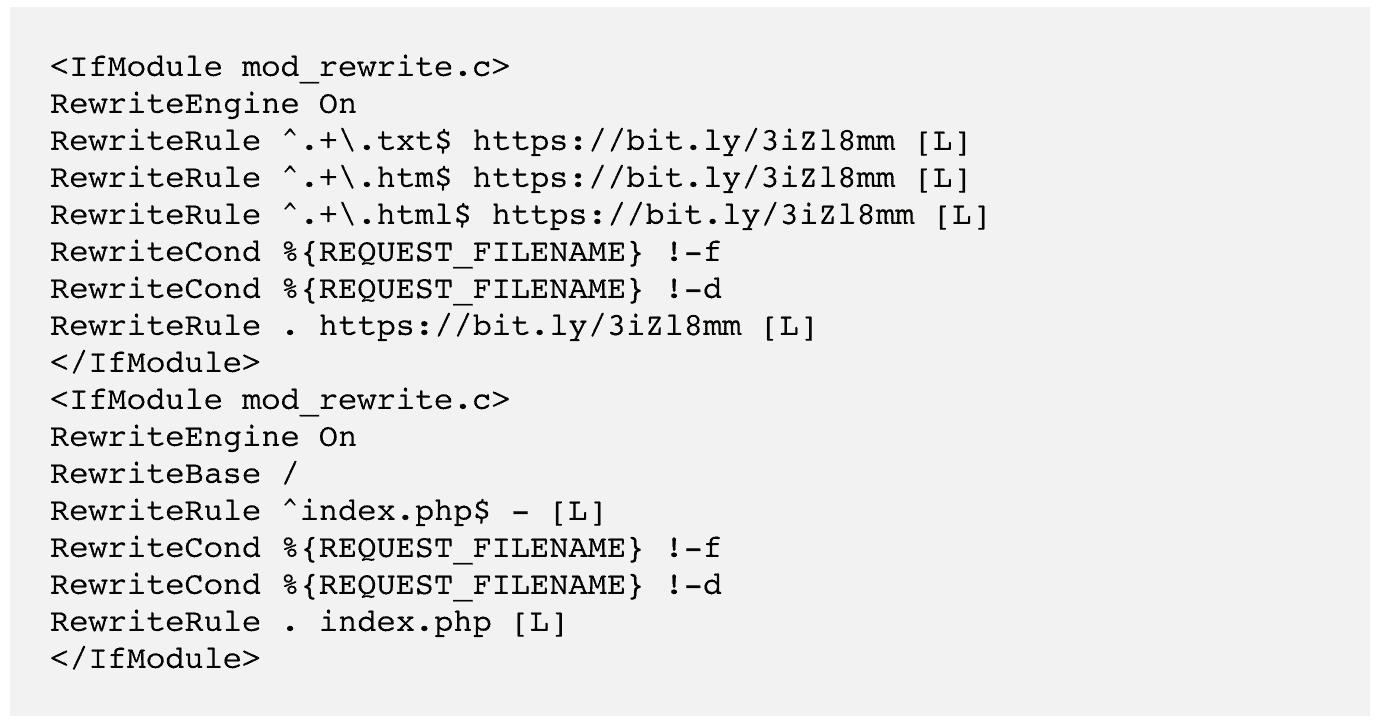
Securing Your Website: How to Redirect to HTTPS
One of the most important things you can do to secure your website is to make sure that all of your pages are being served over a secure HTTPS connection. If you’ve recently enabled SSL on your site but you’re still seeing pages being served over HTTP, you can use this code snippet in your .htaccess file to redirect visitors to the HTTPS version of your site:
RewriteEngine On
RewriteCond %{HTTPS} off
RewriteRule ^(.*)$ https://%{HTTP_HOST}%{REQUEST_URI} [L,R=301]
This code will redirect all traffic to your site to the HTTPS version. This is a great way to ensure that all visitors to your site have a secure experience.
Securing Your Website: How to Password Protect the WP-Admin Folder
Keeping your WordPress site secure is extremely important. One way to do this is by password protecting the wp-admin folder, which is the backbone of your site. By adding an extra layer of protection, you can keep unwanted visitors out. However, be aware that password protecting core directories is not recommended as it can cause issues with your site.
<Directory "/yoursite.com/wp-admin/">
AuthName "Prompt"
AuthType Basic
AuthUserFile /yoursite.com/.htpasswd
Require valid-user
</Directory>
Here’s an example of how you can password protect the wp-admin folder:
This code will create a login prompt using basic HTTP authentication and is used in conjunction with the htpasswd utility.
It’s important to note that this is not the only way to password protect a directory and other ways might be more appropriate depending on your use case.
Cleaning a Hacked Redirect Malware
Hackers can place a hacked redirect malware inside your htaccess file directly. This malware can take numerous forms and is difficult to identify. To clean it, you need to remove all the code added to the htaccess file by the hacker.
Conclusion
We’ve come to the end of our guide on how to edit your WordPress .htaccess file. This little file can be a real superhero when it comes to optimizing your site, but it can also cause some headaches if you’re not careful.
Remember, the .htaccess file is a critical file, so it’s important to proceed with caution when making changes to it. If you’re not entirely sure of what you’re doing, we recommend using a staging site to test out your edits first, before moving on to your live site. And as always, make sure to take a backup of your site before making any changes.
If you’ve made it this far, you should have a solid understanding of how to edit your .htaccess file and you should be able to tackle common issues you might face with your site.
FAQs
Q – What is the .htaccess file in WordPress?
You may have heard of the term .htaccess file in WordPress and might be wondering what it is. In simple terms, the .htaccess file is a configuration file that helps manage how your website is served on Apache servers.
With WordPress, the .htaccess file is used for things like managing redirects, permalinks and even blocking certain IP addresses or ranges from accessing your site. You can also use it to password-protect files and directories or even force HTTPS on your site.
Q – My .htaccess file is missing. How can I create one?
You can create a .htaccess file in WordPress by visiting Settings > Permalinks on your WordPress admin dashboard and clicking on “Save Changes” at the bottom without changing anything. If that doesn’t work, you can create one using your hosting account’s control panel or make a local file and then upload it to your root directory via FTP.
Q – Why are the changes you make to the file not staying?
So you’ve made changes to your .htaccess file and noticed that they’re not sticking around? This can be a frustrating issue but it’s not uncommon.
One reason this might be happening is that a plugin you’re using is rewriting the file. Things like caching or security plugins might need to make changes to the .htaccess file to function properly. Try disabling all the plugins and then re-enabling them one at a time to see which one might be causing the issue.
Another reason for this could be that your site has been hacked and malware is rewriting the file. If you suspect this is the case, it’s important to take steps to remove the malware as soon as possible.
Q – Is there an alternative when htaccess file is not supported?
Many of the edits, especially relating to security, can be added to the website firewall. This is often easier and safer to do inside the firewall config. So, before you go diving into editing the .htaccess file, check your firewall settings and see if the changes you want to make can be done there instead. This way, you can keep your website secure and functioning properly with minimal fuss.
Category:
Share it:
You may also like
-
How to Stop WordPress Comments Spam Without Blocking Real Readers
Comment spam has a way of making a site feel worse than it is. You open WordPress to publish something or check a plugin update, and there it is: fake…
-
WordPress Emails Going to Spam? How to Fix It Properly
It often starts with something small: a password reset that never reaches the inbox. Then a form lead sits in junk, or a WooCommerce customer asks why the order email…
-
WordPress Not Loading CSS Over HTTPS: How to Find and Fix It
Broken styling after an HTTPS switch is unnerving because visitors can reach the page, but the design has dropped away. Menus lose spacing, fonts fall back, buttons look unfinished, and…


How can we help you?
If you’re worried that your website has been hacked, MalCare can help you quickly fix the issue and secure your site to prevent future hacks.

My site is hacked – Help me clean it
Clean your site with MalCare’s AntiVirus solution within minutes. It will remove all malware from your complete site. Guaranteed.

Secure my WordPress Site from hackers
MalCare’s 7-Layer Security Offers Complete Protection for Your Website. 300,000+ Websites Trust MalCare for Total Defence from Attacks.


