How to Configure the Content Security Policy Header in WordPress
by
7-layers of Security for Your WordPress Site
Your website needs the most comprehensive security to protect it from the constant attacks it faces everyday.

The Content-Security-Policy (CSP) HTTP header is a powerful tool in any WordPress site administrator’s arsenal. It aims to provide an extra layer of security for websites by preventing the loading of malicious scripts or content.
Implementing the CSP header in WordPress may seem daunting. However, our experience of over 10 years in the WordPress ecosystem has positioned us to provide well-defined steps to enhance your site’s security.
In this article, we’ll guide you through configuring CSP, from understanding the basics such as directives and source values to crafting a policy that aligns with your site’s needs.
TL;DR: The Content-Security-Policy HTTP header helps protect your WordPress site from various attacks by controlling what resources are permitted to load. You can configure it either by using a plugin or by editing the .htaccess file. To secure your site further, install MalCare for its robust firewall, malware detection and removal features, and bot protection capabilities.
What is the Content-Security-Policy HTTP header in WordPress?
The Content-Security-Policy HTTP header is a security standard that instructs the browser to only execute or render resources on your WordPress site that are from declared, trusted sources. By doing so, it safeguards against various types of attacks, including Cross-Site Scripting (XSS) attacks and data injection, and also reduces the risk of content manipulation by unauthorized sources.
CSP works by specifying directives in the website’s HTTP headers, which outline the types of content that browsers are allowed to load.
For a WordPress site, these directives can include rules for scripts, styles, images, fonts, media, frames, and more. Some of them are default-src, script-src, style-src, img-src, connect-src, font-src, media-src, report-uri, child-src, form-action, frame-ancestors, object-src, frame-src, prefetch-src, and base-uri.
Now each of these directives has a standard set of options, some of which are none, self, unsafe-inline, unsafe-eval, strict-dynamic, report-sample, http:, and https:.
Please refer to this documentation for more information on these directives and options.
By setting a strict policy, you effectively tell the browser to disregard any resource that does not meet the established criteria. This proactive approach is integral to modern web security. It is particularly relevant for WordPress sites due to their widespread use and diverse range of plugins and themes, which can sometimes introduce vulnerabilities.
Check your WordPress site for Content-Security-Policy configuration
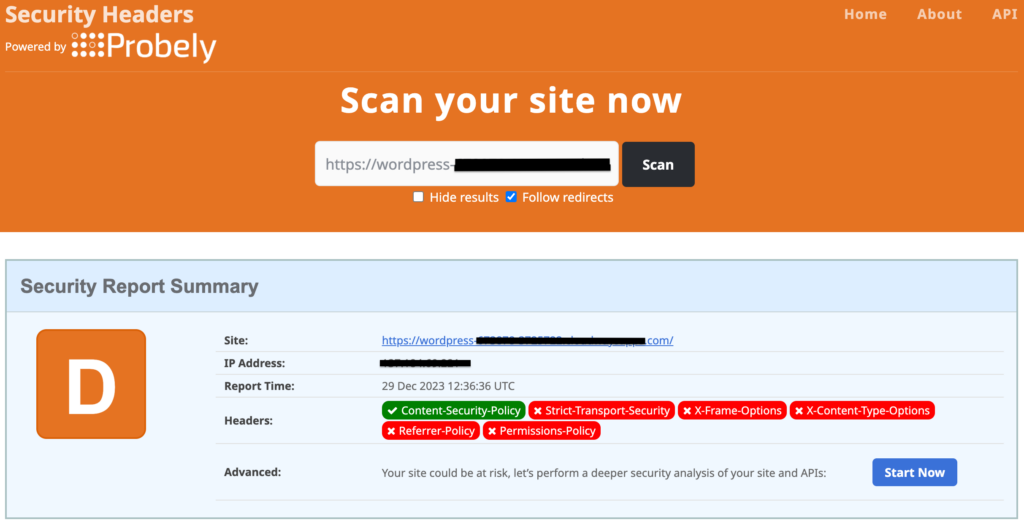
Before configuring the CSP header on your WordPress site, it’s wise to verify whether it’s already operational. A quick way to do this is by heading to the Security Headers website. Just input your site’s URL into their scanning tool, and you’ll be able to see if CSP, along with other security headers, is in place. It’s an easy step that can save you from redundant work.

If your site lacks a CSP header, setting it up is not complicated. Depending on your preference and expertise, you can either use a dedicated plugin, such as HTTP Headers, for a hassle-free setup or, if you’re adept at server-side tinkering, you can opt for manual insertion by editing the .htaccess file.
1. Configure Content-Security-Policy in WordPress using a plugin
The WordPress plugin landscape offers a diverse array of tools to customize HTTP headers, like the CSP header, with options including free and paid versions tailored for different needs.
While there are premium plugins available, such as AIOSEO, those seeking a cost-effective way to manage site headers may find the free HTTP Headers plugin by Dimitar Ivanov more than adequate.
To set up the CSP header on your WordPress site with the HTTP Headers plugin, here’s what to do:
1. Installing HTTP Headers: Go to the ‘Plugins’ menu in your WordPress dashboard, click on ‘Add New’, and search for the HTTP Headers plugin. Install and activate it.
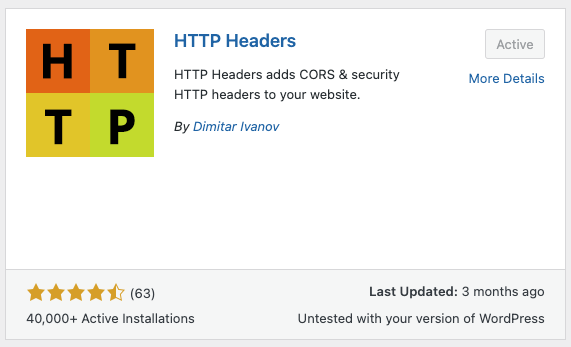
2. Configuring CSP: In your dashboard, go to ‘Settings’, then ‘HTTP Headers’. In the ‘Security’ area, you’ll see the Content-Security-Policy option. It’s likely inactive by default, so click ‘Edit’, enable it by ticking the ‘On’ box, adjust directives as needed, and save.

3. Verification: To confirm your configuration, use the Security Headers website to scan your site. Not seeing the changes? Clear your browser’s cache before retrying.
2. Configure Content-Security-Policy in WordPress by editing the .htaccess file
To activate the Content Security Policy (CSP) header on your WordPress site by editing a system file like .htaccess, it’s crucial to start by backing up your entire site. This can be done effortlessly with a plugin like BlogVault, which stores backups securely offsite—ideal for swift restorations in case an issue arises during the process.
For adding the CSP header to the .htaccess file, here are your options:
A. Via FTP Client
1. FTP Login: Use Filezilla or a similar FTP client to connect to your website using the credentials provided by your host.

2. Locate .htaccess: In the root directory (typically ‘public_html’), find the .htaccess file.
Note: Ensure hidden files are visible in your FTP settings.
3. Edit .htaccess: Right-click the file and select ‘View/Edit’. Insert the CSP directive shown below before the file ends and save it:
<IfModule mod_headers.c>

Header set Content-Security-Policy "default-src 'none'; script-src 'self'; connect-src 'self'; img-src 'self'; style-src 'self';"

</IfModule>
4. Save and Upload: After saving, your FTP client will prompt you to update the server’s file.
B. Via cPanel File Manager
1. Access cPanel: Log into your host’s cPanel dashboard and open the File Manager tool.
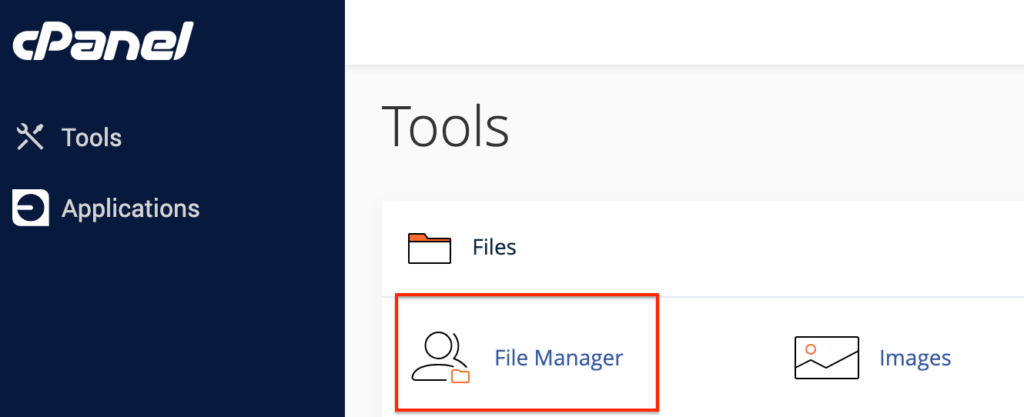
2. Find and edit .htaccess: In the root directory (typically ‘public_html’), right-click on the .htaccess file, choose ‘Edit’, add the above CSP snippet, and save the changes to apply the security configurations.
C. Via SSH
1. Connect to your site using SSH: Open Terminal, initiate an SSH session with `ssh username@ipaddress`, and access the root directory (typically ‘public_html’).


2. Edit .htaccess: Use the command `vi .htaccess` to open the file in the Vim editor. Press ‘i’ to enter the edit mode and add the CSP rules. Once done, hit ‘Esc’ and enter ‘:wq’ to save the file and exit the editor.
Note: If your site is hosted on nginx servers, you need to edit the nginx.conf file, and add the following code to enforce the security headers:
add_header Content-Security-Policy "default-src 'none'; script-src 'self'; connect-src 'self'; img-src 'self'; style-src 'self';";Potential issues and how to troubleshoot them
Configuring the CSP HTTP header on your WordPress site can vastly improve its security. However, you may encounter some issues during configuration. Here are potential challenges and their solutions:
Site breaks
After implementing CSP, if website features stop working or content fails to load, it’s often because resources are being blocked by the new policy. Check the browser’s developer console for CSP violation reports. Adjust your CSP directives to allow the blocked resources, such as third-party scripts or widgets.
Incorrect header syntax
Errors in the CSP directives can lead to the policy not being recognized or applied correctly. Carefully review your CSP syntax to ensure it adheres to the standard format and all sources are correctly defined. Using online CSP validators like CSP Evaluator can help detect any syntax issues.
Conflicts with other plugins or security settings
Some security plugins or existing server settings may conflict with your manually set CSP directives. Deactivate security plugins temporarily to identify conflicts. Review the code in the .htaccess or the nginx.conf file for existing CSP or other security headers that may overlap.
Problems with browser support
Older browsers may not support CSP or certain CSP features, leading to inconsistent security behaviors. Test your website across different browsers and versions. For better backward compatibility, consider including the X-XSS header for older IE versions.
CSP directives are too restrictive
A CSP that’s too stringent can block essential site elements and hinder functionality. Loosen directives incrementally while ensuring security isn’t compromised. Regularly review policy impacts on site performance and make necessary adjustments.
HTTPS mixed content issues
CSP often highlights mixed-content issues where a site served over HTTPS requests resources over HTTP. Ensure all resources are loaded over HTTPS. This may involve updating hard-coded URLs from HTTP to HTTPS or configuring server-side redirects.
Remember that while CSP is a strong layer of security, it works best as part of a holistic approach. Alongside CSP, using a dedicated security solution like MalCare can provide comprehensive coverage, dealing with a broad range of threats effectively and keeping your WordPress site safe.
How are HTTP headers important to WordPress?
HTTP headers are fundamental components in the secure and optimal functioning of a WordPress site. They play a crucial role not only in security measures but also in the overall website performance, significantly contributing to a safe and smooth online experience for users.
Are HTTP headers enough for your WordPress site’s security?
Grasping the function and importance of HTTP headers is a key step towards securing your WordPress site but it’s only part of a more extensive security blueprint. To truly fortify your site’s defenses, a multifaceted approach is essential:
Final thoughts
Although setting up the CSP header requires attention to detail and careful testing to maintain site functionality, the security benefits it brings to your WordPress site are invaluable. By specifying which resources the browser can load, you effectively minimize the risk of XSS attacks and other vulnerabilities stemming from malicious content injection. However, remember that while CSP goes a long way in protecting your website, it is ultimately one aspect of a layered security approach.
To complement your WordPress site’s security measures and ensure you have a robust safeguarding system in place, consider a comprehensive security plugin like MalCare. MalCare protects your site with automated malware scanning and clean-up capabilities, as well as a powerful firewall to block threats before they can exploit vulnerabilities—even those not mitigated by your CSP. A well-configured CSP, paired with MalCare’s advanced security features, ensures your WordPress site is not just a hard target for attackers, but a safer space for your visitors.
FAQs
Will configuring CSP affect my site’s performance?
Properly configuring a CSP should not impact your site’s performance. In fact, preventing the loading of unauthorized resources could potentially improve page load times.
Can I use CSP together with other security headers?
Yes, CSP is often used in conjunction with other security headers for a more comprehensive security approach, such as HSTS and X-XSS-Protection, although the latter is now deprecated in favor of CSP.
How can I test if my CSP is working correctly?
After setting up your CSP, you can use online tools like CSP Evaluator or perform a Content Security Policy check using security scanning websites. Additionally, browser developer tools can report content violations, which can be useful for further refining your CSP.
What happens if I configure CSP incorrectly?
An incorrect CSP configuration can block legitimate content from loading on your WordPress site. To avoid this, start with a restrictive policy and gradually allow individual sources based on your site’s needs, monitoring for any content loading issues.
Will setting up a CSP protect my site from all security vulnerabilities?
A CSP is a strong layer of defense against certain types of attacks, but it does not protect against all security threats. It’s best used as part of a comprehensive security strategy that includes other protective measures, such as using security plugins like MalCare.
How frequently should I update my CSP?
Regularly review and update your CSP whenever you add new resources or change the existing ones on your website to ensure it remains effective in safeguarding your WordPress site.
Category:
Share it:
You may also like
How to Fix the Google Blacklist Warning from Your Website
Google blacklist is a colloquial term used to describe big red warnings visible when visiting websites. There are a few flavours, depending on various factors, but they all mean that…

MalCare Stands Strong Against WP Activity Log Premium SQL Injection Vulnerability
A significant SQL injection vulnerability was identified in the WP Activity Log Premium plugin, a popular tool for tracking user activity on WordPress sites. An SQLi vulnerability poses a serious…
Fix Pharma Hack on WordPress and SEO
Pharma hack is a prolific malware that redirects visitors from your site to an online pharmacy that sells Viagra, Cialis, Levitra, Xanax, Tadalafil, and other drugs. It also shows up…
How can we help you?
If you’re worried that your website has been hacked, MalCare can help you quickly fix the issue and secure your site to prevent future hacks.

My site is hacked – Help me clean it
Clean your site with MalCare’s AntiVirus solution within minutes. It will remove all malware from your complete site. Guaranteed.

Secure my WordPress Site from hackers
MalCare’s 7-Layer Security Offers Complete Protection for Your Website. 300,000+ Websites Trust MalCare for Total Defence from Attacks.


