4 Ways to Restrict Admin Access On Your WordPress Site
by
7-layers of Security for Your WordPress Site
Your website needs the most comprehensive security to protect it from the constant attacks it faces everyday.

Restricting admin access on WordPress is an important login security measure that we use to reduce unauthorized access to your website pages or posts.
There are several reasons why you would want to do this.
Hackers can use privilege escalation to gain access to core site functions like plugin installs. This makes it important to restrict admin access by IPs and not just roles. It’s also possible that your team has grown and you want to ensure only certain members have access to certain site functionality, like publishing content.
Regardless of what your reason may be to restrict admin access on your WordPress site, we are here to walk you through different ways to do it.
TL;DR: If you want to restrict admin access to everybody except a certain group, you can either whitelist IPs (of Team Leads, for example) or restrict access to just administrators. If you’re looking for something in between, there is a plugin called Restrict Admin Access that does just that.
Restricting access to your admin panel can mean many things in WordPress. At its more basic level, WordPress already has a default feature for user roles. Admins, for example, have full access, but a subscriber can’t make any changes to your WordPress site. This is an easy way to establish some rules on what a user can and cannot do on your admin dashboard.
While managing user roles and access privileges is an important part of security, it is difficult to stay on top of it over a long period of time. A much better solution is to install an activity log plugin. An activity log shows you exactly what actions are taking place on your site, when, and by whom. It adds accountability and security to your site in one simple stroke and gives you full visibility into your site in one place.
So, starting from the least stringent, here are the different ways to restrict access to your admin dashboard.
Restrict admin access on WordPress by user roles
Setting up user roles correctly is the simplest way to restrict admin access on WordPress. Different roles come with their own dashboards with different levels of access. WordPress comes equipped with a robust, user role system, providing administrators with a feature-rich tool to control access and permissions with a variety of role levels. By assigning specific user roles, you can tailor access levels to match the responsibilities of each team member. Here are the primary user roles and their associated privileges:
| Role | Access | Responsibilities |
| Admin/Super Admin | Complete control over all features on a single site or, for Super Admins in a multisite setup, across the entire network. | Site and network administration, including the ability to install plugins and themes and manage users. |
| Editor | Authority to publish and manage posts and pages. | Can edit and publish posts authored by other users, making them suitable for content management tasks without the need for full administrative control. |
| Author | Permission to publish and manage their own posts. | Control is limited to the content they’ve authored. Authors can publish, edit, and delete their own posts, but they don’t have the authority to modify content created by others. |
| Contributor | Can write and manage their own posts. | Contributors can create and edit their posts, but they lack the authority to publish them. Instead, their content needs approval from an editor or administrator. |
| Subscriber | Limited privileges, mainly focused on profile management. | Subscribers have minimal capabilities, primarily centered around managing their profiles. They lack publishing or editing rights, making this role suitable for users who only need access to specific content without editorial responsibilities. |
For completely restricting access to a user, we recommend you assign them the Subscriber role. The dashboard only allows for changes in their own profile.
Step 1: Open the Users tab
In the left-hand menu of your admin dashboard, click on Users. This will take you to where you can manage existing users and Add New ones or Edit existing ones.
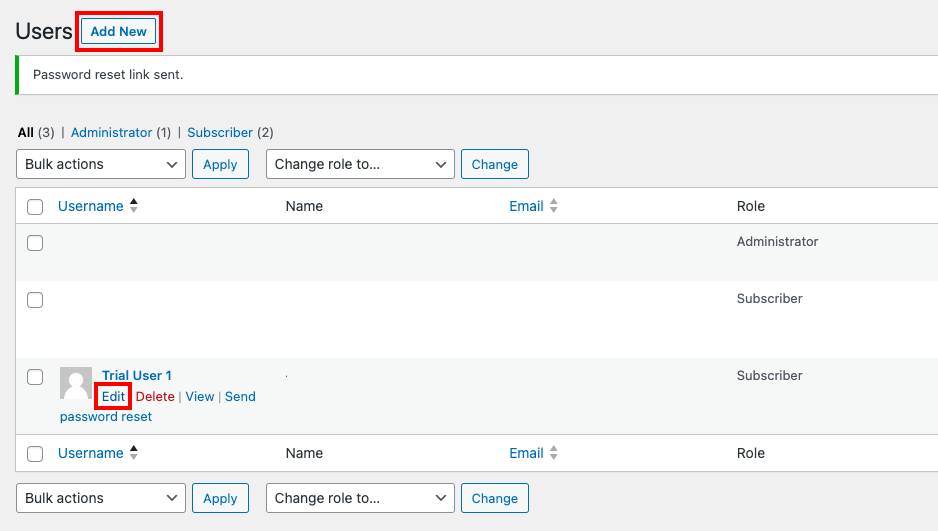
Step 2: Edit the user settings
Once you click either Add New or Edit, you will be able to customize the role of a user in the User Details Page.

Step 3: Choose the role
On the user details page, look for the Role drop-down menu. This menu displays the current role assigned to the user. Select the Subscriber role.

Step 4: Save the settings
After selecting the desired role, click the Update User or Add New User button to save the changes.

Repeat these steps for other users, assigning roles based on their responsibilities within the team.
Your own role needs to be that of an administrator to make these changes. It is a meta way of seeing how user roles work in real time.
Restrict admin access on WordPress by plugin
If setting controls using user roles doesn’t quite cut it, you can use a plugin to restrict admin access on WordPress.
We’re using a plugin called Remove Dashboard Access to do this. Administrators can fine-tune access levels, permitting entry based on user roles or based on the built-in WordPress capabilities of roles.
Additionally, the plugin provides flexibility in redirect options, enabling administrators to choose custom redirect URLs based on user roles. For example, if you manage a membership site, you can redirect different members to the members dashboard. It also offers optional features like allowing or restricting user profile access and displaying custom messages on the login screen, overall contributing to a secure and user-friendly environment.
Step 1: Add a new plugin
In your WordPress admin dashboard, navigate to Plugins and click on Add New.

Step 2: Install and activate Remove Dashboard Access
Search for Remove Dashboard Access in the search bar. Then, click Install and Activate.

Step 3: Customize plugin settings
After activation, select Dashboard Access from the sidebar. Configure the access settings according to your requirements. Choose the desired access levels, set redirect URLs, and enable or disable optional features like user profile access and custom login messages.

Step 4: Save the settings
After configuring the settings, click the Save changes button to apply the new access restrictions and customization features. To test the configuration, log out of your WordPress admin account and ttempt to access the admin dashboard using different user roles and observe the plugin’s effects based on the configured settings.

Troubleshooting
You may find that genuine users are being locked out. In these cases ensure that the user has the right permissions. If that doesn’t work, the only solution is to deactivate the plugin. If you have access to your dashboard, deactivate it on the plugin’s page.
If not, connect to your WordPress site using an FTP client. Then, navigate to the plugin folder: root folder>wp-content>plugins. The root folder is sometimes called public_html too. Find the folder for the Restrict Admin Access plugin and change its name. Check to see if the user is able to login now.
Restrict admin access on WordPress by IP
If you’re looking for a way to limit admin access to only a few users, this method might be the way to go. You’re essentially blocking everybody and letting through only the right IP addresses. Think of it as using a guest list outside a party to restrict access to few people.
This is not a solution that will work for all sites, simply because most people want their sites to be visible to the world. However, it would be a good fit for a private site, like an internal company one. Overall, it’s a great method for admins who want granular control.
Also, this method is specific to sites on Apache servers. If you have an Nginx server, checkout the steps will be different.
Pro tip: Take a backup before making any changes. It’s crucial to create a backup of the whole site to avoid potential issues while editing core site files. This will serve as a safety net in case anything goes wrong during the editing process.
Step 1: Find your IP address
Head to What Is My IP Address? and note down the IP address displayed in the search results. This is your current public IP address.
Step 2: Connect to server
Install an FTP client. We’re using Cyberduck for this step. But, you can also use FileZilla. Once done, connect to your server using the FTP credentials for your site. This is available on your hosting platform.

Step 3: Download the .htaccess file
Navigate to the root directory of your WordPress installation. . Look for the .htaccess file in the wp-admin folder. This file is usually a hidden file. If you can’t find the file, create a new one and call it “.htaccess”. Double-click on the .htaccess file and this will download the file to your device

Step 4: Add the code to the file:
Open the file on a text editor and add the following code:
AuthUserFile /dev/null
AuthGroupFile /dev/null
AuthName "WordPress Admin Access Control"
AuthType Basic
<LIMIT GET>
order deny,allow
deny from all
# whitelist user1's IP address
allow from 12.34.56.789
# whitelist user2's IP address
allow from 12.34.56.789
</LIMIT>
Replace ‘12.34.56.789’ with the actual IP address of your computer. If you have a dynamic IP, be prepared to update this whenever your IP changes, because otherwise, you will not have access to your site. Add as many allow from lines as needed for other team members and their IPs. Save the changes to your .htaccess file.
Step 5: Upload the file
Navigate back to the window of your FTP client. Then upload the file to your wp-admin folder, replacing the existing one. Use a VPN and try accessing your wp-admin login page. A forbidden error should be displayed.

Should you whitelist the IP addresses of internal team members?
While blacklisting all IPs and whitelisting internal team IPs may seem like a straightforward approach to enhance security, there are several considerations that make this strategy less effective and challenging, particularly when aiming for scalability and adaptability in a dynamic technological landscape.
- Scalability challenges: Implementing a strategy that relies on blacklisting and whitelisting based on IP addresses can be suitable for small teams with static setups. However, as teams grow or infrastructure becomes more distributed, maintaining a comprehensive and up-to-date list of allowed and blocked IPs becomes a daunting task. It lacks the scalability required to adapt to changing business needs and technological advancements.
- Potential IP address changes: IP addresses are not static, especially in scenarios involving cloud services, mobile devices, or remote work. Team members may switch networks, use different devices, or connect from various locations, leading to frequent IP address changes. Relying solely on whitelisting internal IPs can result in unintentional access restrictions due to these dynamic IP changes.
- Complexity for dynamic IPs: Dynamic IPs, which are commonly used in residential and mobile networks, present a challenge in terms of management. Attempting to whitelist these dynamic IPs is complex, as they can change frequently and are often assigned dynamically by Internet Service Providers (ISPs). This complexity introduces an administrative burden and potential security loopholes.
- Manual updating required: Maintaining an up-to-date IP whitelist requires manual intervention. Adding or removing IPs as team members change locations or devices can lead to delays and errors. Manual updating increases the likelihood of oversights, leaving security vulnerabilities open for exploitation.
- Limited protection against VPNs: Blacklisting and whitelisting based on IP addresses may provide limited protection against users employing Virtual Private Networks (VPNs). Users utilizing VPNs can effectively mask their actual IP addresses, rendering IP-based access controls less effective. This limitation poses a risk, especially in scenarios where VPN usage is legitimate but could be misinterpreted as a security threat.
- Potential access restrictions for users: Relying solely on IP-based access controls can inadvertently restrict access for legitimate users. For example, employees traveling or working remotely might encounter difficulties accessing necessary resources if their IP address is not whitelisted. This limitation hampers flexibility and productivity for the team.
Troubleshooting
If you’re not able to restrict admin access correctly, check that the syntax of the code is correct. Make sure you’ve added the right IP addresses. Check that the .htaccess file that you uploaded has the right name.
Restrict WordPress admin access using custom code
Another way to completely limit admin access to just your admins is to add code to your theme’s function.php file. If a non-administrator attempts to access the admin area, the code will redirect them to the home page of the website.
Pro tip: We recommend that you make these changes to the functions.php file of a child theme. This ensures that updates made to the theme does not disrupt its functionality. Additionally, it’s a core file. So, take a full backup first.
Step 1: Connect to your WordPress server:
We’re using an FTP client, Cyberduck. If you don’t have one already, download and install it on your computer. Then, connect to your WordPress site server using the credentials from your hosting panel: username, password, and IP.
Step 2: Navigate to the functions.php file:
Once you’re connected, open the root folder. This is often the public_html or www folder. Then, open the wp-content folder and navigate to the folder for your active theme. Then, look for the functions.php file and double-click on it. This will download it to your computer.

Step 3: Add the code:
Open the file in a text editor and add the following code:
add_action( 'init', 'blockusers_init' );
function blockusers_init() {
    if ( is_admin() && ! current_user_can( 'administrator' ) && ! ( defined( 'DOING_AJAX' ) && DOING_AJAX ) ) {
        wp_redirect( home_url() );
        exit;
    }
}
Pro Tip: This code doesn’t compare the roles, but the capabilities of the role. Let’s say you want to give access to editors and administrators, replace the word “administrator” with “editor” and it will include both administrators and editors. The code covers the role you mention and anything higher.
Step 4: Save the file and re-upload it:
Save your newly edited functions.php file. Open the Cyberduck window and reupload the new file, replacing the old one. Once you’re done, try logging in to your website as a user who is not an administrator.
Troubleshooting
When changes made to the WordPress functions.php file are not reflected on the site, several factors may be at play.
- Caching mechanisms, both at the page and browser levels, can retain the old version of the page, making it imperative to clear caches or temporarily disable caching plugins.
- Scrutinize the functions.php file for syntax errors, as even a single mistake can disrupt the file’s processing and hinder the application of changes.
- Confirming that you are editing the correct functions.php file, especially in the context of child themes, is crucial. If using a child theme, ensure that both the parent and child themes are active, as changes in the child theme’s functions.php may not take effect if the parent theme is inactive.
Additional security measures
Restricting access to the website admin panel is a way to secure your site, but it alone will not provide comprehensive protection against all potential threats.
Pertinently, it does not stop hackers from exploiting privilege escalation vulnerabilities in plugin or theme files. It also can’t protect your site from compromised accounts of genuine users. This is why we recommend additional security measures, like:
- Installing a security plugin: Install a reputable security plugin like MalCare, leveraging its advanced malware scanning and removal capabilities. MalCare regularly scans for vulnerabilities and potential malware. If you have been hacked, install MalCare to remove your malware in one click.
- Implementing a firewall: Set up a robust firewall for your web application automatically with MalCare. It is the first line of defense against brute force attacks.
- Enhancing login security: Strengthen login security by incorporating features such as two-factor authentication or passwordless login.
- Monitoring user activity: Utilize an activity log, such as the one provided by MalCare, to actively monitor and track user activity for heightened security awareness.
- Disabling user registration: If your website doesn’t require user registration, take the proactive step of disabling it to minimize potential vulnerabilities.
Final thoughts
Securing your WordPress admin panel is essential to prevent unauthorized access. Techniques like IP whitelisting and user role management are key steps to reducing the amount of functionality that different users have. It prevents hackers from being able to make core changes to your site, like defacing it, using your dashboard.
However, it’s important to know that just doing these things might not be enough. It cannot protect against vulnerabilities in plugins, for example. To ensure strong protection, add MalCare’s advanced WordPress firewall. It adds an extra layer of defense against various online threats and potential attacks.
FAQs
Can you restrict access to WordPress?
Yes, you can restrict access to WordPress using various methods. Some methods include blocking all IPs and whitelisting IPs of the internal team. It is also possible to just limit access to the admin panel by managing user roles or a plugin like Restrict Admin Access.
How do I restrict user roles in WordPress?
To restrict user roles in WordPress, you can use the built-in capabilities and roles system. In the WordPress admin dashboard, navigate to Users and then Roles. You can edit each role’s capabilities to control what actions and features users with that role can access. Additionally, there are plugins available that offer more advanced role management features, allowing you to create custom roles and define specific permissions for each role.
Why should I restrict admin access on WordPress?
Restricting access to wp-admin is crucial for security reasons. The admin area is the control center of your WordPress site, and unauthorized access can lead to various risks, including data breaches, malicious activities, and unauthorized modifications. By restricting access, you prevent potential attackers from gaining control over critical settings, plugins, and themes. It’s a fundamental security measure to protect your website from unauthorized changes, maintain the integrity of your content, and safeguard sensitive information stored in the admin area.
Category:
Share it:
You may also like
-
WordPress Nonce: What It Is, How It Works, and How to Verify It
Most people don’t go looking for a WordPress nonce because they’re curious. They run into one because a form won’t save, a plugin is throwing a 403 error, the REST…
-
Nonce Validation Failed in WordPress: What It Means and How to Fix It
Seeing “nonce validation failed” in WordPress is frustrating, as it tends to show up mid-task: You’re saving a setting, submitting a form, logging in, checking out, or finishing an edit…
-
WordPress Mixed Content: Find the HTTP Leak and Fix It Safely
You installed SSL. You expected the padlock to behave. Then your WordPress site says that it is not secure, an image disappears, a form refuses to submit, or Chrome shows…


How can we help you?
If you’re worried that your website has been hacked, MalCare can help you quickly fix the issue and secure your site to prevent future hacks.

My site is hacked – Help me clean it
Clean your site with MalCare’s AntiVirus solution within minutes. It will remove all malware from your complete site. Guaranteed.

Secure my WordPress Site from hackers
MalCare’s 7-Layer Security Offers Complete Protection for Your Website. 300,000+ Websites Trust MalCare for Total Defence from Attacks.


