How to remove WordPress site not secure warning
by
7-layers of Security for Your WordPress Site
Your website needs the most comprehensive security to protect it from the constant attacks it faces everyday.
Does your WordPress site says Not Secure warning? Is this ‘Not Secure’ warning spread all over the pages on your WordPress site? This is a pretty familiar but serious issue that is enough to scare both you and your site’s visitors as well as affect your site’s search engine rankings. So, how do you dismiss this warning and restore your site’s security?
The solution to this problem is simple. You will need to configure an SSL certificate on your site, either by installing it anew, properly configuring the existing certificate, or renewing it if it has expired. If that sounds like a different language, don’t worry. In this article, we’ll show you how to remove the WordPress site not secure warning
TL;DR: When your browser labels your WordPress site as ‘Not Secure,’ it means it couldn’t locate an SSL certificate on your site, or it may not trust the existing certificate. Ensure your site’s SSL certification is up to date and consider strengthening your site’s security by integrating MalCare’s robust firewall and malware protection.
Why is your WordPress site not secure?
Your WordPress site says ‘Not Secure’ because it does not have an SSL certificate, or it has an incorrectly configured or expired certificate.

The SSL certificate is essential for encrypting data transmitted to and from your site. Without this, all the data transmitted to and from your website is no longer secure and can be easily accessed by hackers. This is why configuring an SSL certificate on your WordPress site is of paramount importance.
Using an SSL certificate enhances the security of the HTTP communication protocol on your site, elevating it to the secure HTTPS version. Furthermore, HTTPS provides your site with a padlock icon beside its address, indicating its secure and reliable nature.

When your site displays a ‘Not Secure’ warning, it means it is not utilizing the HTTPS protocol. Moreover, if your site is labeled as ‘Not Secure,’ it may discourage users from accessing the site. Fortunately, there are straightforward solutions, which we’ll outline in the upcoming sections.
How to fix WordPress site not secure warning?
You can remove the Site ‘Not Secure’ warning from your WordPress site by performing the following steps, which are also explained in the next sections:
- Create a backup of your WordPress site
- Check your site’s SSL status
- Install an SSL certificate
- Fix your existing SSL certificate
- Redirect URLs from HTTP to HTTPS
- Replace all HTTP URLs with their HTTPS versions
- Scan for mixed content issues and fix them
- Inform Google about the changes on your website
- Clear all your caches
- Confirm if the ‘Not Secure’ warning has disappeared
1. Create a backup of your WordPress site
Despite the thoroughness of our provided steps, you should back up your WordPress site before attempting to remove the WordPress site not secure warning. This ensures an easy recovery of your site’s data in the unlikely event that something goes wrong. You can easily do so by using a reliable backup plugin like BlogVault in just a few steps.
First, create an account on BlogVault and add your site to it using the site URL. Next, select the option for automatic installation and enter your admin credentials. And that’s it! Your site will start syncing and BlogVault will automatically create a backup of it.
2. Check your site’s SSL status
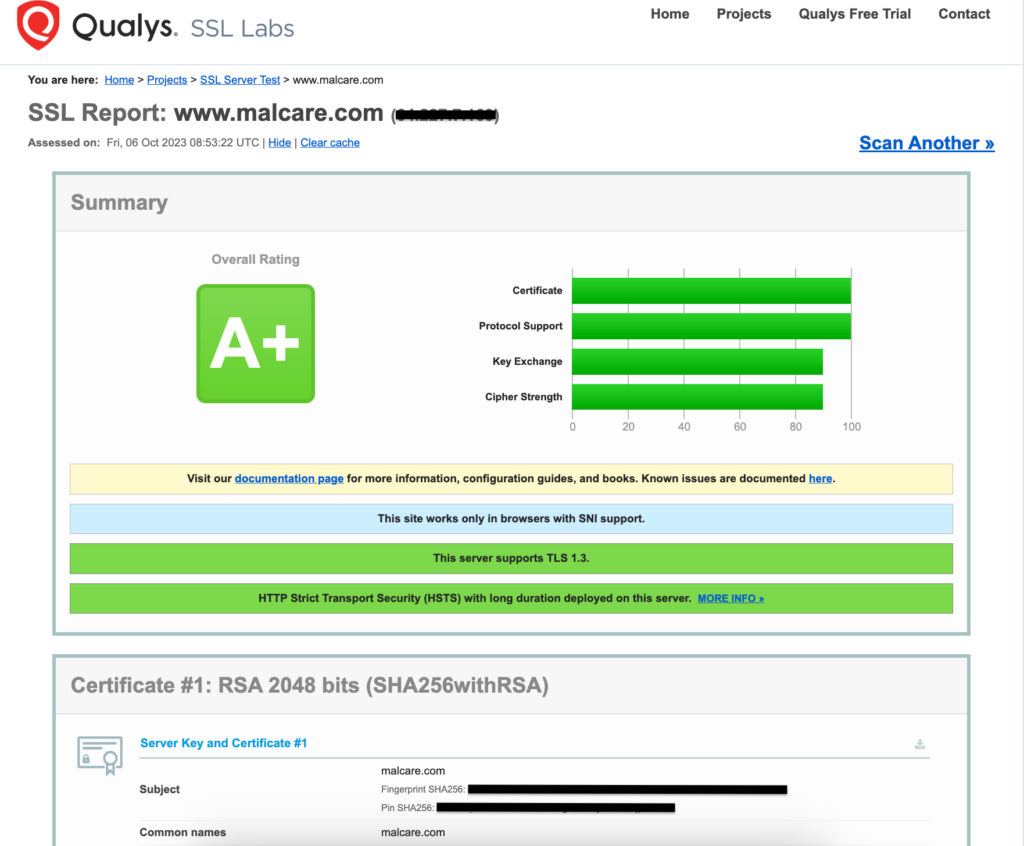
After creating a backup for your site, the next step is to verify the status of its SSL certificate, to check if it exists, if it is active, or if it has expired. This can be easily accomplished by entering your site’s URL into an online SSL checker tool such as Qualys SSL Labs. Here, you’ll find comprehensive information regarding your site’s SSL certification if it exists. Ensure that the results show a rating of A or A+, which is the highest possible rating, and that your SSL certificate uses RSA 2048-bit encryption.
3. Install an SSL certificate
If you do not have an SSL certificate, or your certificate has expired, Here is a guide on how to install an SSL certificate on a WordPress site. If your existing SSL certificate has expired, get in touch with the original certificate authority (CA) to have it renewed before installing it. Different CAs have different renewal plans so check them out properly and select the one which works for you best. However, if your site does have an SSL certificate, skip on to the next step.
4. Fix your existing SSL certificate
If you are seeing a WordPress site not secure warning despite having a valid SSL certificate, it could be because the certificate is not configured correctly. In this case, follow the steps mentioned below:
1. Force HTTPS on Your Site Using a Plugin
The simplest way to fix the ‘Not Secure’ warning from your entire WordPress site is to use a plugin to configure an SSL certificate. While various plugins like WP Encryption, SSL Zen, etc. are available for this purpose, we recommend using Really Simple SSL.
- Install and activate Really Simple SSL from the Plugins section on your WordPress site’s admin dashboard.
- Navigate to Settings, then SSL. This will take you to the Really Simple SSL dashboard, which displays any potential issues with your site.
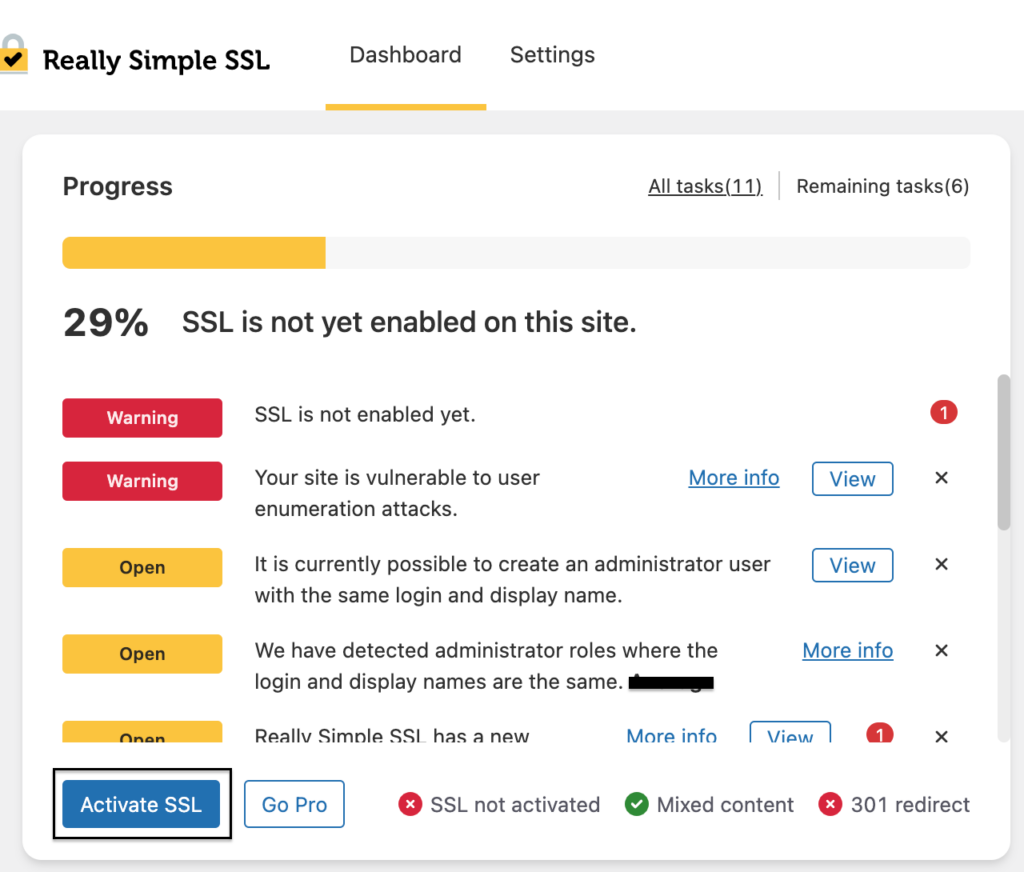
- Click on Activate SSL. A pop-up will appear with essential information to consider.
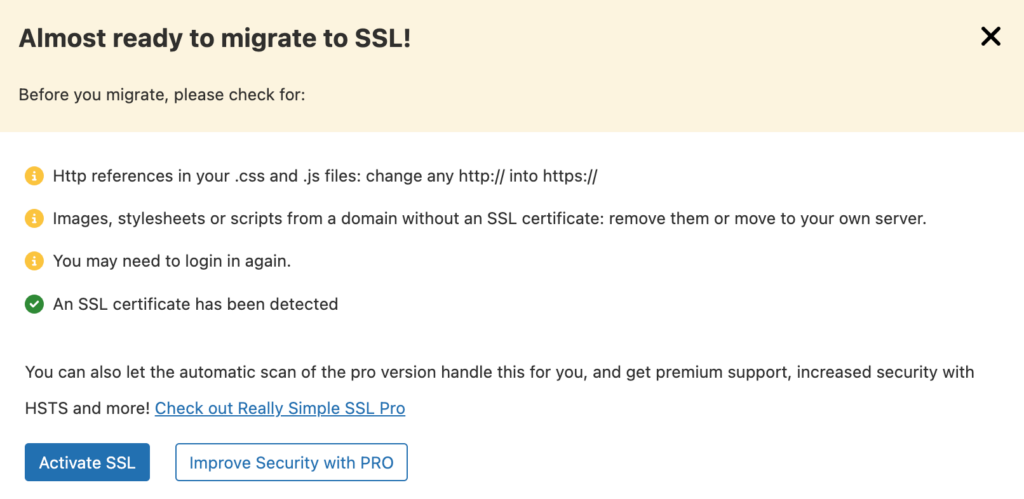
- Click on Activate SSL once more. This swiftly configures your site with an SSL certificate in just a few minutes. Please note that you may be logged out of the admin dashboard during this process.
2. Manually Enforce HTTPS on Your Site
Opting for a plugin like Really Simple SSL during installation would have taken care of this step. However, if the certificate was installed through an alternate method, you can resort to the manual approach to fix the WordPress page not secure warning. Before you proceed, remember that we do not recommend this method as there is potential for errors that could impact your site.
To manually enforce HTTPS on your site, you can follow either the Secure Shell (SSH) method or the File Transfer Protocol (FTP) method.
2.1 Using SSH Method
For the following steps, use Command Prompt if you are a Windows user, or Terminal if you are a Mac user.
- Obtain your WordPress site server’s SSH credentials from your site host.
- Log into your WordPress site’s server using SSH with the following command, replacing ‘user_name’ and ‘ipaddress’ with the appropriate server credentials:
ssh user_name@ipaddressEnter your password when prompted.

- Enter the following command to list all the files:
ls -a
- You should locate the wp-config.php file. Enter the following command to open it in an editor:
vi wp-config.php
- Press i to edit the file and insert the following line of code before the file’s ending:
define('FORCE_SSL_ADMIN', true);- Press Esc and type the command :wq to save the file and exit the editor.
- Repeat steps 3 to 6 to locate the .htaccess file and add the following lines of code before the file’s ending:
<IfModule mod_rewrite.c>
RewriteEngine On
RewriteCond %{HTTPS} off
RewriteRule ^(.*)$ https://%{HTTP_HOST}%{REQUEST_URI}      [L,R=301]
</IfModule>
2.2 Using FTP Method
Use an FTP application like Filezilla for the following steps.
- Obtain your WordPress site server’s FTP credentials from your site host.
- Open Filezilla, enter your IP address in the Host section, your username, password, and port number (if any), and click on Quickconnect.

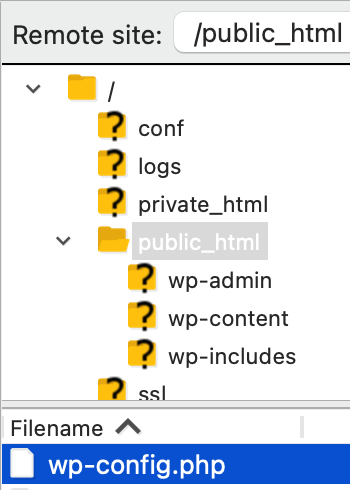
- You will see the file structure of your WordPress site in the Remote site section once you are logged in. Double-click on public_html to open the folder and find wp-config.php in the files listed below.
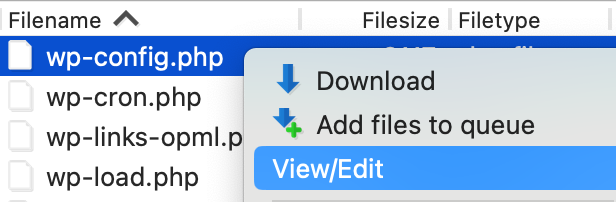
- Right-click on the wp-config.php file to open a context menu and select View/Edit to edit the file.
- In the file editor, type in the following line before the file ending and press Ctrl + S for Windows users or Cmd + S for Mac users to save the file:
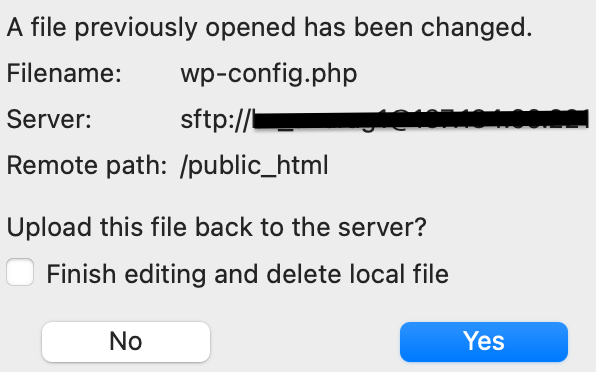
define('FORCE_SSL_ADMIN', true);- On closing the file editor, you will see a dialog box asking if you want to upload the edited file back to your WordPress server. Click on Yes and you are done.
- Repeat steps 4 to 6 after finding the .htaccess file in the public_html folder and add the following lines of code before the file’s ending:
<IfModule mod_rewrite.c>
RewriteEngine On
RewriteCond %{HTTPS} off
RewriteRule ^(.*)$ https://%{HTTP_HOST}%{REQUEST_URI}      [L,R=301]
</IfModule>
In certain cases, transitioning from HTTP to HTTPS can result in an uncommon scenario where your browser struggles to load your WordPress site’s login page due to an excessive number of redirects. If this occurs, insert the following lines of code into the wp-config.php file using either of the methods mentioned above:
if ($_SERVER['HTTP_X_FORWARDED_PROTO'] == 'https')
$_SERVER['HTTPS']='on';
Ensure that you add these lines before the following line of code:
require_once(ABSPATH . 'wp-settings.php');5. Redirect URLs from HTTP to HTTPS
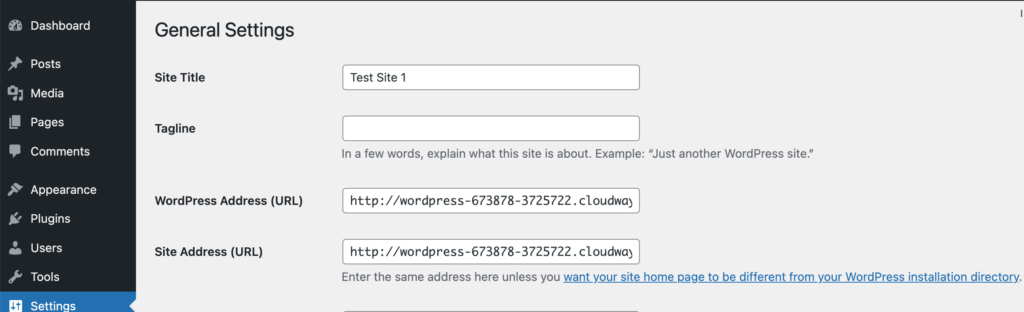
In the WordPress Admin panel, go to Settings, and then to General. Here, you will find the WordPress Address (URL) and Site Address (URL) sections. By default, they contain the URL of your site. If these URLs are preceded by http://, you will need to switch to https://.
Alternatively, if you can access your site using SSH, you can edit the wp-config.php file for the same result. To do so, open the file in your preferred editor and insert the following lines of code at the end:
define('WP_HOME','https://your.site.com/');
define('WP_SITEURL','https://your.site.com/');
6. Replace all HTTP URLs with their HTTPS versions
You have two options for this task. The manual method involves accessing your database and modifying entries in the wp_options table. However, a small mistake can potentially crash your site. Hence, it’s safer and more convenient to use a plugin like BetterSearchReplace (BSR) for this task. This tool facilitates quick database updates.
Here are the steps to follow:
- Go to your WordPress Admin dashboard and install the BSR plugin.
- Once installed, activate the plugin. You’ll find it in the Tools section of your dashboard.
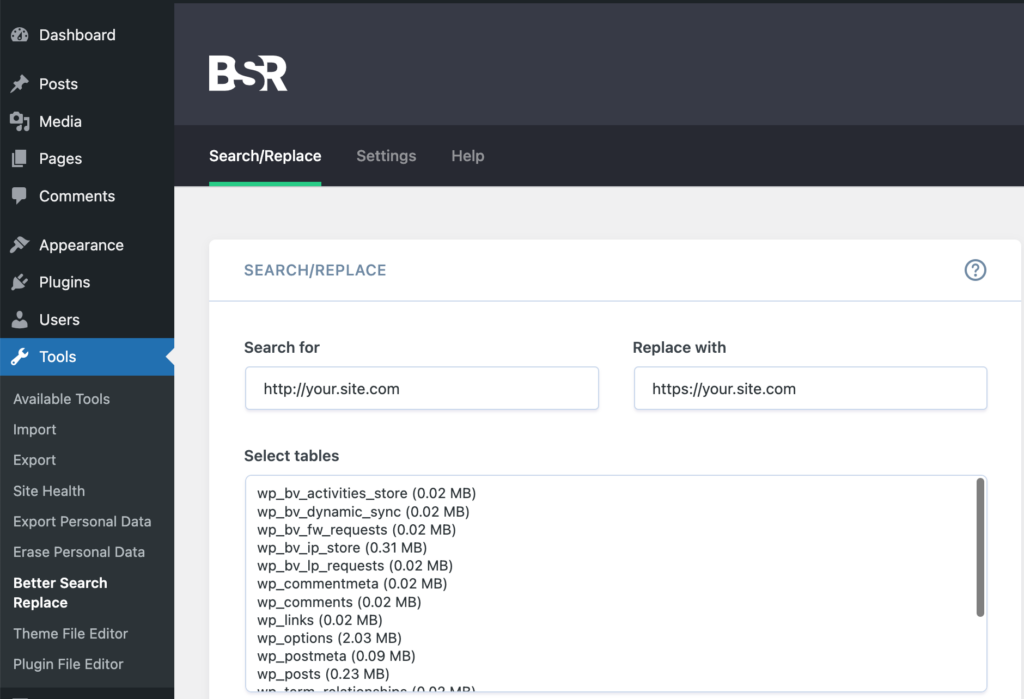
- Next, in the Search for text box, input your website’s URL in the http:// format. Similarly, in the Replace with text box, use the same URL but in the https:// format.
- Select all the tables listed in the Select tables menu. For Windows systems, use Ctrl + Left Click; for Mac systems, use Command + Left Click.
- If you’d like to do a practice run without making any changes to the tables, select the Run as dry run option. When you’re confident and ready to make the changes, deselect the option and execute the tool by clicking on Run Search/Replace →.

7. Scan for and fix mixed content issues
While you may have migrated your site from HTTP to HTTPS using an SSL certificate, some links may have been left out. This happens especially when there are links to images that don’t automatically switch to HTTPS, leading to a site not secure warning in WordPress. This is called a mixed content issue.
The previous step should usually fix this issue. However, if you are still seeing the ‘Not Secure’ warning and want to identify the causes behind this, check your site at Why No Padlock? Once you have identified the issues, you can use a plugin like Easy HTTPS Redirection to convert all these remaining HTTP links to HTTPS ones.
8. Inform Google about the changes on your website
When you change your site’s URL from HTTP to HTTPS, Google has to be informed of this. You can update by adding the new URL to your site’s sitemap, Google Analytics, and Google Search Console. For more information on how to do this, look up Google’s documentation here.
9. Clear all your caches
If you have installed your SSL certificate and set up your WordPress site to use it, you might still see the ‘Not Secure’ warning. To fix this, you should clear any caches that your WordPress site might use, such as caching plugins like WP Rocket, WP Super Cache, etc., or caching services from your web hosting provider. You can find the steps to do this in the documentation of your plugin or your hosting provider.
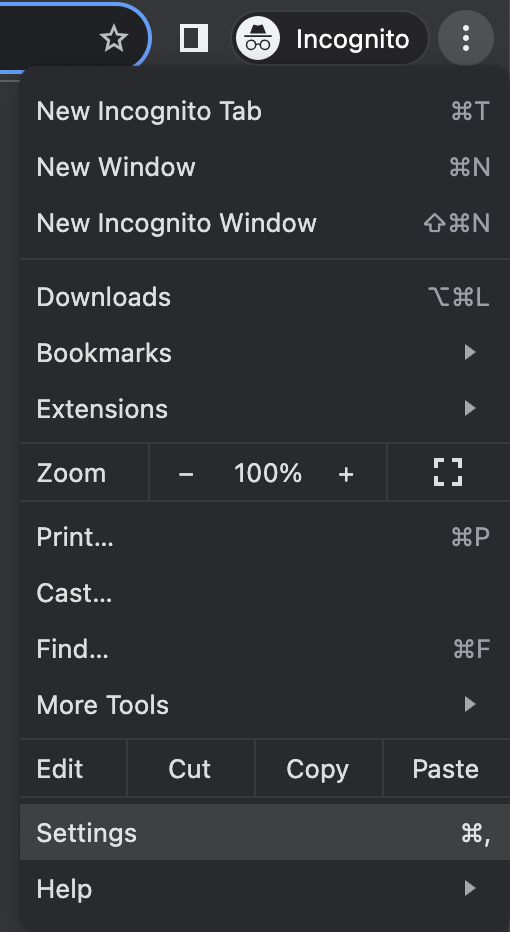
Moreover, you should also inform your users to clear their browser caches, as shown here. The following steps are for Google Chrome, but other browsers have similar options.
- Go to the three-dot icon on the top right corner of the browser and choose Settings.
- Go to Privacy and security and then select Clear browsing data.
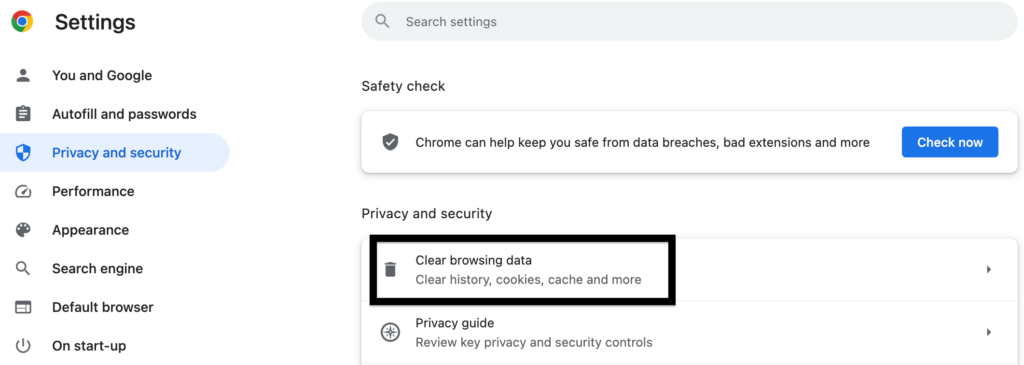
- In the Basic tab, choose All time from the Time range dropdown list, and make sure only the Cached images and files box is checked.
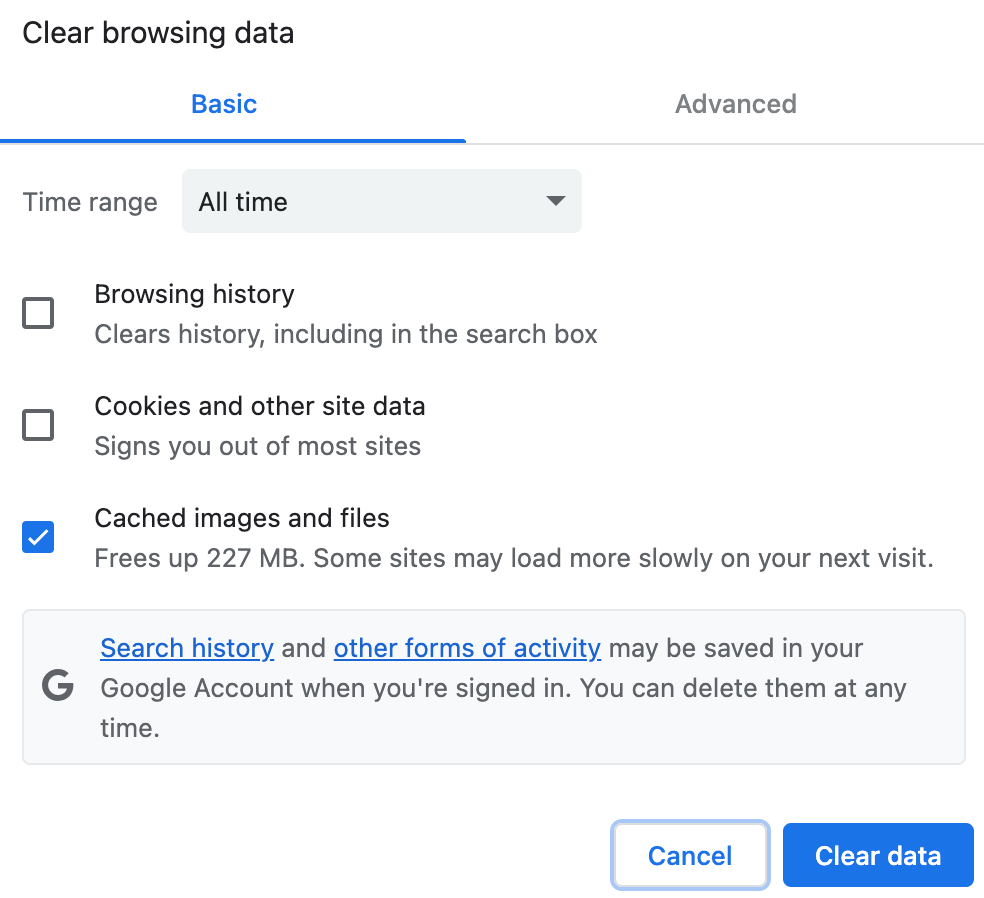
- Click on Clear data to clear the cache and you are done!
10. Confirm if the ‘Not Secure’ warning has disappeared
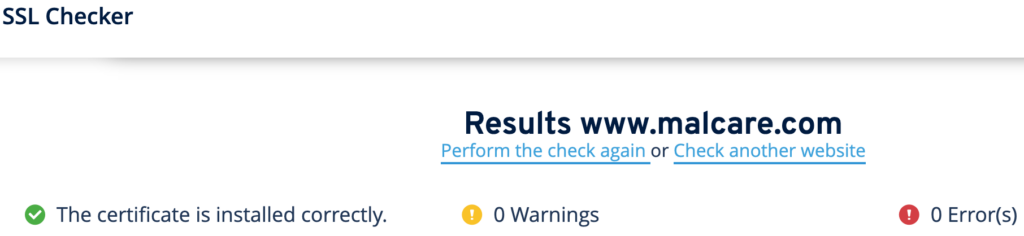
Visit your WordPress website and see if the warning ‘Not Secure’ has changed to a padlock icon.
To verify that your SSL certificate is correctly installed, you can use the IONOS SSL checker tool.
Troubleshooting
Some problems may arise when you try to remove the ‘Not Secure’ warning on your WordPress website by installing an SSL certificate all by yourself. In this section, we have discussed some of these problems.
What if you can’t access your site anymore?
Make sure your site is configured correctly to use SSL with updated URLs in both file settings and databases. If this doesn’t help, a plugin may be interfering with the SSL certificate. Try turning off plugins to see if it fixes the problem.
What if you get an ERR_SSL_VERSION_OR_CIPHER_MISMATCH error?
This error usually happens when the SSL certificate is not set up properly. Review your SSL settings to fix any configuration errors. If the problem is not with your SSL certificate, try updating your browser or using a different browser to see if it works. You can also use an online tool like the Qualys SSL test to find out any other issues with your SSL certificate.
What if you get a NET::ERR_CERT_INVALID error?
Your browser may mark your SSL certificate as invalid if it has wrong details, such as an incorrect domain name, unrealistic SSL certificate issue and/or expiry dates, etc. Check for these details and if needed, get a new SSL certificate with the right details.
What if none of the above solutions work?
In this case, clear all your caches. Your browser, plugins, and web host may sometimes keep old login page links, which causes problems when trying to reach your site with the new HTTPS links.
Using a plugin to install an SSL certificate on your WordPress website avoids many of these problems. This is why, we do not suggest the manual method of installing an SSL certificate.
How to prevent the WordPress site not secure warning?
Having properly configured your WordPress site with SSL credentials, let’s look at some of the ways to ensure the ‘Not Secure’ warning doesn’t return.
- If your website includes outgoing links to other sites, be sure to modify them to use HTTPS for secure connections.
- Remember to check certificate expiry dates to avoid any disruptions. If your certificate is nearing expiration, you have the option to renew it with your current provider or explore free, verified HTTPS certification providers like LetsEncrypt.
- Simplify the process with a plugin like Easy HTTPS Redirection. This tool seamlessly guides users to the HTTPS SSL version of your site.
- Inform Google about the updated HTTPS URL of your site. This ensures that Google directs users to the secure version. For detailed steps, refer to the instructions found here.
How does a ‘Not Secure’ warning impact your site?
Having a secure website is vital for many reasons. In this section, we look at how a ‘Not Secure’ warning hampers your website.
- A ‘Not Secure’ warning lowers user trust and confidence, making them reluctant to enter sensitive data on the website. This can hurt e-commerce sites by increasing bounce rates and decreasing conversion rates, affecting their revenue.
- A ‘Not Secure’ warning also harms the site’s search engine rankings, as Google and other search engines factor in security when ranking websites. This can reduce the site’s visibility and traffic in the long run.
- A ‘Not Secure’ warning may even prevent users from accessing the site at all, as some browsers are becoming more strict about security and may block ‘Not Secure’ sites. This will further reduce the site’s potential audience.
As a website owner, you should be wary of these serious consequences and fix this issue as soon as possible.
Additional measures to secure your WordPress site
We’ll be honest: SSL is not enough to secure your website fully.
We have been working with WordPress websites for more than 10 years, and we know what it takes to protect them. Besides SSL security, you should also implement these essential steps:
- Use a robust security plugin like MalCare that can prevent brute-force login attempts.
- Use complex, unique passwords for all user accounts.
- Implement a lockout policy that automatically locks out users after a certain number of failed login attempts. MalCare includes this functionality in the limit login feature.
- Enable two-factor authentication for an additional layer of login security.
- Regularly update WordPress core, themes, and plugins to ward off vulnerabilities.
- Set user roles appropriately and keep track of user activity to identify suspicious activities
- Ensure proper file permissions to limit unauthorized access to sensitive files.
Conclusion
You’ve taken a significant stride towards securing your WordPress site by implementing an SSL certificate. However, it’s not the ultimate solution. To truly fortify your site, use a robust security plugin like MalCare.
MalCare will not just ensure that your login and the admin area are protected, but also scan your website daily to detect suspicious activities. It’ll help you clean your website if any malware is found. Moreover, it defends your website with a powerful firewall.
So go ahead and implement these measures to keep your site protected and running smoothly.
FAQs
How do I make my WordPress website secure?
To secure your WordPress site, start by using a robust security plugin like MalCare. Additionally, use proper SSL certificates and strong passwords, keep your WordPress core, themes, and plugins updated, and regularly back up your site. You should also implement two-factor authentication with login attempt restrictions and keep monitoring your site for a strong defense.
Why does my website say ‘Not Secure’ when I have SSL?
If your website shows the ‘Not Secure’ warning even after installing an SSL certificate, it could be because there are links on your site that use HTTP instead of HTTPS. This is called a mixed content error. Use a plugin like SSL Insecure Content Fixer to remove and replace all such references.
How do I fix SSL protocol error in WordPress?
The ERR_SSL_PROTOCOL_ERROR is usually caused by an improperly configured SSL certificate, incorrect system date and time, or outdated software. Check your SSL certificate details using an online tool like Qualys SSL test, clear your browser cache, and update your browser. If that does not work, clear your browser’s SSL cache by going into its settings.
How do I force all images to HTTPS in WordPress?
To force all images to load over HTTPS in WordPress, start by changing the file settings to reflect your HTTPS site. Then, check your site for mixed content issues using a tool like Why No Padlock? Use a plugin like Really Simple SSL or SSL Insecure Content Fixer to update all image links in your content to the HTTPS format. Update your themes and plugins as well as some of them may carry hardcoded HTTP links. Finally, clear your browser, plugin, and WordPress cache.
Share it:
You may also like

MalCare Stands Strong Against WP Activity Log Premium SQL Injection Vulnerability
A significant SQL injection vulnerability was identified in the WP Activity Log Premium plugin, a popular tool for tracking user activity on WordPress sites. An SQLi vulnerability poses a serious…
Fix Pharma Hack on WordPress and SEO
Pharma hack is a prolific malware that redirects visitors from your site to an online pharmacy that sells Viagra, Cialis, Levitra, Xanax, Tadalafil, and other drugs. It also shows up…
How To Protect Your WordPress Website From File Upload Vulnerability?
One of the core strengths of WordPress lies in its file upload functionality. The ability to seamlessly upload and integrate various types of files, from images and documents to multimedia…
How can we help you?
If you’re worried that your website has been hacked, MalCare can help you quickly fix the issue and secure your site to prevent future hacks.

My site is hacked – Help me clean it
Clean your site with MalCare’s AntiVirus solution within minutes. It will remove all malware from your complete site. Guaranteed.

Secure my WordPress Site from hackers
MalCare’s 7-Layer Security Offers Complete Protection for Your Website. 300,000+ Websites Trust MalCare for Total Defence from Attacks.


