How to Install an SSL Certificate on WordPress Website
by
7-layers of Security for Your WordPress Site
Your website needs the most comprehensive security to protect it from the constant attacks it faces everyday.

Installing an SSL certificate on your WordPress site is the first step towards making your site secure. An SSL certificate on your site is like using a digital lock and key. Just as you would not leave your home without locking it, similarly, you should not leave your site without the defenses of an SSL certificate.
In this article, we show you different ways to install an SSL certificate on WordPress site. Depending on your host or ability to install a plugin, we’ve got you covered.
TL;DR: The easiest and quickest way to add an SSL certificate to WordPress is to use the Really Simple SSL plugin. Then, you need to ensure that all the pages on your site are being served on HTTPS by checking its URL on Why No Padlock? However, an SSL certificate is only the first step toward securing your site. To give your WordPress site the ultimate security forcefield, install MalCare.
What is SSL?
SSL, or Secure Sockets Layer, is a protocol that encrypts all communication between a web server and a browser. It ensures that the data transmitted between them remains confidential and secure from potential hackers or cyber-attacks.
HTTPS stands for Hypertext Transfer Protocol Secure, and it’s the secure version of HTTP, the standard protocol for transmitting data over the internet. When browsing a website, the padlock in the address bar indicates that the connection is an HTTPS connection that is encrypted by SSL, providing an added layer of security.
A ‘Not Secure’ warning in the address bar indicates the absence of an SSL certificate or the presence of an expired or misconfigured certificate on the website. This serves as a caution, alerting users that any information entered on the site could be intercepted by hackers.
What do you need to install an SSL certificate in WordPress?
Your web hosting provider usually issues SSL certificates for your websites. So before you begin:
1. Check if your site already has an SSL certificate you need to install
You will need to check if your web host:
- Provides free SSL certification
- Provides paid SSL certification bundled with its hosting plans
- Allows you to install third-party SSL certificates
In case your SSL certificate has expired, or in the rare case that your WordPress site does not have an SSL certificate, you will need to install it.
2. Take a full site backup
Furthermore, we recommend that you create a backup of your WordPress site using a backup plugin before proceeding with SSL certificate installation in WordPress. We suggest using BlogVault which boasts quick, reliable, and full backups, easy restores, scheduled backups, and more.
Now, SSL certificates can be installed on WordPress websites either manually or by using a plugin. The plugin method is the easier one, but if you wish to install a third-party certificate or a self-signed certificate, take the other routes mentioned in this article.
[Recommended] How to install an SSL certificate in WordPress using a plugin
Use a dedicated SSL plugin like Really Simple SSL to install free third-party certificates from Let’s Encrypt on your WordPress site. This is especially useful if your web host does not provide an SSL certificate.
Step 1: Install the Really Simple SSL plugin from the WordPress plugins section and activate it.
Step 2: Open the Really Simple SSL dashboard by navigating to Settings and then to SSL.
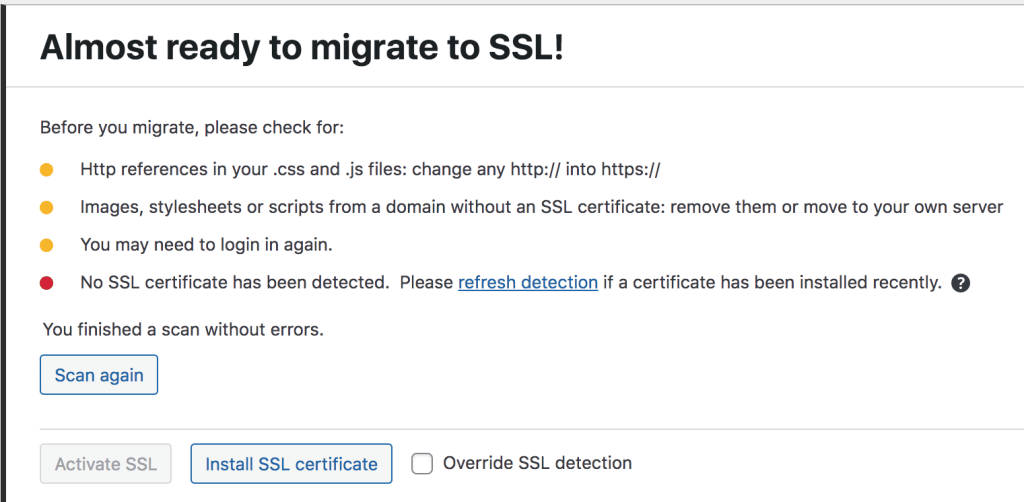
Step 3: Click on Install SSL certificate.
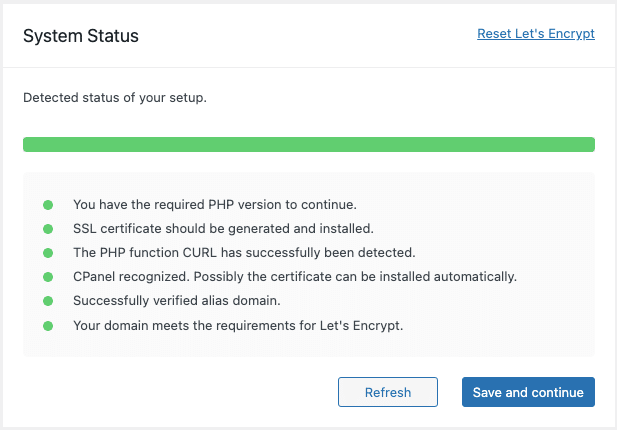
- This brings up the System Status pop-up which checks if your website meets the minimum requirements for installing the certificate.
- Click on Save and continue if there are no issues.
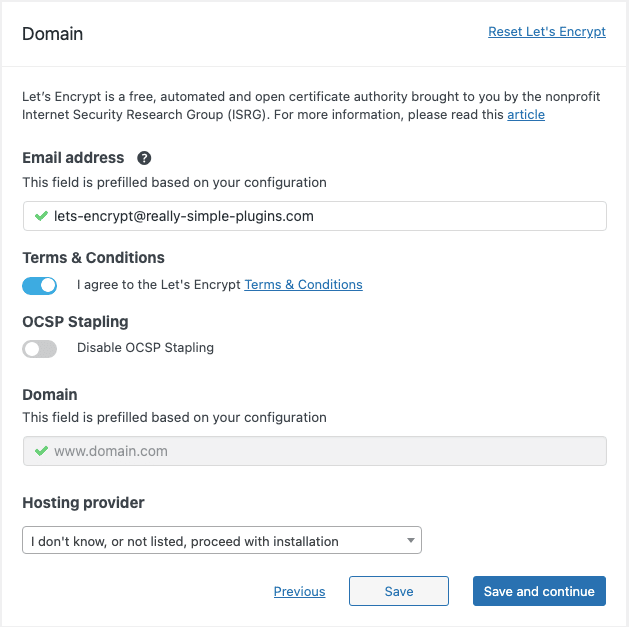
Step 4: Enter site details in the Domain wizard.
- Most of the information in this section is pre-filled based on the system status check from the previous step.
- Click on Save and continue once done.
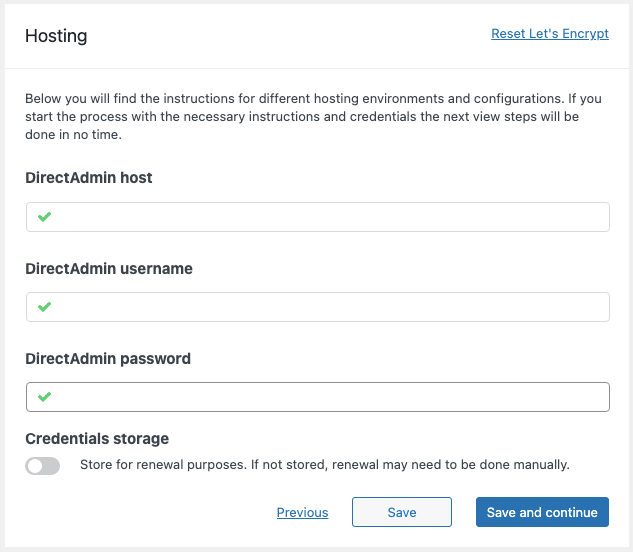
Step 5: Enter your web host’s URL and admin credentials in the Hosting section.
- Click on Save and continue to move forward.
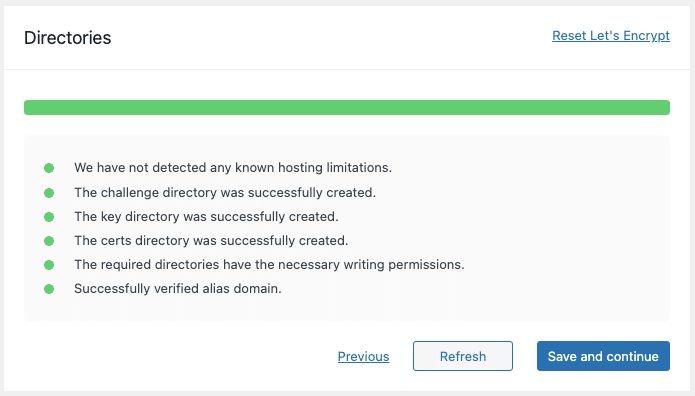
Step 6: Verify the results in the Directories pop-up.
- Here, Really Simple SSL checks your credentials for verification.
- Click on Save and continue if there are no issues.
Step 7: Install an SSL certificate by clicking on Save and continue in the Generation pop-up.
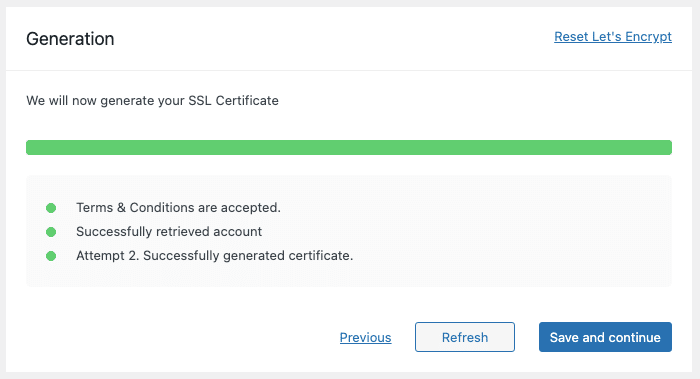
Really Simple SSL should now set up an SSL certificate on your WordPress site from Let’s Encrypt. You might be logged out of your site, so keep your credentials handy.
How to install an SSL certificate in WordPress using a web host
Use your web hosting provider’s own dashboard interface for site administration to install an SSL certificate in WordPress if using a plugin to install certificates does not work. For example, Cloudways and SiteGround are some of the most commonly used web hosts that provide their own dashboards. In this section, we show you how to add an SSL certificate on WordPress using these web hosts.
How to install an SSL certificate in Cloudways
Step 1: Log in to your Cloudways dashboard and navigate to the Application Management section of your WordPress website.
Step 2: Click on SSL Certificate where you can install a certificate from Let’s Encrypt (default option) or a third-party certificate.
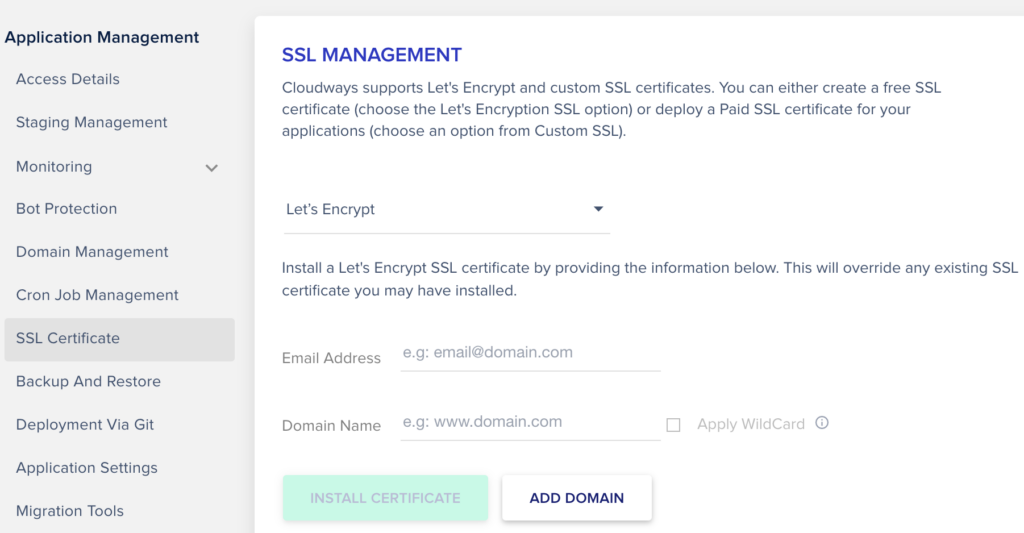
Step 3: Select the option to install a Let’s Encrypt certificate, add your email address and website domain name, and click on INSTALL CERTIFICATE.
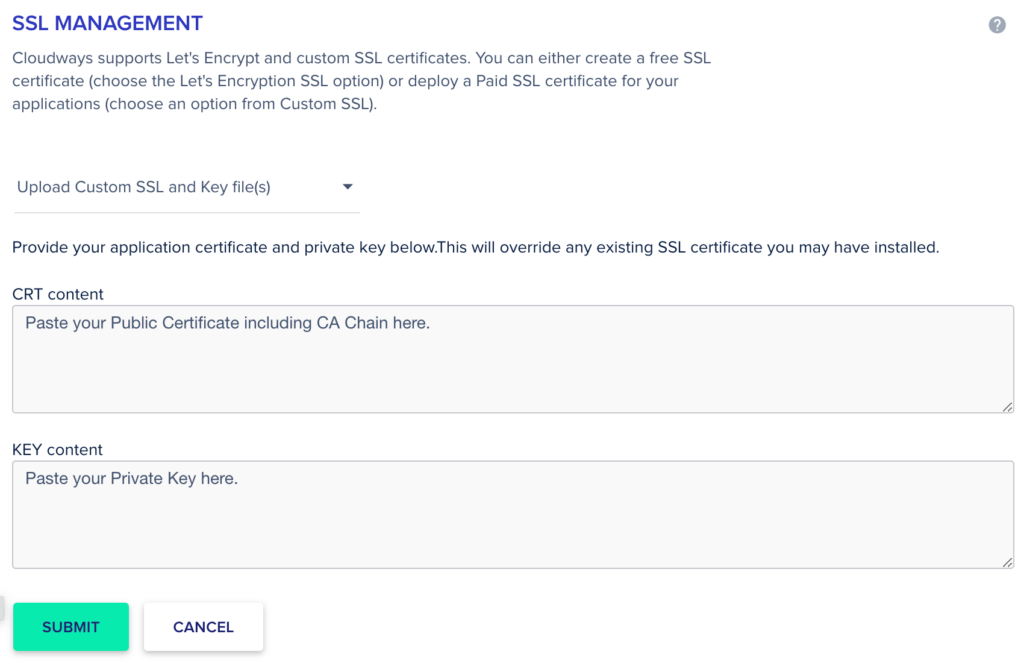
Step 4: Select the option to Upload Custom SSL and Key file(s) if you want to install a third-party certificate instead of a Let’s Encrypt one and click on INSTALL SSL.
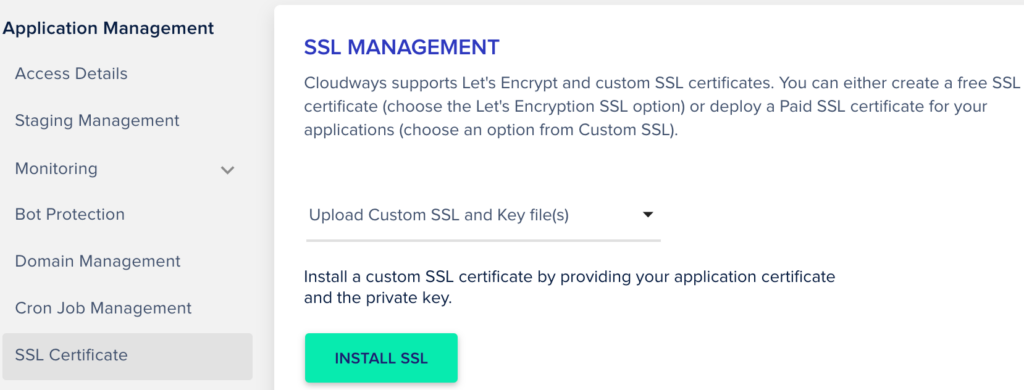
Step 5: Paste your public certificate and private key in their respective sections, and click SUBMIT.
How to install an SSL certificate in SiteGround
Step 1: Login to your SiteGround dashboard and click on Security.
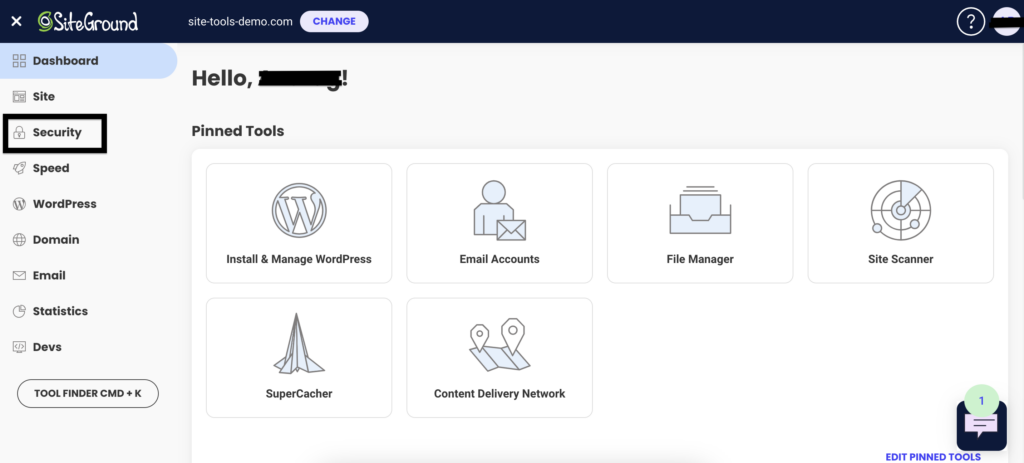
Step 2: Click on SSL Manager to open up the controls for installing SSL certificates.

Step 3: Click on INSTALL to install a Let’s Encrypt SSL certificate.
- Choose your domain from the Select Domain drop-down menu.
- Choose the preferred certification mode from the Select SSL drop-down menu.
- Click on GET to install the certificate.

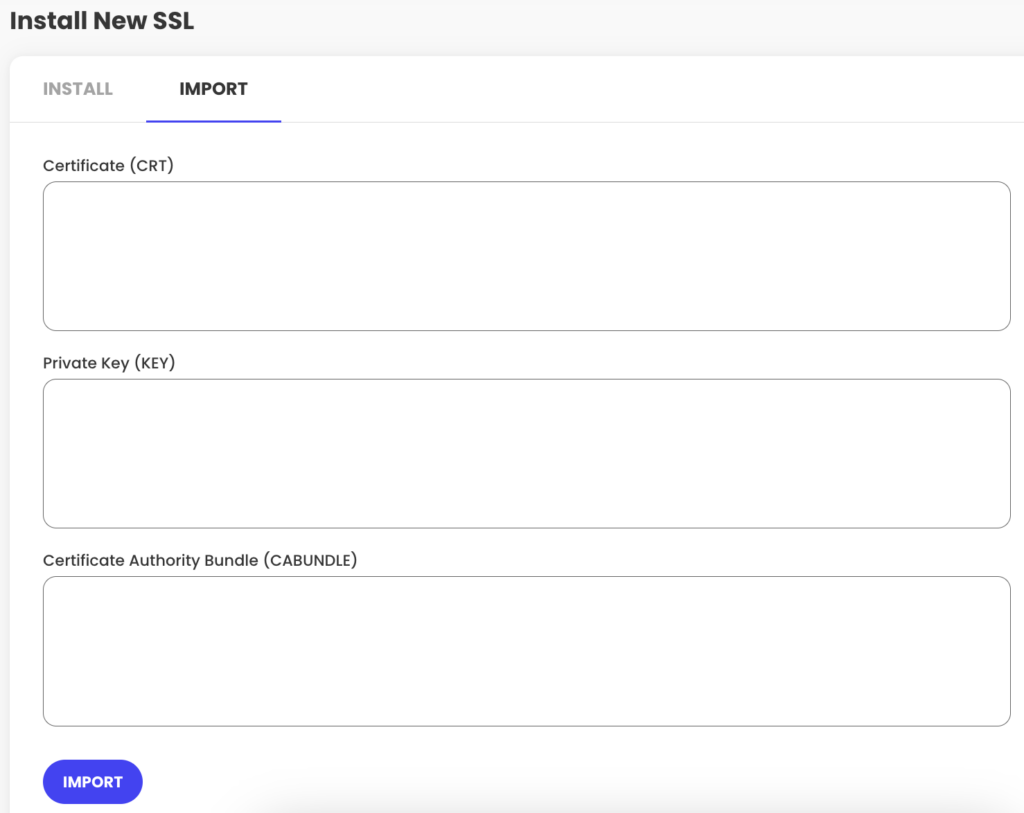
Step 4: Click on IMPORT to install a third-party certificate.
- Copy and paste your certificate, public key, and certificate authority (CA) bundle (if any) in their respective fields.
- Click on IMPORT to obtain the certificate and install it.
Note: A certificate authority, or CA, is a trusted organization that stores, signs, and issues SSL certificates. Web browsers are installed with a list of trusted CAs that are used to verify SSL certificates on websites. So if your browser finds a certificate on your WordPress site that is obtained from a non-trusted CA, it can mark your site as insecure. As a result, your site loses its users’ trust and its search engine rankings are affected. Hence, it is very important to choose the right CA when it comes to obtaining an SSL certificate. Some examples of trustworthy CAs are Let’s Encrypt, Sectigo, GlobalSign, DigiCert, Cloudflare, etc.
How to install an SSL certificate in WordPress manually (using cPanel)
Use cPanel to add SSL certificates on web hosting services like GoDaddy, Bluehost, Hostgator, etc. Using cPanel to upload an SSL certificate is a fairly simple process and its interface remains practically the same across different web hosts. The steps here will work for all cPanels across all web hosts.
Recommended read: Get an SSL certificate for WordPress
Step 1: Log in to your site’s cPanel, go to the Security section, and click on SSL/TLS.

Step 2: Click on the option to Generate, view, upload or delete SSL certificates.
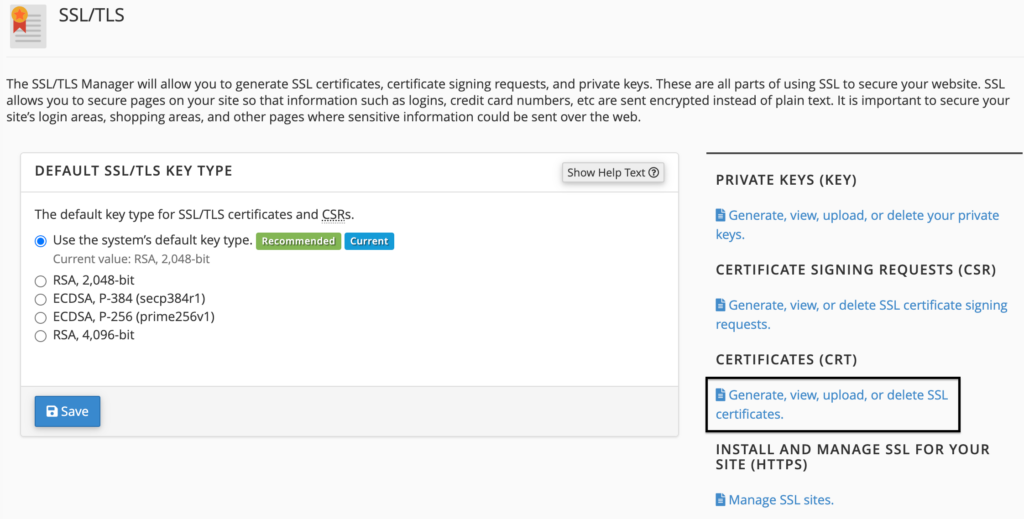
Step 3: Provide your certificate details in the Upload a New Certificate section.
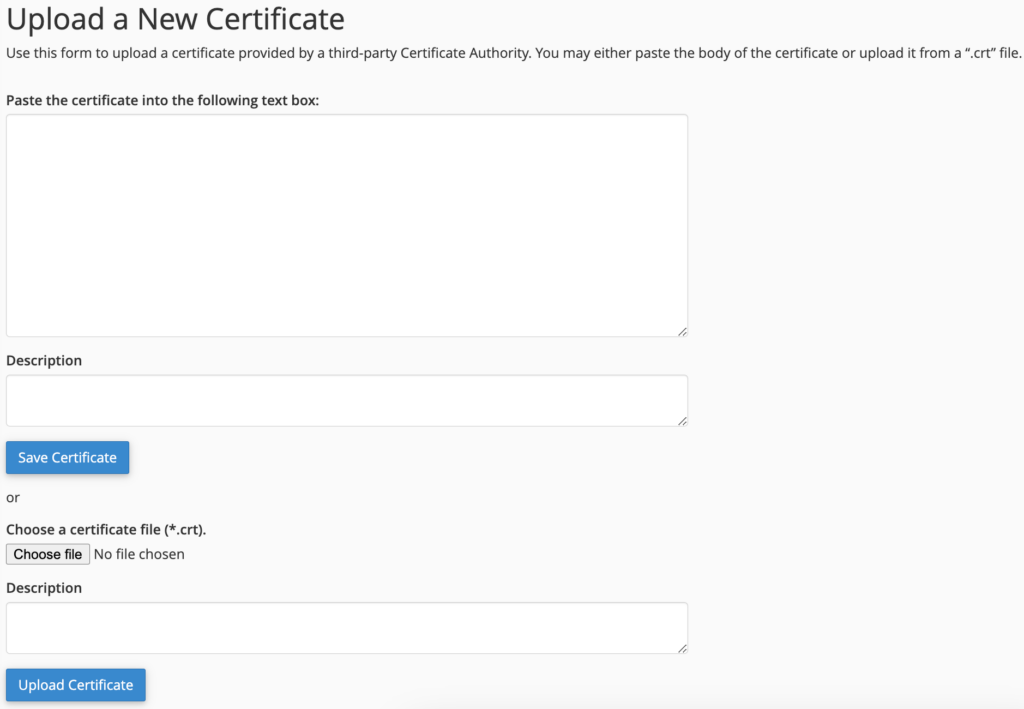
Step 4: Click on Install once the certificate appears in the Certificates on Server section to add it to your site.

[Not Recommended] How to add an SSL certificate to WordPress via web server
Obtain an SSL certificate from a CA to manually install it on your WordPress site using the specific method of installation needed by your web server—Apache or nginx for example.
However, we do not recommend this method as it runs the risk of things going horribly wrong and crashing your website. Moreover, manual SSL installation involves several steps and is incredibly time-consuming. It will require you to modify core files and the site database, where faults could turn fatal for your site. After all that effort, you will then have to manually point your site from HTTP to HTTPS, which is crucial for SSL installation.
Avoid all these risks and make the process simple and quick by using a plugin like Really Simple SSL to install SSL certificates on your sites. However, if you still wish to manually install an SSL certificate, ensure you back up your site by using a plugin like BlogVault before proceeding.
What to do after installing an SSL certificate in WordPress?
Now that you have installed an SSL certificate on your WordPress website, it is time to ensure that it is set up properly all across your site.
- Change your site’s URL from http:// to https:// in the General Settings section of your admin dashboard.

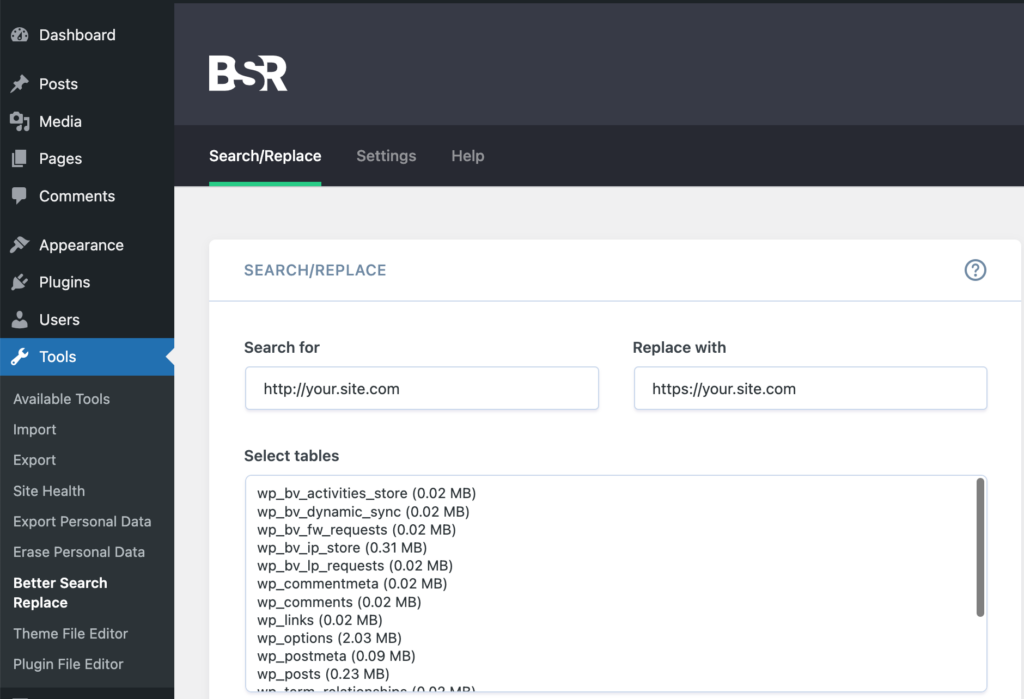
- Update your site’s database with its https:// URL. Use a plugin like BetterSearchReplace (BSR) to do it simply and quickly.
After installing and activating the BSR plugin, go to the Tools section of your dashboard to access the BSR dashboard. Enter your site’s http URL in the Search for box and the https URL in the Replace with box. Select all tables in the Select tables section, uncheck the Run as dry run option, and click on Run Search/Replace →.
- Inform Google about the changes on your site by updating its URL in its sitemap, Google Analytics, and Google Search Console. This ensures that Google tracks your site properly and shows it in search results.
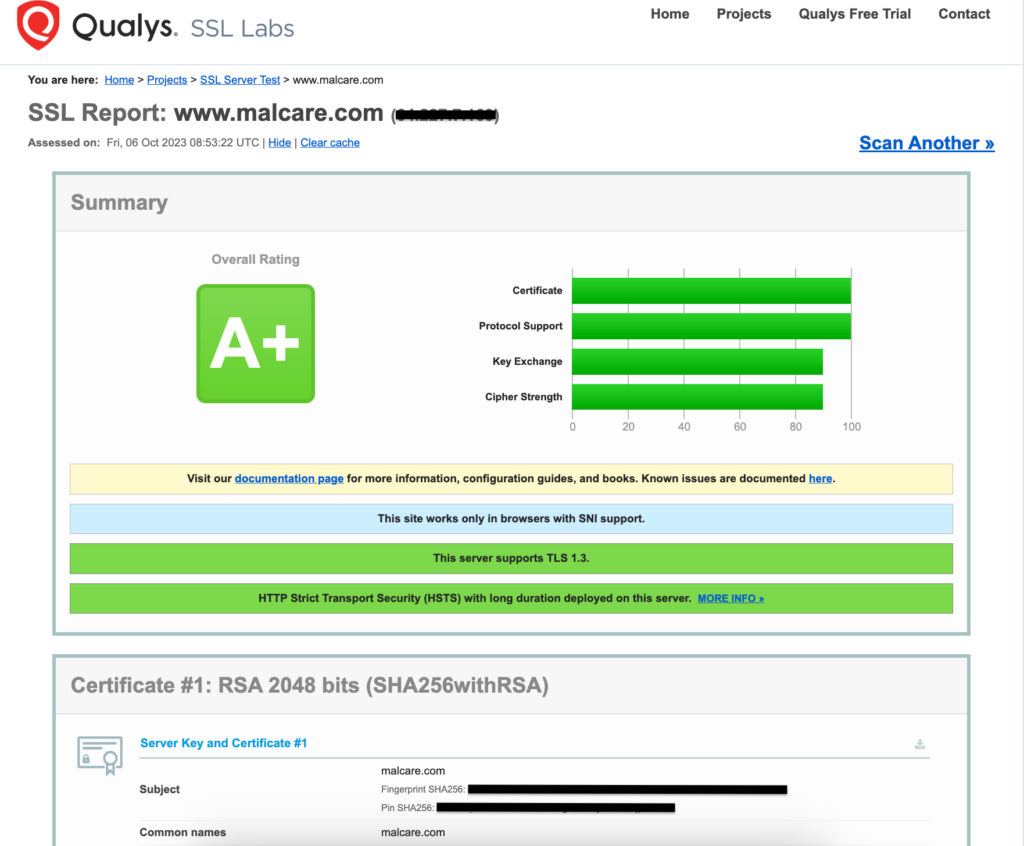
- Run your site’s URL on the Qualys SSL test site to ensure your SSL certificate is properly installed and reflected in the results.
- Keep track of your site’s certificate expiry dates and renew it on time. This is crucial to avoid expired certificate issues as Google is gradually moving on from SSL certificates with 1-year validity to those with 90-day validity.
Troubleshooting your WordPress site’s SSL installation
On the way to securing your WordPress site by adding an SSL certificate on it, you might face some roadblocks. But fret not, as we try to address some of the most common issues that may arise in this process and the ways to resolve them.
Are you receiving any of the following errors: HTTP 429 Too Many Requests, No Domains Authorized, or Certificate is not for the chosen domain?
These errors appear when the details on the SSL certificate do not match that of your WordPress site. Check your SSL certificate details for any incorrect information and get it reissued from the CA.
Are you receiving an Expired SSL Certificate error?
The reason behind this error is as the name suggests: an expired SSL certificate. However, if you have recently installed an SSL certificate and are seeing this error, check the certificate activation and expiry dates. An incorrect or improbable date usually leads to this error. Furthermore, with Google’s move towards SSL certificates with 90-day validity, you must check your site’s certificate expiry dates and renew it on time.
Are you receiving a NET::ERR_CERT_INVALID or a NET::ERR_CERT_COMMON_NAME_INVALID error?
This error means your browser thinks your WordPress site’s SSL certificate is invalid. There could be many reasons, but the most common ones are incorrect domain names or activation/expiry dates. Check these details and get them corrected with the CA while reissuing your certificate.
Are you receiving an ERR_SSL_VERSION_OR_CIPHER_MISMATCH or an ERR_SSL_PROTOCOL_ERROR error?
The cause behind this error could be either an improperly set up or formatted SSL certificate, an issue with the certificate’s digital signature, or the use of an outdated encryption algorithm. You may need to review your SSL settings to fix any configuration errors.
If the problem still exists, try updating your browser or using a different browser to see if it works. You can also use the Qualys SSL test to find out if there are any other issues with your SSL certificate. Also, check if any firewall plugin is interfering with the SSL certificate by disabling it and reloading the site. In the worst case, you might need to get your certificate reissued.
Are you seeing Not Secure warnings on your login page or site?
A ‘Not Secure’ warning on your WordPress login page or site means your browser can’t find an SSL certificate, or if a certificate is present, it has expired or it has not been configured correctly. To resolve this issue, you can either install a new SSL certificate or fix your existing one with a plugin like Really Simple SSL. Next, you need to replace and redirect all HTTP URLs with their HTTPS versions. Finally, clear all your website caches and inform Google about the changes to your site.
Are you receiving a NET::ERR_CERT_AUTHORITY_INVALID error?
This error means that the CA that issued the SSL certificate is not on the browser’s built-in list of trusted vendors, leading to the browser not trusting your site’s certificate. This error is also caused by self-signed certificates that a browser cannot identify. To remove this issue, obtain an SSL certificate from a trusted vendor like Comodo, DigiCert, Sectigo, etc., and install it on your site.
Are none of these solutions working for you?
When these solutions do not yield results, start by clearing all your caches – WordPress site cache, plugin cache, and browser cache. Sometimes, these spaces contain old links to your site, which causes issues when trying to reach your site with the new HTTPS links. Clearing caches can help resolve this error.
Additional security measures to protect your WordPress site
Adding an SSL certificate is just the first step in securing your WordPress site. It only encrypts the communication to and from your site but does nothing to protect your site against the plethora of threats out there. Hence, you need to take additional measures to ensure that your site remains protected against all kinds of threats.
- Pair your SSL certificate with a security plugin like MalCare. Its robust firewall capabilities and strong bot protection protect your site against malicious attacks, while its malware scanning and removal features ensure your site remains clean at all times.
- Advise users to use strong passwords that are changed at regular intervals.
- Use good login security measures like two-factor authentication (2FA) methods for added security.
- Regularly review user accounts and privileges to prevent unauthorized changes to your WordPress site. Use MalCare’s activity and firewall logs to identify and stop such activity.
- Limit login attempts to your site to prevent unauthorized users and bots from launching brute-force attacks. If you use MalCare, you won’t need to worry about these issues.
- Keep your WordPress core, plugins, and themes regularly updated to prevent the misuse of any vulnerabilities.
Final thoughts
By installing an SSL certificate on your WordPress website, you have taken the first step towards securing your site and all the communications to and from it. However, as we mentioned earlier, an SSL certificate is no guarantee of foolproof site security. You need a security plugin like MalCare to further strengthen your site’s security regimen.
MalCare’s robust firewall, strong malware detection and removal features, and hardened bot protection ensure that your WordPress site remains guarded against digital threats of all kinds. Moreover, its activity and firewall logging features help you keep an eye out for any suspicious activity on your site.
FAQs
How do I install a free SSL certificate in WordPress?
Use a reliable plugin like Really Simple SSL to install a free certificate on your WordPress site. Once installed and activated, access the Really Simple SSL dashboard from your Settings section, click on Activate SSL twice, and your site will be set up with a free SSL certificate from Let’s Encrypt.
Is SSL certificate free in WordPress?
Yes. WordPress provides free SSL certification for your website by default. You can also obtain free SSL certificates from certificate authorities (CAs) like Let’s Encrypt, SSL for Free, etc. if you prefer using third-party certificates. These are usually valid for 90 days, post which you have to renew them. However, if you want certificates with longer validity, you might need to pay for them.
Where are the SSL settings in WordPress?
While WordPress.com provides free SSL certification for your website by default, there are no settings that you can edit for this. You can only modify the file settings by logging into your dashboard and navigating to Settings and then General. Here you will find the WordPress Address and Site Address sections, where you must update your URLs with their https:// versions.
Why is SSL not showing on my WordPress site?
If your WordPress site is not showing its SSL certification or is showing a ‘Not Secure’ warning, it could be that your site does not have an SSL certificate, or the certificate has expired or is improperly configured. This is an easily fixable issue and requires you to either install a new certificate or configure the existing certificate properly.
How do I add an SSL certificate to my website?
You can add an SSL certificate to your WordPress website by using a plugin like Really Simple SSL. To do so, install and activate the plugin on your WordPress site and activate SSL capabilities by accessing the Really Simple SSL dashboard. We recommend using the plugin method as it is simpler and quicker and reduces the chances of errors or faults.
Share it:
You may also like

MalCare Ensures Unmatched Protection Against User Registration Privilege Escalation Vulnerability
Imagine discovering that your WordPress site, which should be secure and under strict control, has suddenly become accessible to unauthorized users who have the same administrative powers as you. This…

MalCare Ensures Proactive Protection Against WP-Members XSS Vulnerability
MalCare continues to protect its customer sites from all kinds of attacks, even the ones exploiting zero-day vulnerabilities. The recent stored cross-site scripting (XSS) vulnerability found in the WP-Members Membership…
![Top 9 ManageWP Alternatives To Manage Multiple Sites Easily [Reviewed]](https://www.malcare.com/wp-content/uploads/2022/12/malcare-default-image.jpeg)
Top 9 ManageWP Alternatives To Manage Multiple Sites Easily [Reviewed]
ManageWP is a popular name in the WordPress maintenance plugins market. People love how much you get for a free plan, how easy it is to set up, and how…
How can we help you?
If you’re worried that your website has been hacked, MalCare can help you quickly fix the issue and secure your site to prevent future hacks.

My site is hacked – Help me clean it
Clean your site with MalCare’s AntiVirus solution within minutes. It will remove all malware from your complete site. Guaranteed.

Secure my WordPress Site from hackers
MalCare’s 7-Layer Security Offers Complete Protection for Your Website. 300,000+ Websites Trust MalCare for Total Defence from Attacks.


