Your WordPress site works, but it probably does not do everything you need yet.
If you want forms, backups, SEO tools, better security, or more control over design, plugins are what make that possible. That is why adding plugins to WordPress matters. Behind the scenes, plugin files sit under wp-content/plugins in your WordPress file structure, though you will rarely need to touch that yourself.
Used well, plugins make your site easier to run and easier to grow. Used carelessly, they can slow it down, cause conflicts, or break something important. That is why it helps to know not just how to install a plugin, but how to do it safely.
Which is exactly what we are here to help you with.
The easiest way to add a plugin is through Plugins > Add New Plugin in your dashboard. Before you install anything, check that the plugin is updated, compatible with your WordPress version, and well-reviewed. We also recommend that you backup your site first. This is especially true before installing a plugin that affects design, checkout, caching, or security.
Adding plugins to WordPress
There are two parts to adding plugins to WordPress.
- Installing adds the plugin files to your site.
- Activating turns the plugin on.
Most of the time, you will use the dashboard method. It is quick, familiar, and enough for most sites. The other methods are still worth knowing, especially if you are using a premium plugin, dealing with upload limits, or managing files directly.
Before you install a WordPress plugin for your site, take a moment and check three things:
- When it was last updated
- Whether it works with your version of WordPress
- What recent reviews say
That small pause can save you a lot of stress later.
A) Via the dashboard
This is the simplest method. If the plugin is listed in the WordPress plugin directory, you can install it right from your dashboard.
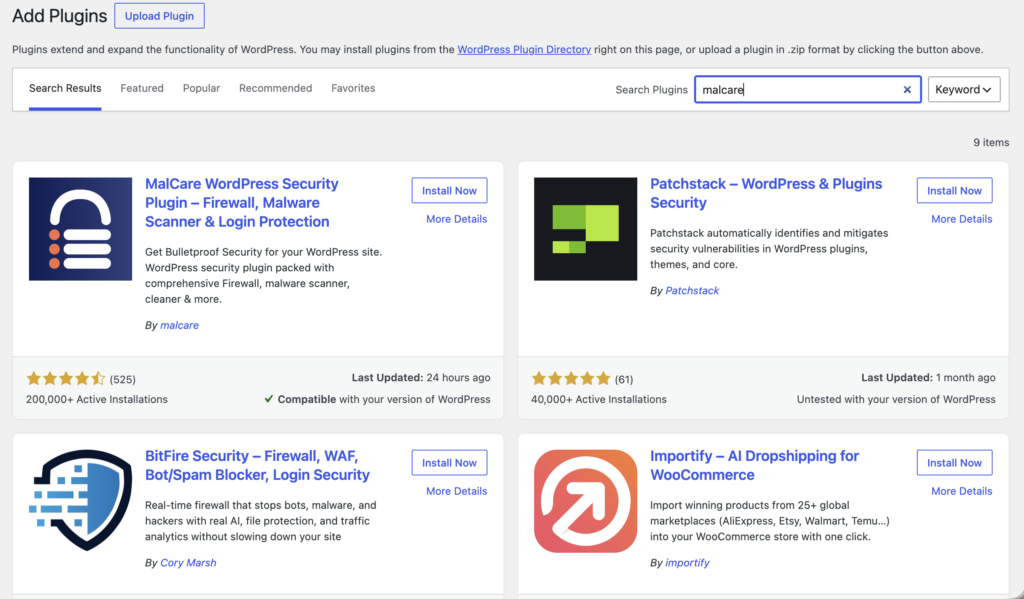
Start by finding the plugin inside your WordPress admin area. In your wp-admin area, click Plugins in the sidebar, then click Add New Plugin. Use the search bar to find the plugin you want.
🚨 Note: Take an extra second here and check the developer name too. Some plugins have similar names, and it is easy to click the wrong one when you are moving quickly.
Finish by installing the plugin and activating it. Once you find the right plugin, click Install Now. WordPress will add the plugin files to your site. When the button changes, click Activate.
That part is easy. What comes next matters too.
Some plugins work right away. Others need to be set up before they do anything useful, especially WordPress security plugins. After activation, look for a new menu in the sidebar, a settings link, or a setup wizard.
B) Via a zip file upload
You will use this method when the plugin is not in the WordPress directory. This is common with premium plugins and tools downloaded from a developer’s site.
It is still straightforward. You just need to upload the correct file.
Begin by downloading the plugin ZIP file from the official source. That matters because nulled WordPress plugins are one of the easiest ways to invite trouble onto a site.
Go to the plugin website or your account download area and get the plugin ZIP file. Leave it zipped for this method.
⚠️ Note: A quick warning here. Some plugin sellers give you a full download package that includes guides, license files, and the plugin ZIP inside another folder. If WordPress says the plugin is invalid, you may have uploaded the wrong file. It happens more often than people expect.

Open the upload tool in WordPress and select the ZIP file. In your dashboard, go to Plugins, then Add New Plugin, then click Upload Plugin. Click Choose File and select the plugin ZIP file.
If you are replacing a free version with a premium version, check the plugin’s instructions first. Some upgrades are smooth. Some need a different process. It is better to know before you click.
Complete the installation and activate the plugin. Click Install Now. When WordPress finishes, click Activate Plugin.
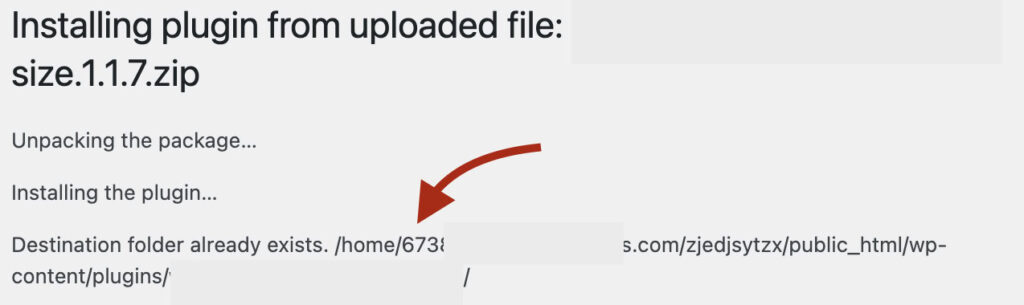
If you see a message saying the destination folder already exists, stop and check what is already installed. That usually means a version of the plugin is already on your site.
C) Via FTP upload
FTP gives you direct access to your site files. It is useful when the dashboard upload fails or when you want more control over where plugin files go.
It is also less forgiving. If you upload the wrong folder or place files in the wrong directory, WordPress may not detect the plugin.
That is why we strongly suggest making a backup first. We recommend you backup your site before using FTP, especially on a live site.
Download the plugin and extract its folder on your computer. Download the plugin ZIP from the WordPress plugin directory or the developer’s website. Then unzip it on your computer. For FTP installs, you need the extracted plugin folder, not the ZIP file.
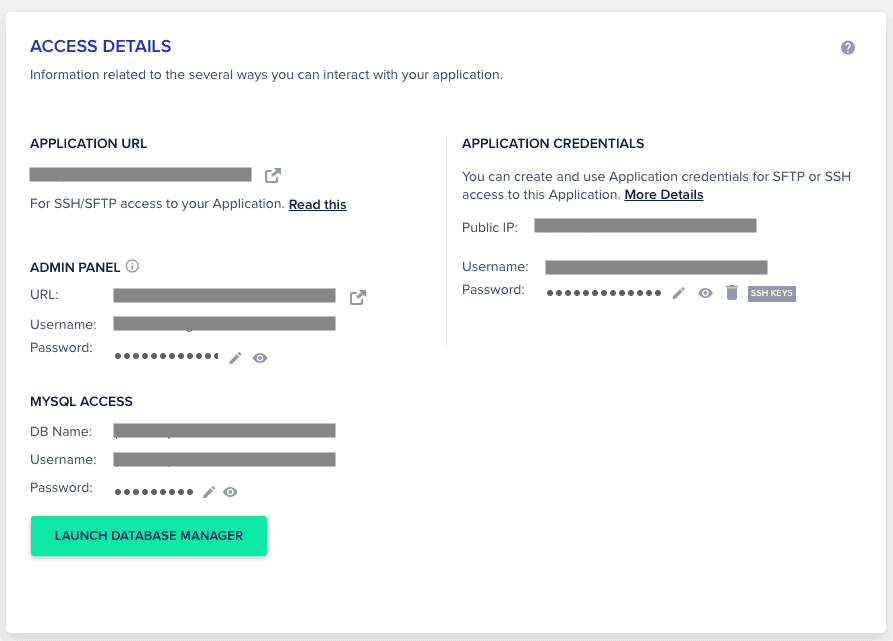
Set up an FTP client and collect your server login details. Use an FTP client like Cyberduck or FileZilla.
You will also need your FTP or SFTP details from your host. That usually includes:
- host
- username
- password
- port, if required
If your host supports SFTP, use that. It is more secure.
Connect to your server and open the plugins directory. Open your FTP client and connect to your server. Then go to your WordPress root folder, which is often public_html. From there, open: wp-content/plugins
This is where WordPress stores plugin folders.
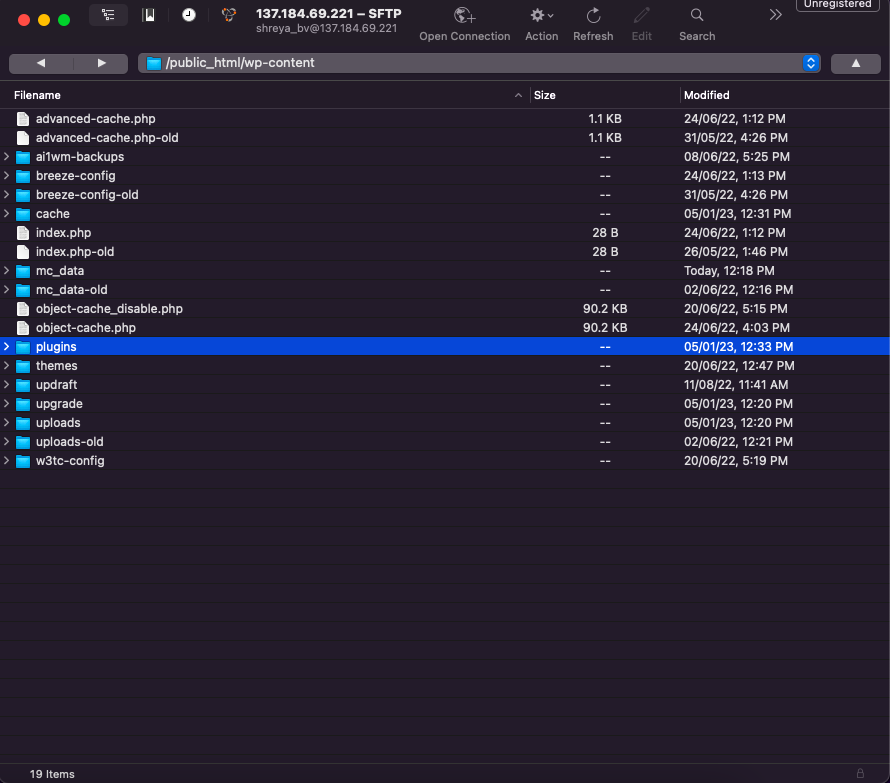
Upload the extracted plugin folder to the correct location. Upload the full extracted plugin folder into wp-content/plugins.
Be careful with the folder structure. If the plugin files end up inside an extra folder, WordPress may not recognize the plugin. That is one of the more common reasons people end up trying to fix WordPress errors.
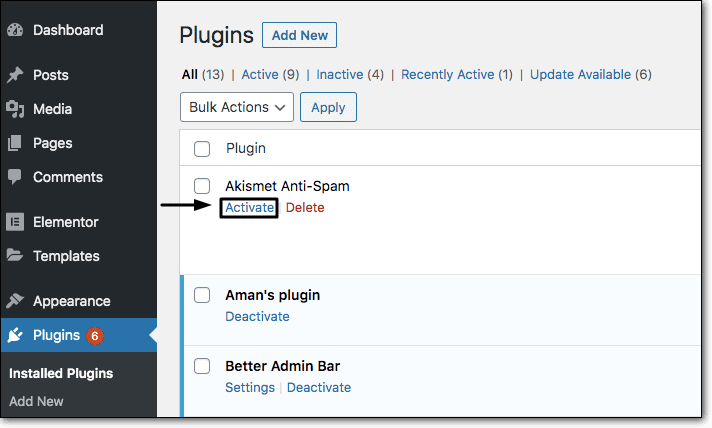
Return to your dashboard and activate the plugin. Go back to your WordPress dashboard and open Plugins > Installed Plugins. Find the plugin you uploaded and click Activate.
If it does not appear, check the folder structure first. That is usually the issue.
How to add WordPress plugins via WP-CLI
WP-CLI is a command line tool for WordPress. It is useful if you are comfortable with SSH and prefer working in the terminal.
If that is not you, that is fine. Most site owners never need this method.
Check that your host supports SSH and that WP-CLI is available. Before you begin, confirm that your host allows SSH access and that WP-CLI is installed.
Some hosts include it. Some do not. If it is missing, you will need to install it first.
Connect to your server through SSH using your account details. Open Terminal or your command line tool and connect with: ssh username@ipaddress
Replace username and ipaddress with your real server details. Install the plugin using its WordPress plugin slug. Use this command: wp plugin install plugin-slug
The slug is the part of the plugin URL that comes after /plugins/.

For example, if the plugin URL is: https://wordpress.org/plugins/blogvault-real-time-backup/
Then the slug is: blogvault-real-time-backup
So the command becomes: wp plugin install blogvault-real-time-backup
Add activation to the command if you want the plugin live right away. To install and activate in one step, use: wp plugin install blogvault-real-time-backup --activate

Then check your dashboard and front end. A plugin can install cleanly and still need setup. That is especially true when the goal is to harden a WordPress site, not just add a feature.
Using a plugin on your WordPress site
After you activate a plugin, the next question is usually the same.
Where do you find it?
That confusion is normal. Plugins do not all place themselves in the same spot. Some add a new menu to the left sidebar. Some appear under Settings or Tools. Some only show up when you edit a post, page, or product.
That is especially common with e-commerce plugins and content tools that only appear where you actually use them.
Here is where to look:
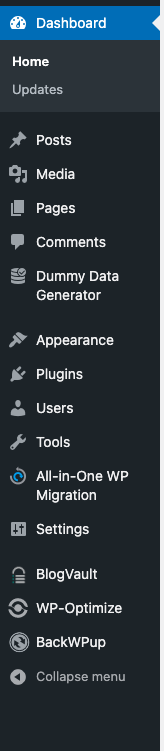
- Check the left sidebar for a new plugin menu
- Go to Plugins > Installed Plugins and look for a Settings link
- Check inside Settings, Tools, or ToolName
- Open a post, page, or product if the plugin affects content
- Read any setup notice or welcome screen after activation
Try not to skip the setup screen if one appears. It often handles the part that makes the plugin actually useful.
And after activation, test the area the plugin affects. If it touches forms, checkout, SEO, caching, or design, make sure that part of your site still works the way you expect.
Why are plugins beneficial?
Plugins are one of the reasons WordPress feels approachable. You do not need to build every feature from scratch. You can add what your site needs, when your site needs it.
That is a big deal when you are managing a site on your own. You want tools that help, not tools that make simple tasks feel technical.
Plugins can help you:
- Add features like contact forms, ecommerce, bookings, backups, and memberships
- Cut down on manual work by handling jobs that would otherwise take code or repeated effort
- Manage your site more easily with tools for security, redirects, image compression, and performance
- Improve design and content with page builders, block plugins, and SEO tools
- Keep things moving by making routine tasks faster and easier
The key is choosing plugins that solve real problems. That is where the value is.
How to choose the right plugins
This is the part that protects your site long-term.
A plugin may look great on its sales page and still be a poor fit for your site. So before you install one, slow down just enough to check what matters.
- Updates: Has it been updated recently?
- Compatibility: Does it support your WordPress version?
- Reviews: What are users saying lately?
- Support: Are support questions getting answers?
- Performance: Is the plugin known to be heavy or problematic?
- Purpose: Does your site truly need it?
If two plugins do the same job, choose one. Too much overlap leads to clutter, confusion, and severe plugin conflicts.
Also, do not leave old, deactivated plugins sitting on your server for months. If you know you are not using a plugin, delete it. Unused code still takes up space and can become a risk if it is abandoned.
Before installing a major plugin, especially one that affects checkout, caching, forms, security, or SEO, create a backup first. If possible, test it on staging.
A few things are easy to miss:
- If a plugin adds shortcodes, check what happens if you remove it later.
- If it changes caching, clear your cache and recheck key pages.
- If it affects payments, test the full flow.
- If it asks for third-party access, read the setup screens closely.
Parting thoughts
Adding plugins to WordPress should feel simple, not stressful.
Most of the time, it is. You find a plugin, install it, activate it, and move on. But when a plugin affects something important, it deserves a little more care.
That care pays off.
It helps you avoid slow pages, plugin conflicts, broken layouts, and those moments where your site suddenly feels fragile. So keep it simple. Choose plugins with care. Install only what your site needs. Test what matters. Keep a backup before major changes.
FAQs
Frequently asked questions
Plugins and extensions are often the same thing in WordPress. Sometimes an extension is a smaller add-on that only works with a main plugin, such as a WooCommerce extension.
The best plugins to install are the ones your site actually needs. For most sites, that often means a backup plugin like BlogVault, a security plugin like MalCare, and a speed tool like Airlift.
You can add free plugins in WordPress from the plugin directory in your dashboard. Go to Plugins > Add New Plugin, search for the plugin, then click Install Now and Activate.
You can install as many plugins as your site can handle well. What matters most is plugin quality, overlap, and whether your hosting can support them without slowing down.
Plugins are helpful because they add features without making you build them from scratch. You can use them to improve security, speed, SEO, design, backups, forms, and more.