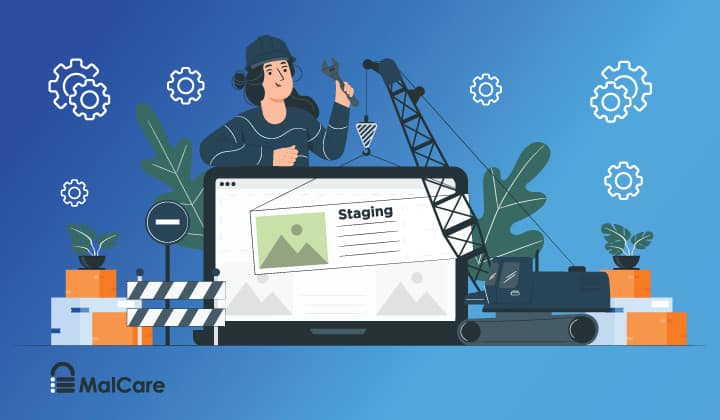
Create WordPress Staging Environment – A 0 to 1 Guide
by
7-layers of Security for Your WordPress Site
Your website needs the most comprehensive security to protect it from the constant attacks it faces everyday.
Have you ever made changes to your website that you regretted later?
Making modifications on your website only to realize later that they aren’t good enough or they are causing your website to break is a nightmare.
Not only do you have to figure out how to restore your site to a point before the modification but you may also need to fix your broken site.
Plus, we assume you spent quite a bit of time making the modifications and now you have to spend more time rolling back the modification.
We understand the pain, we have all been there.
Wouldn’t it be great if you could test your modifications first before making them on your live site? This is exactly what a staging environment will enable you to do.
A staging site is a replica of your live site. It offers you a testing ground without risking your live site.
In this article, we’ll show you exactly how to create a staging site for your WordPress sites.
TL;DR: There are many ways in which you can stage a website but the easiest way to download and install a plugin like BlogVault Staging. It’ll help you create a website with the click of a button. Not just that, afterward making modifications on the site, it’ll also help you push the changes from your staging site to live site with a simple click.
[lwptoc skipHeadingLevel=”h1,h4,h5,h6″ skipHeadingText=”Final Thoughts”]
What is A WordPress Staging Environment?
A staging site environment is basically a replica of your live website. Staging environments are used to run tests and experiment with changes.
A WordPress staging site is useful when:
- You want to update your website. Sometimes, when you update your site or even a single plugin, it might cause incompatibility issues that will break your website.
- You want to try a new theme or new plugins.
- You want to make major changes to your sites such as changing the layout, images, and design.
- You want to troubleshoot problems you’re facing on your live site. If you troubleshoot on your live site, it may cause more problems and affect your visitor’s experience.
WordPress staging environments are extremely handy but they have their disadvantages too. In the next section, we’ll explore the pros and cons of using a WP staging environment.
Pros of Using a Staging Environment
- A staging site helps you experiment on your website without the risk of breaking your live site.
- It enables you to run updates to check if it’s causing any compatibility issues without putting your live or original website at risk.
- Using a staging environment you can discover the cause behind critical issues plaguing your site without putting it on maintenance mode.
- Staging websites help you verify your backup copies. When you want to restore a specific copy of your website, a staging site can help you identify the backup copy. Moreover, it can also help you verify if the backup is a working copy.
Cons of Using a Staging Environment
- Creating a staging site requires you to invest extra money. Your hosting provider may offer staging services at an extra cost. Some of the staging plugins are paid services.
- Setting up a staging environment can be complex and time-consuming.
- Moreover, replicating changes from the staging site to the live site can also be time-consuming. If you have made too many or complicate changes, then there is a good possibility that you’ll forget what modifications you made on the site.
IMPORTANT: There are challenges associated with using staging websites but you can overcome them. For instance, there are plugins like BlogVault that offer free staging services. It offers an easy way to create a staging environment and replicate changes from the staging site to the live sites. All you need to do is click a button.
How to create a Staging Environment in WordPress??
There are three different ways for you to create a Staging Environment in WordPress. Those are:
i. Staging a Site With a WordPress Plugin (easy)
ii. Staging a Site With Web Host (easy)
iii. Staging a Site Manually (hard)
We are going to walk you through all the methods so that you can choose whichever is convenient for you.
i. Staging a Site With a WordPress Plugin
Earlier in the article, we spoke about how some staging plugins are premium services while others like BlogVault offer it for free. In this section, we’ll show you how to stage using the BlogVault plugin. But before we go on to the steps, there are quite a few more impressive reasons why BlogVault is a great choice. Those are:
- Many staging plugins use your site server to store the staging site. Your server is overworked and your website becomes slow. BlogVault, on the other hand, stores your WordPress staging site on its own server.
- There are many staging plugins that are not incompatible with cache plugins. Clearing cache is essential on staging sites because it enables you to preview the changes you are making on your site. BlogVault has had no issues with cache plugins.
- You’d be surprised to know that some staging plugins don’t support multisite. But BlogVault can stage multisite without a worry.
Now, let’s go ahead and stage a site with the plugin.
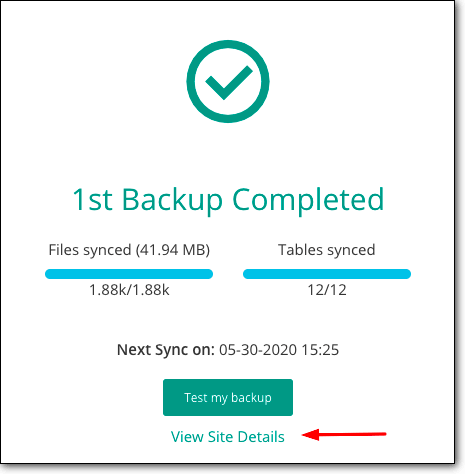
1. Download and install the BlogVault plugin. It’ll immediately start taking a backup of your website.
2. Once the process is complete, click on the option – View Site Details
3. It’ll take you to a new page where you’ll find a Staging section. Within that section, click on the option Add Staging.
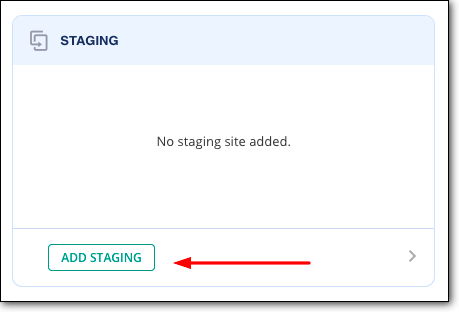
It’ll take a few minutes for BlogVault to create a staging site.
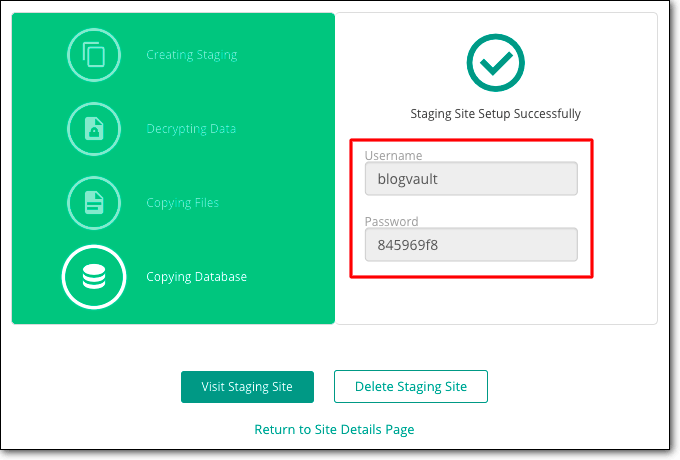
4. To access the BlogVault staging site, you have to click on the Visit Staging Site option.

5. All staging sites are password-protected so that no one can access it other than you or the people you share the credentials with. You’ll need a username and password to enter the staging environment. You will find the username and password on the same page where you found the option – Visit Staging Site.
After using the staging site, you’d want to replicate the changes you made on the staging environment on the live site. You don’t have to do it manually. Just merge the staging site with the live one. With BlogVault, you can push your changes to live. This saves you the hassle and your time!
In the next section, we’ll show how exactly you can do it –
→ Merging Staging Site With Live Site
Merging your staging site with your live site is extremely easy with BlogVault. All you need to do is follow these steps –
1. Log into your BlogVault dashboard and go to the Staging section.
2. Select Merge and your staging site will merge with your live site. BlogVault also allows you to select which changes you want to push to the live site.
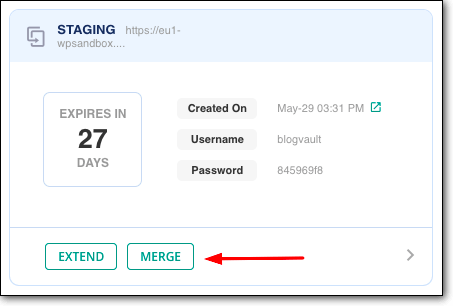
Within a few minutes, all the modifications that you made on your staging site will appear on the live site.
Would you like to learn more about WordPress Staging plugins? Checkout our guide on Best WordPress Staging Plugins, hand-picked by us to make it a lot easier for you to choose the right plugin for yourself.
ii. Staging a Site With Web Host
Most hosting services offer staging facilities. If you are subscribed to higher plans of hosting providers like SiteGround and Bluehost beginning with $20 per month, you will have access to staging sites. Other popular hosting providers like WP Engine, FlyWheel, and Kinsta offer staging facilities with all their plans.
In this section, we are going to show you how to access staging with two popular WordPress hosting companies –
NOTE: Perhaps you are not using any of the WordPress hosting providers above. But if you follow the steps that we have listed down below, it will give you an idea of how to go about creating a staging site with your own hosting company.
1. Creating a Staging Site on BlueHost
If your site is hosted on Bluehost, then you can take the following steps to enable Bluehost staging.
→ To stage your site on Bluehost you need to log into your WordPress website.
→ From the menu on your dashboard, select the option Staging.
→ On the next page, select Create Staging Site and Bluehost will create a WordPress staging site that you can use.
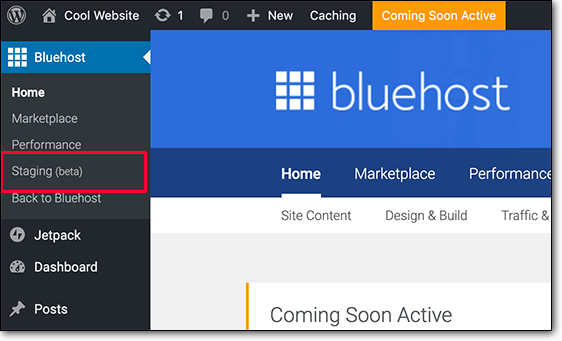
→ To access the staging WordPress sites, you will need to select the option Go to Staging Site. Now, you can use your WordPress user credentials to log into the staging environment.
Merging Bluehost Staging Site With Live Site
After you have made modifications to your staging site, you’d want to push the changes to your live site. To do that, you need to take the following steps –
→ From your WordPress dashboard, select Staging.
→ On the next page, you’ll be offered to merge your files or database or both.
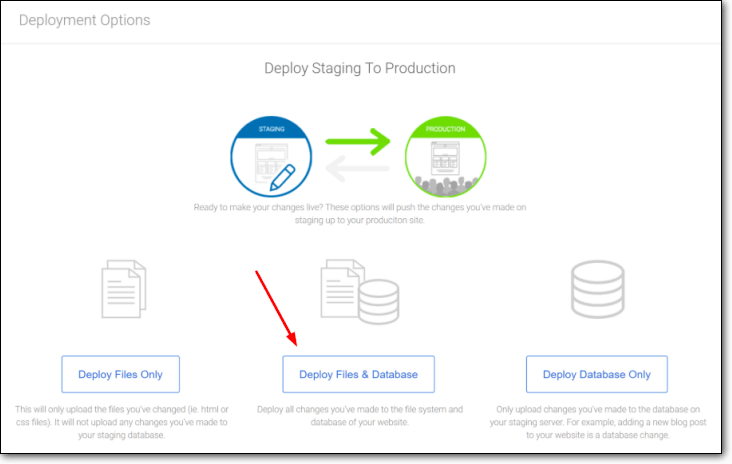
After you select one of the options, Bluehost will start merging your staging site with the live one.
2. Creating a Staging Site on Kinsta
If your site is hosted on Kinsta, then you can take the following steps to enable Kinsta staging.
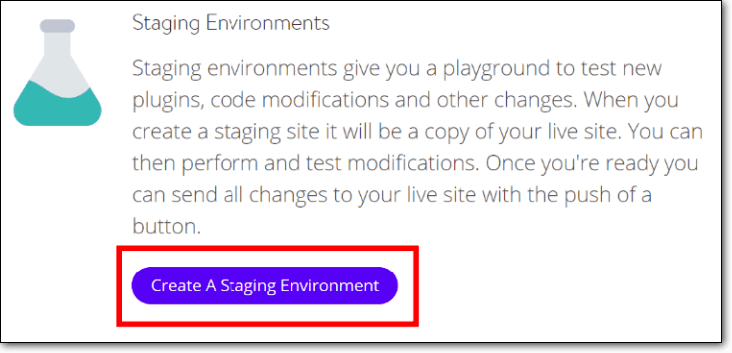
→ Log into your Kinsta hosting account and then select the website that you want to stage.
→ Next, you need to find the option Staging Environment. Click on it.
→ On the next page, you need to select Staging > Create A Staging Environment.
→ When the staging site is ready, you’ll find the URL of the environment by navigating to Domain.
Merging Kinsta Staging Site With Live Site
Now to merge the changes you made on your staging site to the live site, follow the steps below –
→ Log into your Kinsta dashboard, and select the staging site.
→ Then select Staging Environment > Push Staging to Live.
That’s it. Kinsta will merge your staging site with your live site.
iii. Staging a WordPress Site Manually
Creating a staging site manually is a very time-consuming and complicated process. That is why we do not recommend staging a site manually. Not just that, there is no easy way to push changes from the staging to the live site. You will have to manually replicate it.
IMPORTANT: If you still want to try out the manual method, we strongly suggest taking a complete site backup. The manual method involves working with WordPress files and database. While you are fiddling with them, it’s possible to make a mistake which will cause your website to break.
The manual process involves the following steps:
- Creating a subdomain which will act as a staging site
- Downloading files and database from your live site
- Uploading the same files and database to your subdomain or staging site
1. Create a Staging Subdomain
You can create a subdomain using your hosting provider.
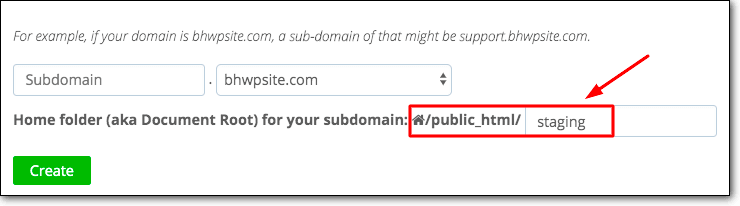
→ Log into your hosting provider account, navigate to the cPanel, and select Subdomain.
→ On the next page, create a subdomain and name it Staging. If you don’t know how to go about creating a subdomain you’ll need to find a help doc by your hosting provider explaining how to create a subdomain.
Here’s a guide from Bluehost – How to Create a Subdomain?
And here’s one from Kinsta – How Do I Add a Domain to a Site?
2. Download Files and Database From Live Site
A WordPress website is made up of files and a database. You will need to download both. The purpose is to upload them on your subdomain so that it can replicate your website and act as a WordPress staging environment.
i. To download files you need to follow the steps below:
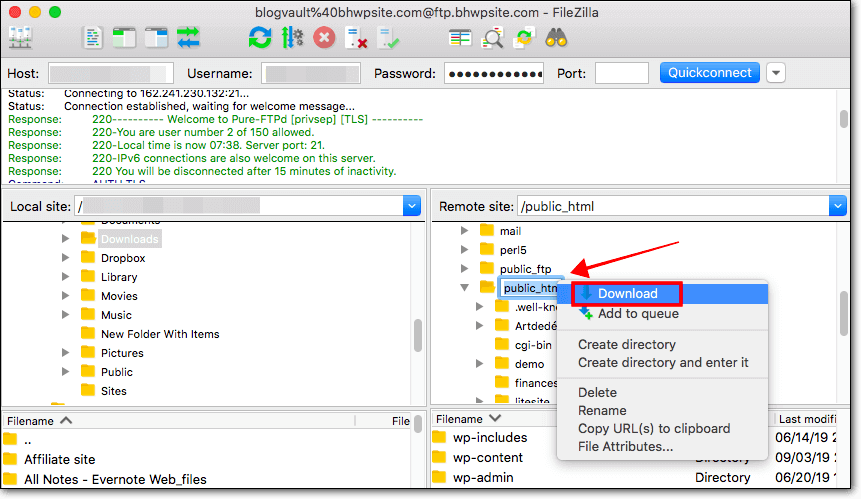
→ You need to install and activate an FTP software like Filezilla or CyberDuck. The software will help you access your WordPress files and download them on your computer.
→ After installing it on your computer, open the software. It’ll ask you your Hostname, Username, and Password so that it can connect with your website and fetch your WordPress files.
If you don’t have these credentials with you, reach out to your hosting provider, and ask for your credentials.

→ Once the connection is established, you will find your WordPress files on the Remote site section.
→ In the Remote site section, find the folder called public_html. Right-click on the folder and select Download. Your WordPress files will be downloaded to your computer.
ii. To download the database you need to follow the steps below:
→ Log into your hosting provider account, navigate to the cPanel, and then select phpMyAdmin.
→ Next, select the option Export. Under Export Method, select Quick and then hit Go.
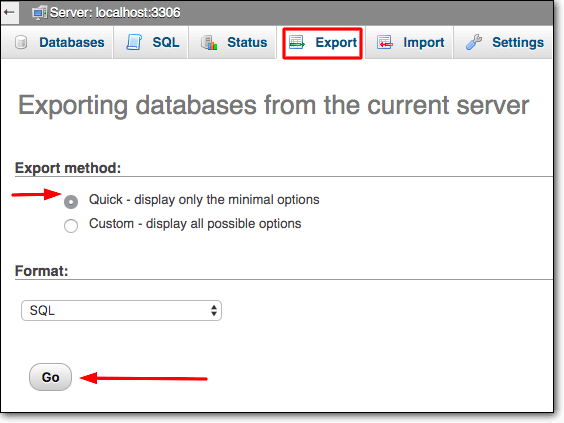
Your WordPress database will be downloaded to your computer.
3. Upload Files and Database to the Subdomain
Now that you have both your files and database stored on your computer, you will need to upload them on the subdomain – Staging.
The subdomain like we said earlier will act like a staging site where you can test and make modifications.
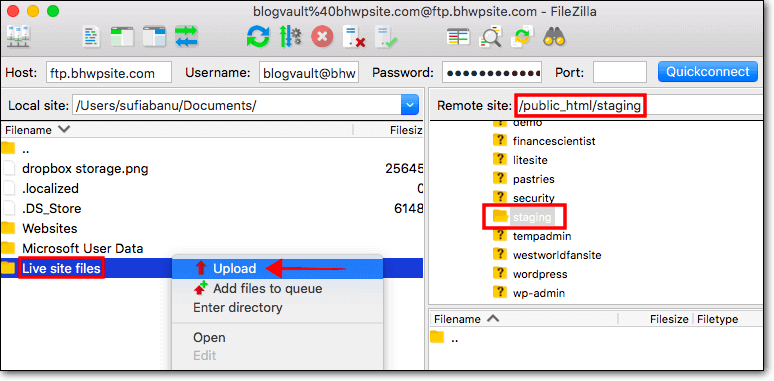
→ Open your FTP software and ensure that you are connected with your website. Like we showed earlier, on the right-hand side there is a section called Remote site where files from your site appear. On the left-hand side, you will have the Local site section where files stored on your computer will appear.
The custom domain (Staging) can be found on the Remote site section. And the downloaded files and database can be found on the Local site section.
What you need to do is upload the files and database to the subdomain folder.
i. Uploading the Files
- Store your files and database into a single folder on your computer. We named our folder Live site files.
- Then, select the subdomain folder – Staging.
- Next, navigate to the Local site section and right-click on the Live site files folder. Select Upload and this will upload the folder to the Staging (subdomain).
- The URL of the new staging site can be found on your hosting provider account. Log into your account, navigate to your cPanel, and select Domain > Subdomains.
ii. Uploading the Database
To upload the database you need to first create a database for the subdomain – Staging.
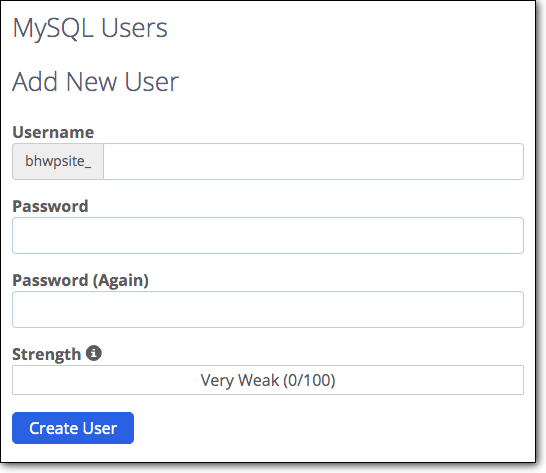
- Log into your hosting provider account, navigate to the cPanel, and go to Databases and select MySQL Databases.
- Next, write down the name of the database in the section Create New Database and hit Create Database.

- You will now create a new database user to be able to use the database. The page where you created your database – scroll down and you’ll find a section where you can create a MySQL user.
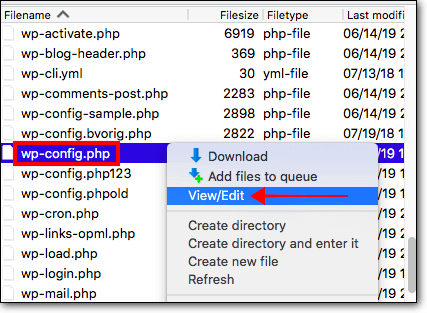
- Once the database and username are ready, you need to ensure that the new database is connected to the subdomain. Please open the FTP software and on the remote site section navigate to public_html > Staging. Inside the Staging folder, you’ll find the wp-config file. Right-click and choose Edit.
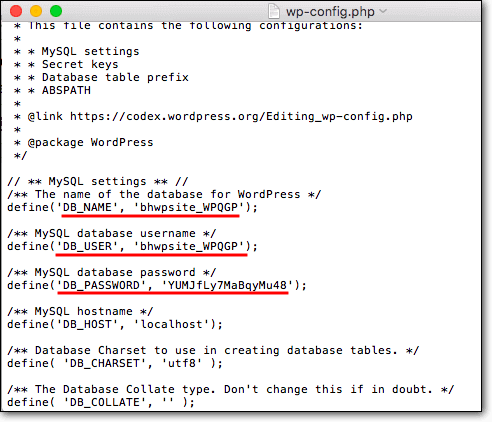
- The file will have information about your previous database (database name, username, and password), replace them with the database you just created.
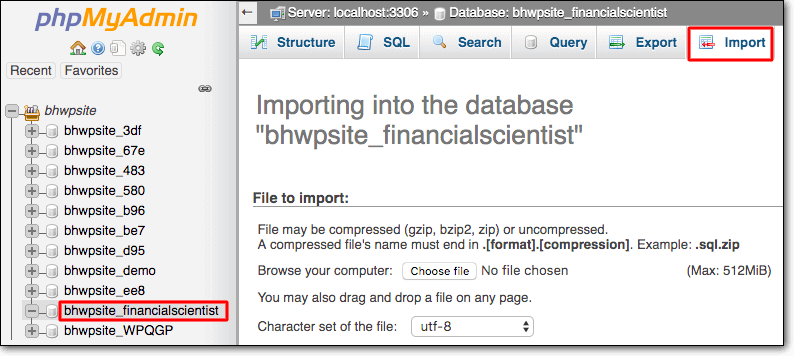
- Then, it’s time to upload the database you downloaded in step 2 to the new database.
- Go back to your cPanel and select phpMyAdmin. You should be able to see the new database. Select it and go to the Import section.
- Upload the database from your computer and you are good to go.
- Like we said earlier, the link to the new staging site can be found on your hosting provider account. Log into your account, navigate to your cPanel, and select Domain > Subdomains.
Merging Staging Site With Live WordPress Site
After you have made modifications to the new WordPress staging environment, there is no easy way to merge your staging site with the live site. You will have to manually replicate the changes on your live site.
That’s it, folks. That’s how you create a WordPress staging environment.
Final Thoughts
While there are a number of ways in which you can stage your website, using a plugin is the easiest and most affordable. Unlike the manual method, there is no risk of breaking your website if you are using a plugin like BlogVault to stage your site.
Try BlogVault Staging Now!
Category:
Share it:
You may also like

MalCare Ensures Proactive Protection Against WP-Members XSS Vulnerability
MalCare continues to protect its customer sites from all kinds of attacks, even the ones exploiting zero-day vulnerabilities. The recent stored cross-site scripting (XSS) vulnerability found in the WP-Members Membership…
![Top 9 ManageWP Alternatives To Manage Multiple Sites Easily [Reviewed]](https://www.malcare.com/wp-content/uploads/2022/12/malcare-default-image.jpeg)
Top 9 ManageWP Alternatives To Manage Multiple Sites Easily [Reviewed]
ManageWP is a popular name in the WordPress maintenance plugins market. People love how much you get for a free plan, how easy it is to set up, and how…
MalCare Proactively Defends Against Icegram Express SQL Injection Vulnerability
MalCare’s recent data has revealed numerous attempts to exploit a newly found SQL injection vulnerability in the Icegram Express plugin. Attackers commonly use this sophisticated SQL injection technique to extract…
How can we help you?
If you’re worried that your website has been hacked, MalCare can help you quickly fix the issue and secure your site to prevent future hacks.

My site is hacked – Help me clean it
Clean your site with MalCare’s AntiVirus solution within minutes. It will remove all malware from your complete site. Guaranteed.

Secure my WordPress Site from hackers
MalCare’s 7-Layer Security Offers Complete Protection for Your Website. 300,000+ Websites Trust MalCare for Total Defence from Attacks.


