How To Install and Setup WordPress Multisite Network?
by
7-layers of Security for Your WordPress Site
Your website needs the most comprehensive security to protect it from the constant attacks it faces everyday.
If you have multiple businesses or schools or personal websites and they all have a few things in common, you must have wondered if there’s a more efficient way of managing all those websites instead of managing them individually. In that case, WordPress multisite is the solution you are looking for.
Launched in version 3.0 in 2010, WordPress multisite allows multiple WordPress websites to exist in a single WordPress install.
In this article, we’ll show you how to build a multisite WordPress. It can be a daunting process even for someone who has built WordPress websites before. But there’s nothing to worry about.
You’d be all right if you follow our step-by-step guide to WordPress multisite. However, if you are looking at how to install WordPress manually you can check this article.
[lwptoc skipHeadingLevel=”h3,h4,h5,h6″ skipHeadingText=”In Conclusion”]
Before we jump headlong into the steps you’d need to take to install and configure a WordPress multisite, there are few things you need to learn.
What is a Multisite WordPress?
A multisite WordPress network is a collection of websites that share the same WordPress installation. In other words, if you have 5 separate WordPress sites, you can have them all in one place and operate them from a single dashboard.
Take, for instance, the BBC America website. It runs on a multisite network. Every BBC show has it’s very own website (called subsite under multisite setting). Instead of having multiple separate websites, they have all their shows under a single site. This makes managing websites far too easy.
To conclude, we’d draw a comparison between a regular website and a multisite WordPress network.
- One website + one WordPress install = Regular WordPress website
- Multiple websites + one WordPress install = Multisite WordPress network
Pros and Cons of Using a Multisite Networks
It’s easy to see why using WordPress multisite is so appealing. However multisite is not for everyone. Let’s look at the pros and cons of using multisite.
Pros of WordPress Multisite
-
- Share Same Plugins & Themes: Themes and plugins can be installed on the master dashboard. And they will be activated across the entire network for all the subsites to use.
Note: More on the ‘master dashboard’ in the Set-Up & Configure section.
- Streamlined Updates: The Superadmin can update WordPress plugins and themes for all the subsites at once.
Note: More on the ‘Superadmin or Super Administrator’ in the Set-Up & Configure section.
- Single Dashboard: Multisite WordPress makes it possible to run multiple sites from a single WordPress dashboard. Enabling you to manage everything including the themes, plugins, and users. In this way, it is possible to manage dozens and dozens of subsites.
Cons of WordPress Multisite
- Incompatible Plugins: One of the biggest challenges with multisite is finding compatible themes and plugins. Many plugins and themes are incapable of handling multisite installations.
- Complex Migration: Migration can be an exceedingly complex and tricky process. While it’s possible to migrate multisite to a new domain or hosting provider, standalone migration, i.e. migrating a single subsite, is extremely difficult and most plugins don’t support it.
- Unsuitable for Websites Using Different Plugins & Themes: WordPress Multisite is best used when you are building a network of sites sharing similar functionality. But if you have websites for wildly different purposes then it’s possible that you will end up using different plugins, themes, and customization. Then enabling multisite is not recommended.
IMPORTANT: WordPress Multisite emerged at a time when there weren’t many good options to manage the website. Fortunately, things have changed since. If you are looking for a good management solution then you should look into WP Remote.
It’s a popular, user-friendly, feature-packed management plugin. It’ll enable you to manage multiple websites from a single dashboard.
After having weighed the pros and cons, if you decide to go ahead and set up WordPress multisite WordPress, follow our beginner’s guide below.
How to Install and Setup WordPress Multisite Network?
If you are building a multisite from scratch then start from Step 1. But if you already have an existing website and you want to convert it into a multisite then start with Step 2.
CAUTION: To set up a multisite, you will need to make changes to your WordPress files which is risky. The slightest error could lead to a broken site. So, if you are setting up multisite on your existing website, we recommend you take a complete WordPress backup.
Step 1: Build a WordPress Website
The first thing you’ll need to do is buy a domain and a hosting plan. If you’ve never built a website on your own then the process may feel daunting but trust us, building a WordPress website is not all that difficult. There are plenty of resources that you follow.
Once your website is up and running, it’s time to convert it into a multisite environment.
Step 2: Activating Multisite Via Config File
In this step, you’ll need to upload a piece of code to your config file. You can access the config file through your hosting account or an FTP Client like Filezilla. Filezilla is a software that you’ll need to install into your local computer to use.
We’ll show you how you can edit your config file through both your hosting account and the Filezilla software.
I Access Config File Via Hosting Account
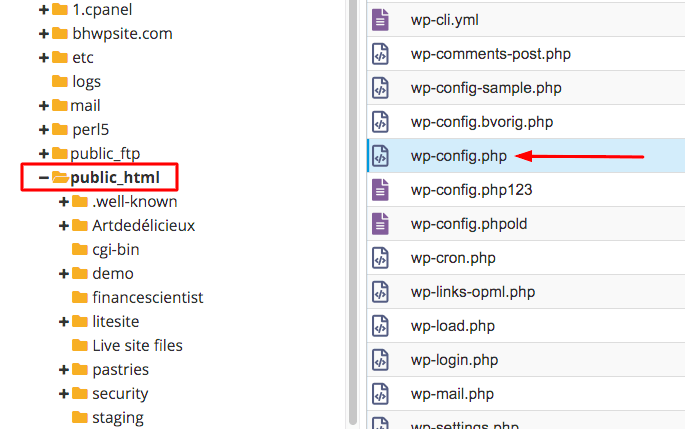
1. Log into your hosting provider’s account and then navigate to the cPanel. From the cPanel, select the File Manager.
2. From the File Manager page, select the public_html folder.
3. The wp-config.php file is present inside the public_html folder. When you find the file, just right-click and select Edit.
II Access Config File Via Filezilla
1. Download and install Filezilla into your local computer. It’s a software that’ll connect your local computer with the backend of your website. This means you can modify the config file from your computer.
2. Open FileZilla and enter your Hostname, Username, Password, and Port. If you don’t have these details, ask your hosting company for FTP credentials. You can also follow these videos to learn where your FTP credentials are stored.
3. When the connection is made, a group of folders will appear in the Remote Site section on your right. One of the folders will be the public_html folder. Select it.
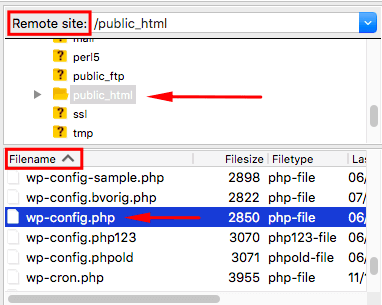
4. Right underneath the Remote Site, there’s another section called Filename. After you select the public_html folder, the wp-config.php file will appear in this section.
5. When you find the wp-config.php file, just right-click and select Edit.
III Insert Code to Allow Multisite
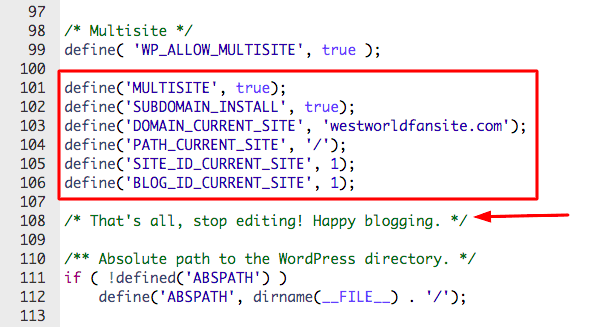
After you’ve selected edit, the wp-config.php file will pop open. Find this sentence in the config file:
/* That’s all, stop editing! Happy blogging. */
And place the following lines of code right above the ‘Happy Blogging’ sentence:
define(‘WP_ALLOW_MULTISITE’, true);
Click on Save Changes and close the file. On my website the code looks like this:

You have now converted your website to a multisite network. Go to your WordPress dashboard. In the left-hand corner, you should see a Multisite icon.

But we are only halfway through the job. The next step is to install the network.
IV Installing the Network
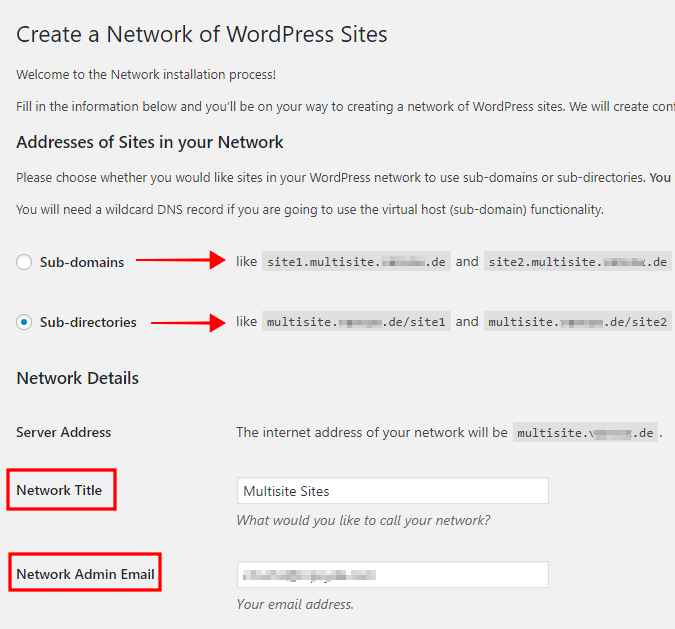
1. On your WordPress dashboard, go to Tools and select Network Setup. From here, you’ll configure the network –
(a) The first step is to decide how the URL of the subsites are going to look. You can choose between site1.example.com and example.com/site1 (i.e. subdomain or subdirectory). The selection of the URL structure will not affect how the sites are stored so there’s no need to worry about that.
(b) Next, fill in other details like Network Title and Network Admin Email and hit Install. As soon as you click on Install, WordPress will give you two snippets of codes. You’ll need to add them to the wp-config.php and .htaccess files respectively.
V Add Code to the wp-config File
Open the wp-config file using the method we showed to you in the previous section. Insert the first code snippet right above the line
/* That’s all, stop editing! Happy blogging. */
Don’t forget to hit Save Changes. On my website the code looks like this:
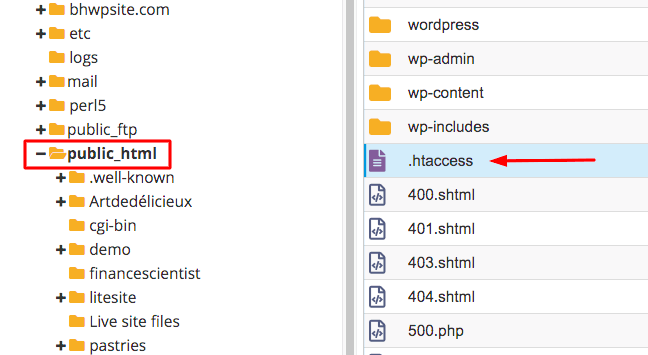
VI Add Code to the .htaccess File
In the .htaccess file, we’ll insert the second code snippet. And like the config file, you can find the .htaccess file in the File Manager or through FileZilla. To learn more about editing the .htaccess file, you can check our article.
METHOD 1 – .htaccess File in the File Manager
Log into your hosting account and then navigate to the cPanel > File Manager > public_html folder > .htaccess file. When you find the file, just right-click and select Edit.
[NOTE: If you can’t find the .htaccess file, that’s because it’s hidden. To learn how to change site settings and make the file visible, follow instructions in this article – How To Edit .htaccess File in WordPress?]
METHOD 2 – .htaccess File in FileZilla
Open Filezilla and enter your FTP credentials. If you don’t know what your FTP credentials are, then check out these videos or speak to your hosting provider.
- Then navigate to the Remote Site section
- Select the public_html folder
- After that go to the Filename section look for the .htaccess file
- When you find it, just right-click and select Edit.

When you open the file, you’ll find code that looks similar to the second code snippet. Replace the existing codes with the new codes. Don’t forget to hit Save Changes. On my website the code looks like this:
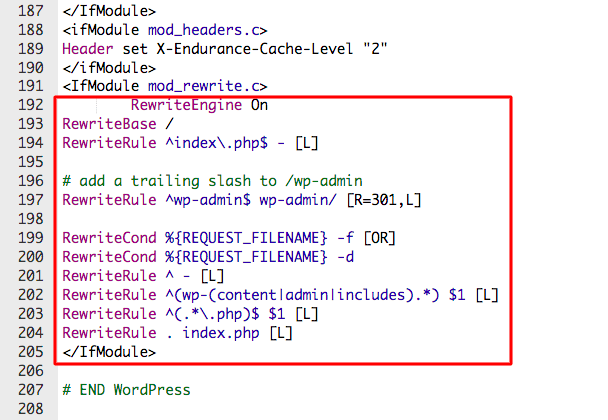
Your multisite network is ready to roll!
How to Add a New Subsite to Your Multisite Network?
Living up to its reputation of being really user-friendly, WordPress multisite is easy to operate. Site admins can add new websites or subsites by taking a few straightforward steps.
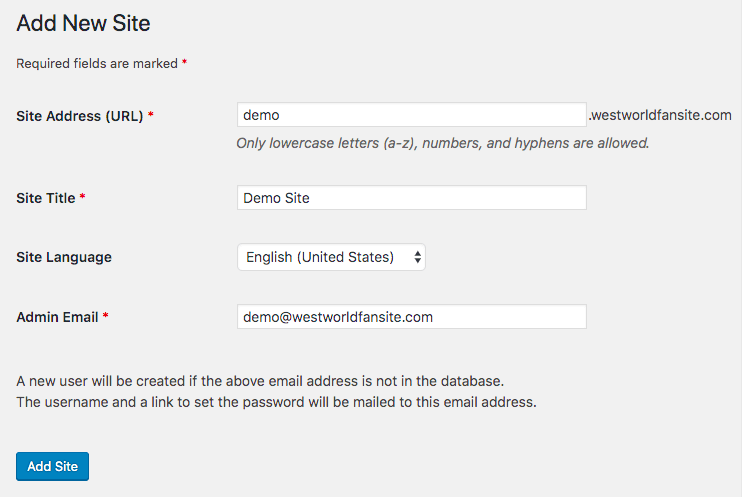
- On your WordPress dashboard select All Sites and then Add New. Enter details like desired URL, site title, website name admin email, etc (as you can see in the image below). When you are ready, click on Add Site.
- You can add as many websites as you like. And if you want to view all your subsites, then go to your Master Dashboard and select Sites > All Sites.
It’s worth mentioning here that any users who have been assigned the role of a WordPress admin will automatically become a Super Admin when the website becomes a multisite network. And a Super Admin has complete control over any site on the network.
NOTE: WordPress sites running on versions below 4.5 need to implement domain mapping. There are plugins available for this. We recommended reading Multisite Domain Mapping.
How to Install Plugins and Themes in the WordPress Multisite?
Installing themes and plugins on a multisite is easy. You install them the same way you install it on a regular site.
- From your Master Dashboard, go to Plugins > Add New and then search, install and activate plugins to your site.
- To install and set a theme, go to go to Themes > Add New and then search and add themes to your site.
The plugin and theme that you install will be activated across all the subsites. You can activate and deactivate plugins and themes at a network level. And with that, we come to the end of setting up a WordPress multisite network.
In Conclusion
Multisite WordPress is a very powerful tool for those who can utilize it. But let’s remember that WordPress is a tricky universe and hackers and bots are lurking around to damage the network of websites. Whether you’re running a single installation or a multisite, you need to make sure that you are taking security measures.
With MalCare Security Plugin by your side, you don’t have to worry about hackers, bots and the rest. Also, you can follow our WordPress security guide for more information about this.
Try MalCare Security Service Right Now!
Category:
Share it:
You may also like

MalCare Ensures Unmatched Protection Against User Registration Privilege Escalation Vulnerability
Imagine discovering that your WordPress site, which should be secure and under strict control, has suddenly become accessible to unauthorized users who have the same administrative powers as you. This…
MalCare Ensures Proactive Protection Against WP-Members XSS Vulnerability
MalCare continues to protect its customer sites from all kinds of attacks, even the ones exploiting zero-day vulnerabilities. The recent stored cross-site scripting (XSS) vulnerability found in the WP-Members Membership…
![Top 9 ManageWP Alternatives To Manage Multiple Sites Easily [Reviewed]](https://www.malcare.com/wp-content/uploads/2022/12/malcare-default-image.jpeg)
Top 9 ManageWP Alternatives To Manage Multiple Sites Easily [Reviewed]
ManageWP is a popular name in the WordPress maintenance plugins market. People love how much you get for a free plan, how easy it is to set up, and how…
How can we help you?
If you’re worried that your website has been hacked, MalCare can help you quickly fix the issue and secure your site to prevent future hacks.

My site is hacked – Help me clean it
Clean your site with MalCare’s AntiVirus solution within minutes. It will remove all malware from your complete site. Guaranteed.

Secure my WordPress Site from hackers
MalCare’s 7-Layer Security Offers Complete Protection for Your Website. 300,000+ Websites Trust MalCare for Total Defence from Attacks.


