How To Update PHP Version In WordPress? (Beginner’s Guide)
by
7-layers of Security for Your WordPress Site
Your website needs the most comprehensive security to protect it from the constant attacks it faces everyday.
PHP is a server-side scripting language that is used by web developers to create dynamic websites. WordPress, Joomla, Drupal and other popular content management systems, are all written in PHP.
When PHP was originally created in 1994, PHP stood for “Personal Home Page“. though it is now referred to as “PHP: Hypertext Preprocessor“. You can see an example of PHP code in the box below:
<?php
    echo "Welcome to the Malcare Blog!";
?>
PHP is configured on your website server and cannot be changed within the WordPress admin area. WordPress recommends website owners use PHP 7.4 or greater, though WordPress has backward compatibility all the way back to PHP 5.6.20 so you may be using an older version of PHP.
In this article, I would like to explain why you should update PHP version in WordPress and the steps you should follow before performing an upgrade. I will then show how to update PHP in WordPress and what you should review after updating.
Why Update PHP Version in WordPress
The PHP version you use for a WordPress website can influence your website’s security, performance, and compatibility.
New versions of PHP are released regularly and each release branch is supported for two years from its stable release date. Every release of PHP adds a number of improvements to the language that helps provide visitors with an improved user experience.
- Features – Major releases introduce new functions and syntax that developers can use. This allows developers to add new functions and features to WordPress themes and plugins.
- Performance – Optimisations are added to make PHP more efficient. When rendering a big template, the website PHP Benchmarks advises that PHP 7.0 is twice as fast as PHP 5.6, with PHP 8.0 improving website loading times even further. These improved page loading times will improve your website’s search engine rankings and increase incoming traffic.
- Security – Security fixes are applied to address vulnerabilities and bugs. This greatly reduces the risk of your WordPress site being hacked.
Another key factor to consider is compatibility. As new PHP versions are released, developers begin to take advantage of new functions and syntax, which means your WordPress theme and plugins may be incompatible unless you upgrade the PHP version in WordPress.
Before You Upgrade PHP Version in WordPress
To update PHP in WordPress safely, I highly recommend verifying some key information first and then creating a staging area. You can then update the PHP version that your staging area is using and check that there are no compatibility issues with the new version of PHP you have selected.
By following these recommendations, you will greatly reduce the risk of something going wrong on your live website.
1. Check PHP Version in WordPress
The first step is to check the PHP version that your WordPress website is currently using. An easy way to check this is to use the WordPress site health tool.
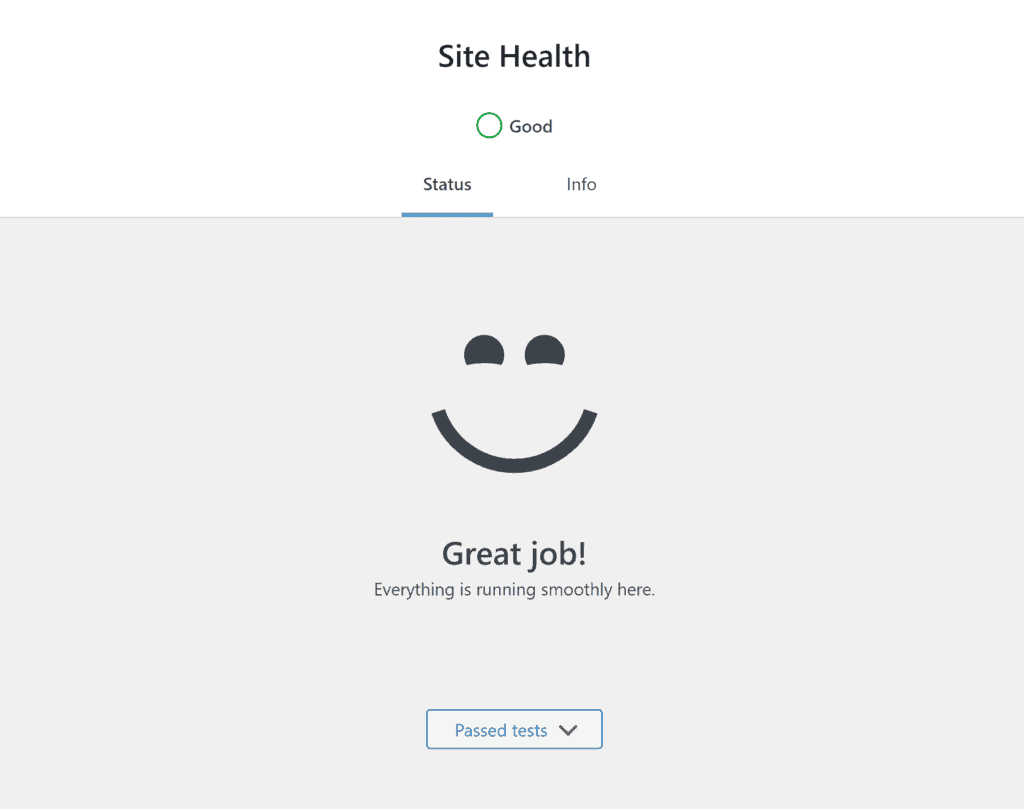
The Site Health tool can be found in the WordPress admin area under Tools. The status tab in Site Health checks a total of 19 performance and security issues such as inactive themes and plugins, HTTP requests working correctly and the WordPress core being up to date. It will also advise you if important PHP modules have not been installed.
If you pass all tests, you will be told you’re doing a great job.
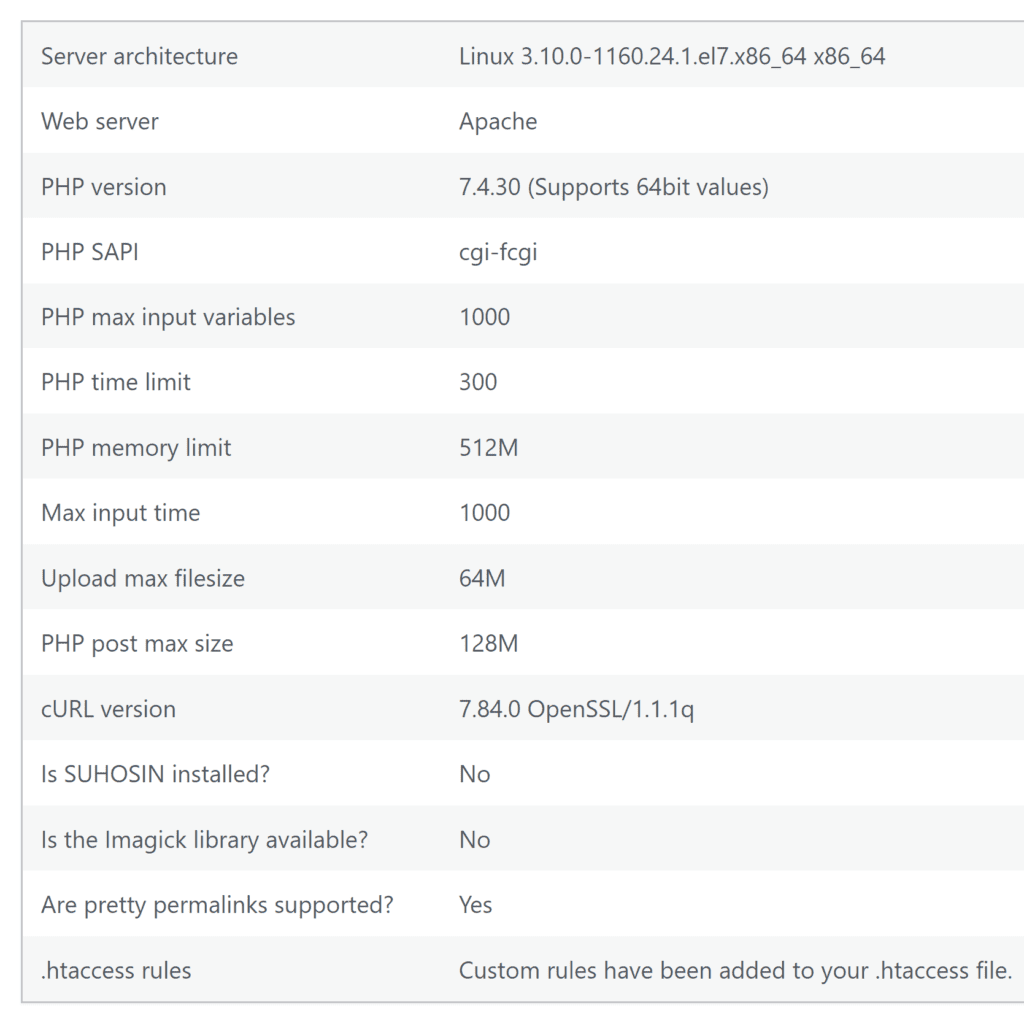
The info tab gives you a complete overview of WordPress across ten categories. Under the server category, you can view the PHP version your server is currently using.
In the screenshot below, you can see one of my WordPress websites is using PHP 7.4.30.
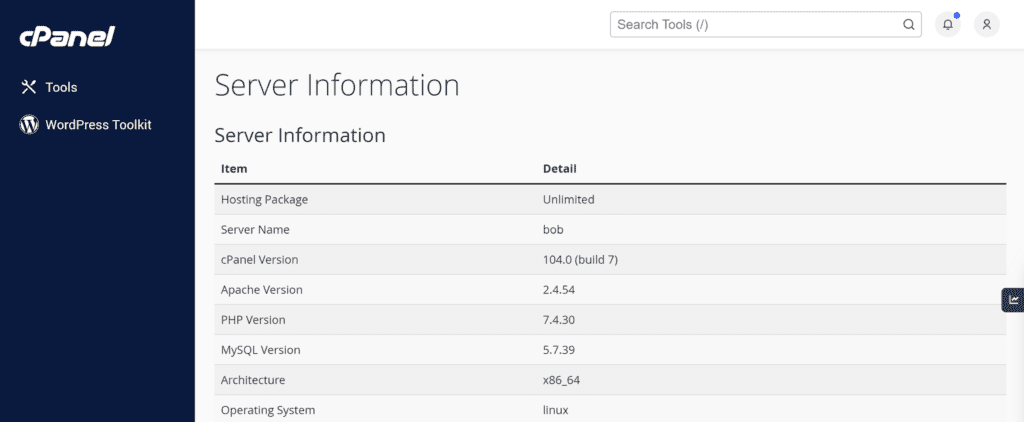
The version of PHP you are using can be confirmed from your hosting control panel too. In the popular hosting platform cPanel, for example, the PHP version can be viewed on the server information page. You will see a link to this page in the general information column.
You’ll also find your server’s PHP version in many administrative WordPress plugins and there are dedicated info plugins such as Version Info available which help you reference PHP and MySQL versions more easily.
2. Verify PHP Compatibility
Compatibility is something you need to consider whenever you change PHP on your server.
In an ideal world, we would always use the latest version of PHP so that we can take advantage of the latest PHP performance and security enhancements, though there is a higher chance your website will break if you do this.
Every new major version of PHP introduces new functions and syntax and deprecates older ones (i.e. removes them). As a website owner, you need to ensure that the PHP version you use works in harmony with the WordPress core and all installed WordPress themes and plugins. If any part of your website uses functionality that is not supported by your server’s installed PHP version, your WordPress may break.
The table below shows which versions of the WordPress core are supported by different PHP versions.
* At the time of writing, the latest WordPress version is 6.0.1.
| PHP Version | Supported WordPress Versions |
|---|---|
| 8.0 | 5.6 to Latest Version |
| 7.4 | 5.3 to Latest Version |
| 7.3 | 5.0 to Latest Version |
| 7.2 | 4.9 to Latest Version |
| 7.1 | 4.7 to Latest Version |
| 7.0 | 4.4 to Latest Version |
| 5.6 | 4.1 to Latest Version |
| 5.5 | 3.7 to 5.1 |
| 5.4 | 3.7 to 5.1 |
| 5.3 | 3.7 to 5.1 |
| 5.2 | 3.7 to 5.1 |
It is important to verify that your server supports the version of WordPress you are using, though as the WordPress core supports many older versions of PHP, it is rarely the cause of major compatibility issues.
It is more likely that a WordPress theme or plugin is incompatible, particularly if they have not been updated in more than 12 months. Unfortunately, the only practical way to detect theme and plugin compatibility issues is to create a staging area for your website, update the PHP version and then test your website (I’ll talk more about reviewing compatibility problems later).
3. Update the WordPress Core, Theme & Plugins
It is important to keep WordPress up to date to ensure your website remains secure and performs correctly. An up-to-date WordPress website is also less likely to experience compatibility issues when you update PHP so I recommend updating the WordPress core, active WordPress theme, and all active WordPress plugins.
It is also prudent to generate a backup of your website before you process these updates if you aren’t using a real-time backup solution such as BlogVault. This allows you to restore your website if the updates crash your website.
4. Backup Your WordPress Website
Once your WordPress website is up to date, I recommend backing up website. This precautionary step will give you a snapshot of your website just before you created a staging area.
Please check out my article “19 Best WordPress Backup Plugins to Keep Your Data Safe” for a list of the best WordPress backup solutions on the market.
5. Create a Staging Environment
A WordPress staging environment can be used to create a copy of your live website and store it in a private development area. This allows you to safely process WordPress updates and make other changes to your website. A staging environment is without doubt the best way of safely testing a new version of PHP.
Many hosting companies offer website staging functionality and a number of WordPress staging and backup plugins can be used to create a staging environment too.
If you’re unsure about how to create a WordPress staging website, I recommend reading my article “How To Create a Staging Site for WordPress Websites“. In the article, I show the exact steps you need to follow to create a staging website using BlogVault, WPStaging, WP Stagecoach, WP Engine, FlyWheel, and Kinsta.
Please be sure to use a WordPress staging solution that allows you to change the PHP version that is being used.
6. Update PHP in Your Staging Area
At this stage, you should have an identical copy of your WordPress website in a staging area that you have verified is working correctly. You can now change PHP version in WordPress that your staging area uses.
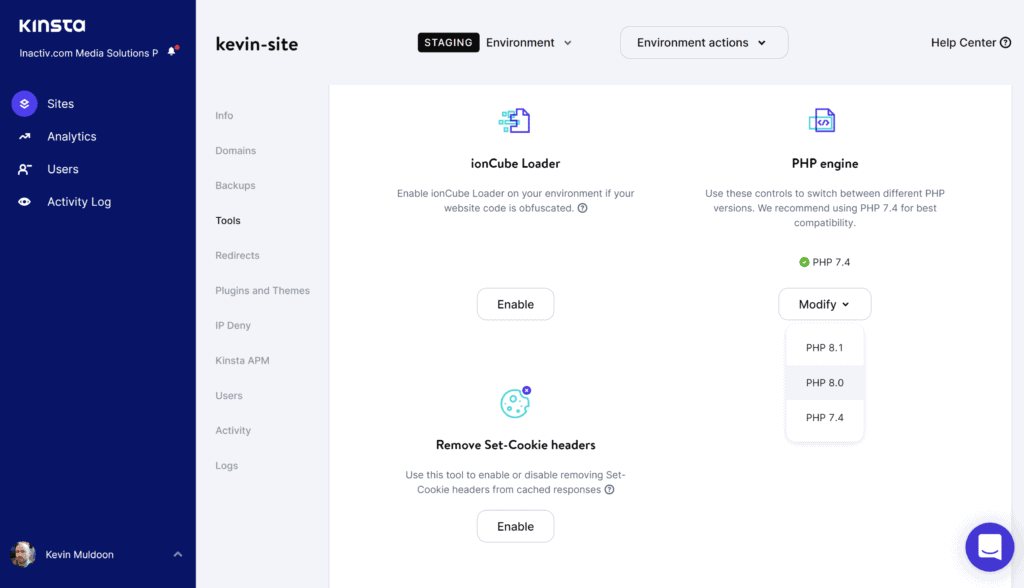
Most staging solutions allow you to change the PHP version using a dropdown menu. For example, if you use Kinsta to create your staging environment, all you have to do is go to the tools section and select the version of PHP you want to use under PHP engine. WP Engine customers can use a feature called PHP Tester that lets you test your WordPress website with different PHP versions without actually updating PHP.
WordPress recommends website owners use PHP 7.4 at least, but it is worthwhile upgrading to PHP 8.0 or above if your website is compatible.
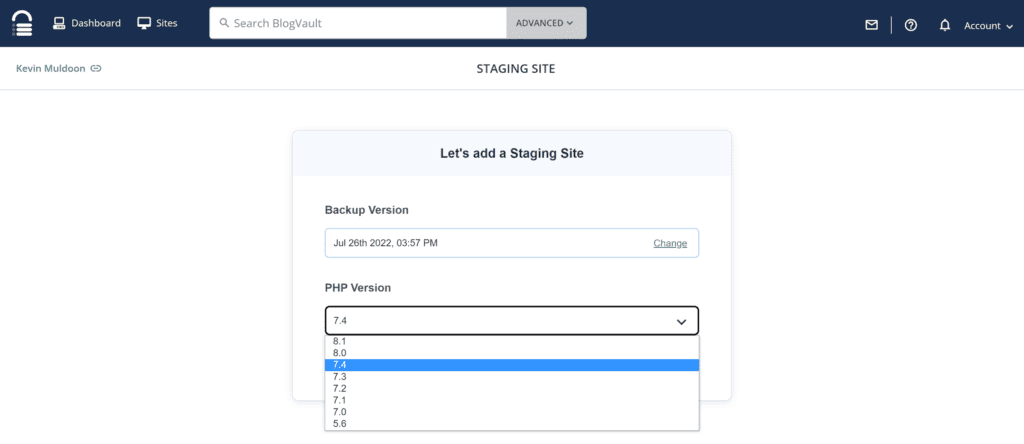
BlogVault does it a little differently from other solutions. With BlogVault, you select the PHP version you want when you create a staging area. There is no option to change a PHP version once the staging site is active, but you can easily create additional staging areas using different PHP versions if necessary.
7. Review Your Staged WordPress site
With your staged WordPress website now using a newer version of PHP, it is time to start testing.
Be sure to check every aspect of your website.
- Website Design – Does your staging website look and function exactly like it should?
- Forms & Dynamic Elements – Are forms, tools, and dynamic elements of your website still working correctly?
- Performance – Is your website loading slower or quicker than before? (GTmetrix and PageSpeed Insights are useful tools for checking this)
Testing is the most important step of updating PHP in WordPress, so take your time and check everything. You’ll thank yourself later.
If you do run into some compatibility issues, you need to do some troubleshooting to determine which WordPress theme or plugins are causing the problem. My Troubleshooting PHP Upgrade Issues section later in this article explains exactly how you can do this.
How to Update PHP in WordPress
If your staged WordPress website worked correctly after updating PHP, it is safe to update PHP in the production environment that hosts your live website.
With most hosting companies, it only takes a minute to update PHP in WordPress through your hosting control panel.
GoDaddy
The process of updating the PHP version with GoDaddy depends on whether you have a Linux, windows, or managed WordPress hosting account.
Change PHP Version in Linux
- Go to your GoDaddy Products page
- Under web hosting, select your hosting account and click Manage
- Go to the settings area in your main dashboard
- Select Server
- Go to the area that says PHP Version and select Manage
- Select the PHP version you want to change to, type ‘update‘ to confirm your choice and then click Save
Change PHP Version in Windows
- Go to your GoDaddy Products page
- Under web hosting, select your hosting account and click Manage
- Select Plesk Admin from the main dashboard
- Navigate to the domain you want to modify and select PHP Settings
- Select the version of PHP you want to use from the PHP Support menu and click OK
Change PHP Version in a Managed WordPress Account
- Go to your GoDaddy Products page
- From the My Products page, select Manage All
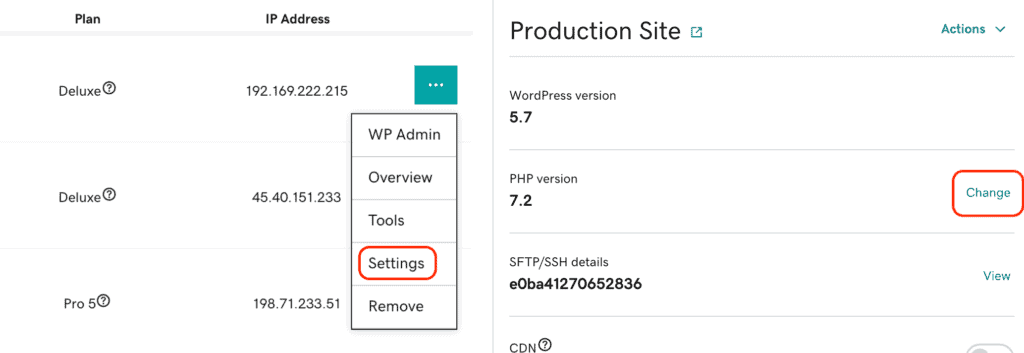
- Click on the three-dot dropdown menu (…) for the website you want to modify and select Settings
- In the Production Site area, navigate to PHP Version and click Change
- Select the PHP version you want to change to and click Save Changes
Namecheap
Namecheap offers many different types of hosting accounts. Due to this, the process of updating PHP is different for those that use shared hosting and those that have VPS and dedicated server accounts.
The company also offers a managed WordPress hosting service called EasyWP. This service uses a simplified hosting dashboard and does not allow you to update PHP directly yourself.
How to Update PHP on Shared Hosting Accounts
- Login to your cPanel hosting account
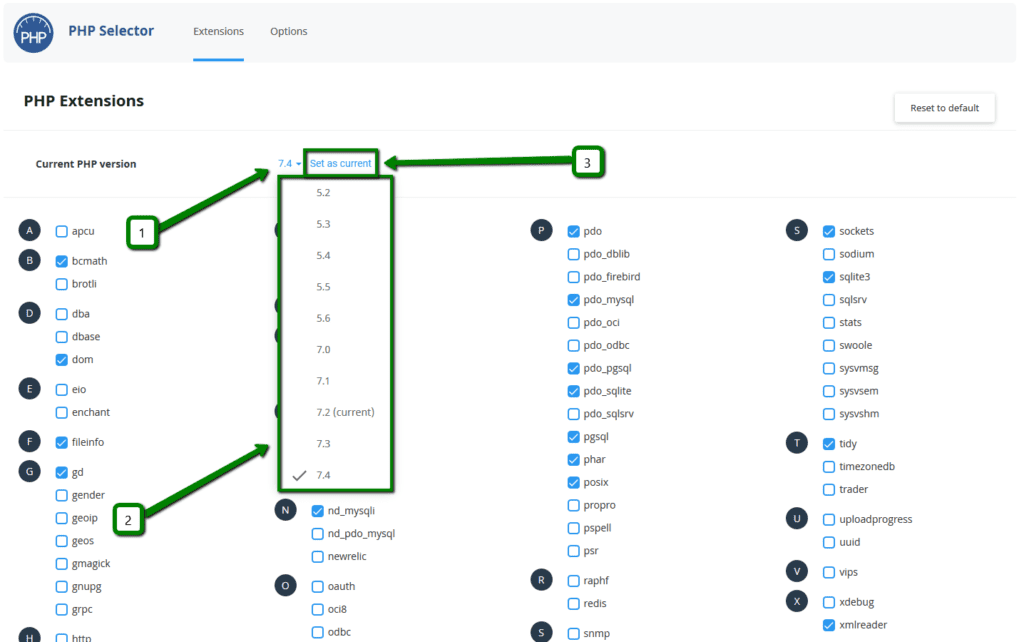
- Navigate to the Exclusive for Namecheap Customers section and click Select PHP Version
- Click on the Current PHP version dropdown menu and select the version of PHP you want to change to
- Click on Set as current to apply changes
How to Update PHP on a VPS or Dedicated Server
- Login to your WHM control panel
- Launch EasyApache from the main navigation menu
- Backup your current configuration and then click the settings cog to start customising your configuration
- Select the Apache Version you want to use
- Choose the PHP version you want to change to
- Go through the remaining steps and then click Save and build to complete the update process
BlueHost
BlueHost offers customers two different types of hosting control panels. The older hosting panel is called Legacy and the new hosting panel is called Rock. The process of updating PHP is straightforward with either type of account.
How to Update PHP in the Legacy Hosting Control Panel
- Log in to the main BlueHost control panel
- Navigate to the Hosting tab and select cPanel
- Go to the Programming section and select PHP Config
- Select the version of PHP you want to update to and click Save Change
How to Update PHP in the Rock Hosting Control Panel
- Log in to the main BlueHost control panel
- Go to the main navigation menu and select Advanced
- Navigate to the Software section and click MultiPHP Manager
- For each website you want to update, choose the PHP version you want to update to and click Apply

SiteGround
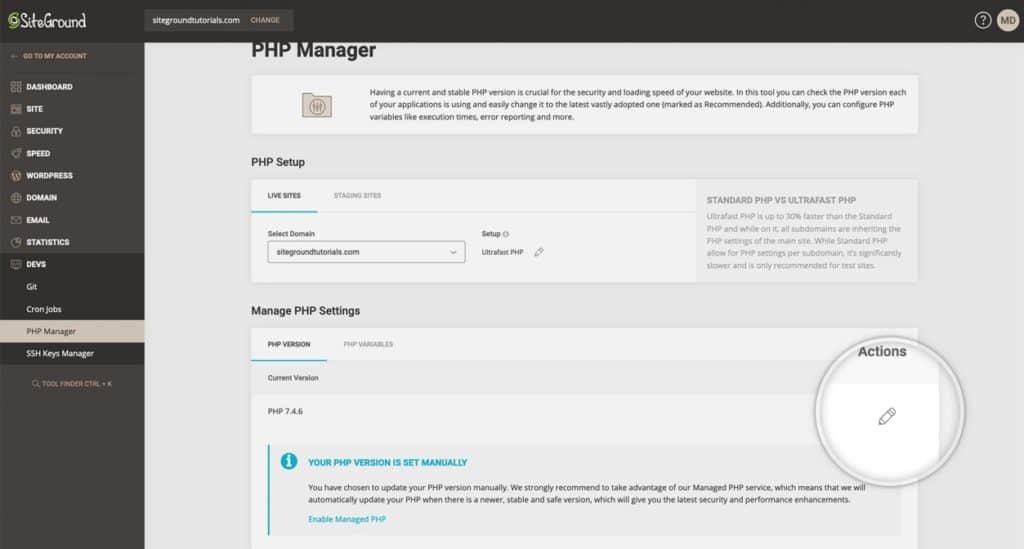
SiteGround previously used cPanel for their hosting control panel, but now offers customers a custom panel called Site Tools.
- Log in to Site Tools
- In the main menu, navigate to Devs and select PHP Manager
- In the Manage PHP Settings box, click on the edit icon and select the version of PHP you want to change to
SiteGround also offers a Managed PHP Service that automatically updates PHP to the newest and safest version of PHP. Whilst this is a useful feature, I would strongly recommend you continue to update PHP manually to avoid your live website crashing due to WordPress theme and plugin compatibility problems.
HostGator
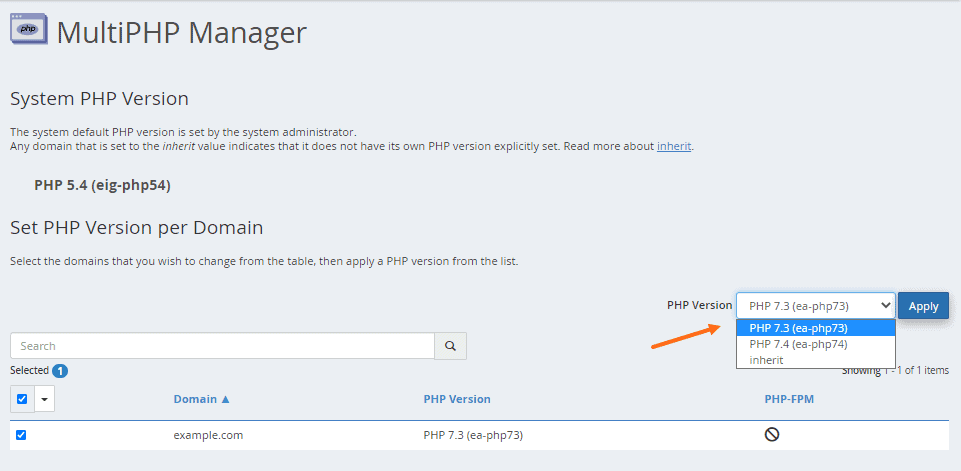
HostGator uses cPanel for their hosting control panels, therefore you need to use the MultiPHP Manager to update PHP in WordPress.
- Log in to cPanel
- Navigate to the Software section and select MultiPHP Manager
- Select all the domains you want to update PHP for
- Select the PHP Version you want from the dropdown menu and click Apply
Kinsta
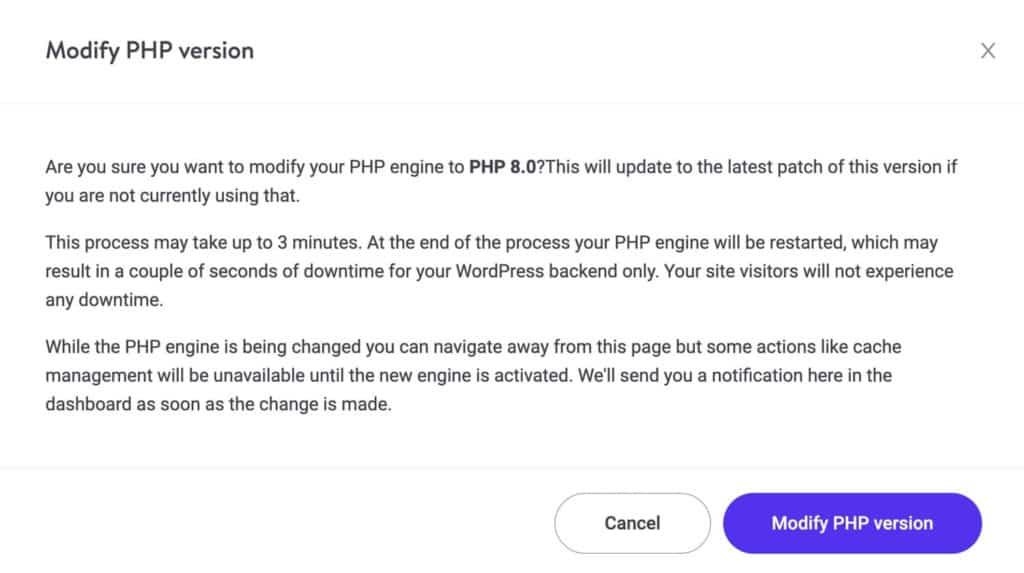
Kinsta’s custom dashboard makes it easy to update PHP in your staging environment or your live website.
- Log into your Kinsta dashboard and select Sites from the main menu
- Click on the Tools tab
- In the PHP engine section, click the Modify button and select the PHP version you want to change to
WP Engine
WP Engine allows customers to update PHP in WordPress from the overview page and the site page.
How to Update PHP on the Overview Page
- Log in to your WP Engine user portal
- Select your production environment
- In the Environment Stats section, click on the PHP Version number
- Select the PHP version you want and click Change PHP Version
How to Update PHP on the Site Page
- Log in to your WP Engine user portal
- Select your production environment
- Click on the PHP version number that is displayed next to your environment
- Select the PHP version you want and click Change PHP Version
* If you want to update PHP in your staging environment, be sure to select your staging environment at step two.

Change PHP Version in Other Hosting Environments
As you have seen from the examples above, the process of upgrading PHP in WordPress is straightforward and should only take a minute to complete.
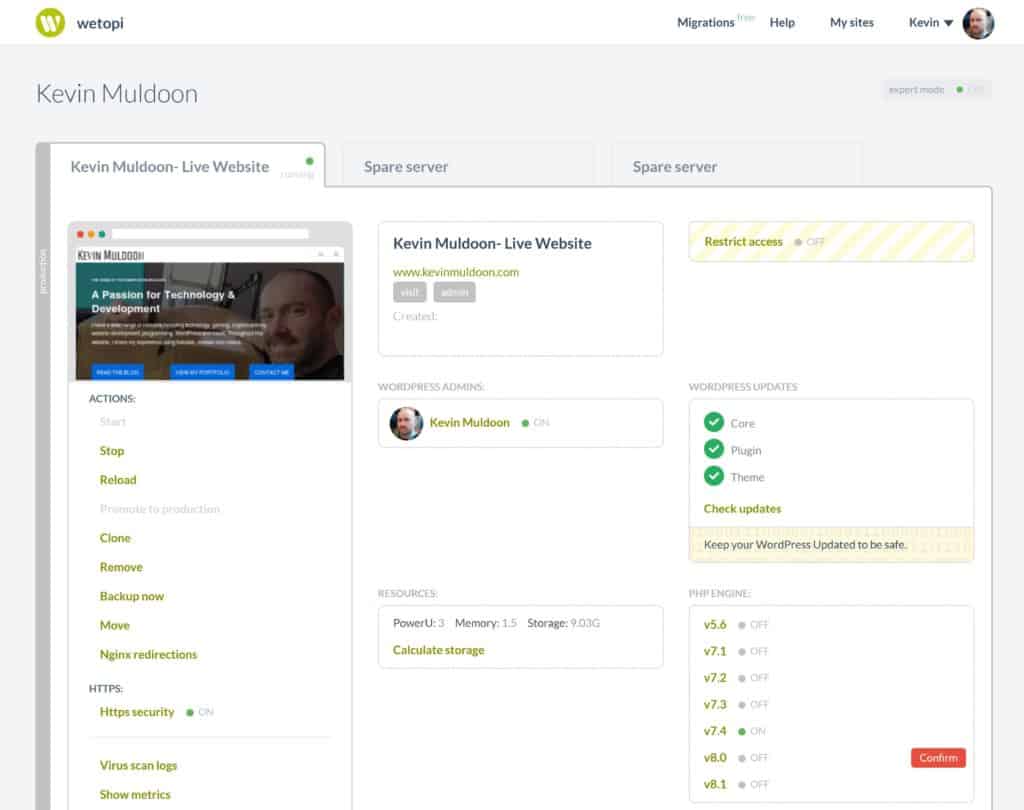
You’ll frequently find the option to update PHP in a section called Software or Tools, though hosting companies that use their own custom hosting control panel are simplifying things further. For example, my personal blog is hosted by the managed WordPress hosting company Wetopi and they allow me to change the PHP version from the main hosting dashboard.
It is important to speak to your hosting company if you cannot find the settings area to update PHP or if your hosting company restricts customers from updating PHP. Simply send them an email asking them to update your account.
Hi there.
My name is Kevin Muldoon and my account number is ABC12345. In order to ensure my website is secure and efficient, I would like to update PHP to version 8.0. Can you please process this upgrade for my account.
Kind Regards.
Kevin
An example of a support request to a hosting company
Should You Hire an Expert?
My recommendation is to always speak to your hosting company if you are unsure about how to update PHP.
If you have purchased an unmanaged VPS or dedicated server, you may not be eligible to ask your hosting company for support. In that situation, you may want to consider hiring an expert through a third-party hosting support company or a freelancing marketplace such as Freelancer or Upwork.
Hiring an experienced hosting administrator is a good short-term solution, but long term, you should not be managing a hosting environment yourself if you cannot update server software yourself.
What To Do After Updating PHP in WordPress
The important thing to do after updating the PHP version in WordPress website is to verify that everything is still functioning correctly.
If you followed my advice and updated your website’s PHP version in a staging environment, the risk of your live website experiencing problems after updating PHP is extremely low. It is, however, still prudent to test your website thoroughly to ensure there are no compatibility issues after updating.
Troubleshooting PHP Upgrade Issues
You may run into some compatibility issues when you update PHP. As the WordPress core has great support for older versions of PHP, these compatibility problems tend to arise because:
- You are using an outdated WordPress theme
- You are using outdated WordPress plugins
- You have upgraded to a new version of PHP that is not yet supported by WordPress developers
It can be difficult to determine which WordPress theme or plugins are incompatible. WP Engine’s plugin PHP Compatibility Checker was a useful tool in the past as it lets you check which PHP version WordPress themes and plugins, but the plugin has not been updated in some time and does not support the latest versions of PHP.
Unfortunately, WordPress developers do not always confirm which version of PHP their theme or plugin supports, so it’s up to you to do some detective work.
In some instances, it is obvious where the fault lies. For example, if a form or widget is not displaying properly, it is likely that the corresponding plugin does not support the newer version of PHP you installed. Troubleshooting is more difficult if you are facing WordPress’ infamous white screen of death.
If you are facing a white screen after updating PHP, follow these steps:
- Deactivate All WordPress Plugins – Deactivate all WordPress plugins from the admin area. If the admin area cannot be accessed, rename the wp-content/plugins temporarily and then change it back in order to deactivate all plugins. This can be achieved using an FTP client such as FileZilla or a file manager within your hosting control panel.
- Change Your WordPress Theme – If you are still facing a white screen after deactivating all WordPress plugins, consider switching to a default WordPress theme such as Twenty Twenty-Two to rule out your WordPress theme being the cause.
- Check Your Website’s .Htaccess File – It is worth reviewing the WordPress .htaccess file if your website is not working with any WordPress theme. Be sure to speak to your host if you are unsure of how to do this.
- Reactivate WordPress Plugins One By One – If the white screen of death disappeared after deactivating all WordPress plugins, you can detect the problematic problems using trial and error. All you have to do is reactivate WordPress plugins one by one. This will help you see which plugins are causing compatibility issues.
Don’t be alarmed if you do face PHP compatibility issues. That is, after all, why you are using a staging environment to test your PHP upgrade. With a little troubleshooting, you should be able to determine which WordPress themes and plugins are incompatible with the newer version of PHP you selected.
Final Thoughts
WordPress continues to recommend that website owners use PHP version 7.4 or greater. As such, I strongly encourage you to update PHP in WordPress if you are using version 7.3 or below. Doing so will improve your website’s speed, security, and compatibility with modern WordPress products.
The process of updating PHP in WordPress is straightforward, but PHP compatibility issues are common on WordPress websites so be sure to test any PHP update you perform in a staging environment first.
Good luck.
Kevin
Frequently Asked Questions
A list of frequently asked questions about updating PHP for a WordPress website.
Does it Really Matter Which Version of PHP I Use?
Yes, it does.
Newer versions of PHP offer more functions, better security, and enhanced performance. The version of PHP you use also affects which WordPress themes and plugins you can use on your website.
How Do I Know When it is Time to Update PHP version in WordPress?
The WordPress requirements page currently recommends PHP version 7.4 or greater. If you are using an older version of PHP, such as 5.6, 7.0, 7.1, 7.2 or 7.3, I recommend upgrading.
You may also want to consider using a newer version of PHP such as PHP 8.0 or PHP 8.1 in order to take advantage of new functionality and improved security and performance.
Do I Really Have to Test Everything in a Staging Environment First?
It only takes a minute to upgrade PHP in WordPress via your hosting control panel, but if you update PHP without testing whether it is safe to upgrade, there is a high risk that you will crash your live website.
By using a staging environment, you can review compatibility issues and safely troubleshoot any problems that arise.
What If the Theme and Plugins I Use Do Not Support the Latest Version of PHP?
Unfortunately, themes and plugins that have not been updated in a while may not support the latest version of PHP. You have a few options in this situation:
- Continue using the older version of PHP so that your preferred themes and plugins still function correctly
- Ask the developers to add support for newer PHP versions to their products
- Stop using the theme or plugins in question and find alternative solutions
I do not recommend using outdated WordPress themes and plugins. As such, if a developer will not update their product, I strongly encourage you to find an alternative solution.
What’s the Risk of Using an Unsupported Version of PHP?
Every major release of PHP is supported for two years. If you continue using a version of PHP that is unsupported, you will no longer gain access to updates that address bugs and security problems. This can make your website more vulnerable to attacks from malicious parties.
Category:
Share it:
You may also like
MalCare Ensures Unmatched Protection Against User Registration Privilege Escalation Vulnerability
Imagine discovering that your WordPress site, which should be secure and under strict control, has suddenly become accessible to unauthorized users who have the same administrative powers as you. This…

MalCare Ensures Proactive Protection Against WP-Members XSS Vulnerability
MalCare continues to protect its customer sites from all kinds of attacks, even the ones exploiting zero-day vulnerabilities. The recent stored cross-site scripting (XSS) vulnerability found in the WP-Members Membership…
![Top 9 ManageWP Alternatives To Manage Multiple Sites Easily [Reviewed]](https://www.malcare.com/wp-content/uploads/2022/12/malcare-default-image.jpeg)
Top 9 ManageWP Alternatives To Manage Multiple Sites Easily [Reviewed]
ManageWP is a popular name in the WordPress maintenance plugins market. People love how much you get for a free plan, how easy it is to set up, and how…
How can we help you?
If you’re worried that your website has been hacked, MalCare can help you quickly fix the issue and secure your site to prevent future hacks.

My site is hacked – Help me clean it
Clean your site with MalCare’s AntiVirus solution within minutes. It will remove all malware from your complete site. Guaranteed.

Secure my WordPress Site from hackers
MalCare’s 7-Layer Security Offers Complete Protection for Your Website. 300,000+ Websites Trust MalCare for Total Defence from Attacks.


