Beginner’s Guide to Using Divi Theme Builder
by
7-layers of Security for Your WordPress Site
Your website needs the most comprehensive security to protect it from the constant attacks it faces everyday.

The Divi Theme Builder is a versatile design tool that comes with the Divi theme. With it you can build a variety of different sites: a food blog, an e-commerce store, a portfolio of services, or even a calling card for your business.
The basic theme is customisable with an enormous library of templates and dynamic modules. While it is easy to use, the sheer number of options can be overwhelming at the same time. And it’s difficult to find what you need.
In this article, we’ll start at the beginning, and work our way up to using all the features. And don’t worry, there is no coding involved. It’s a beginner-friendly tutorial.
TL;DR: Divi is built by Elegant Themes, and they offer many amazing pre-designed templates that you can use to start with. If you have the pioneering spirit, you can also create templates from scratch. Whichever route you decide to use, make sure to safeguard your work with a BlogVault backup first.
Building a site can be very fulfilling, and the design process can be fun and exciting. With the rise of page builders, like Divi and Elementor, it has become much easier to pull together a site that mirrors what you want quickly and easily. Page builders are intended to be low-code solutions, and follow through with the WordPress ethos of democratising sites.
That being said, it still requires time, energy, and effort to build a site. We recommend you set up BlogVault backups on your site before starting, and make sure to take regular on-demand backups before every major change. Better still, whip up a staging site quickly, and use it to test drive changes before pushing them to your live site. With BlogVault, you can rest assured that your hard work is never lost.
With that in mind, let’s dive into the world of the Divi Theme Builder.
Getting started with Divi Theme Builder
The Divi Theme Builder is an interface within Divi that lets you customise the design of your site. To use it, you’ll need to install and activate the Divi theme first. Here are the steps to do so:
- Subscribe to Elegant Themes: You will need an Elegant Themes subscription to use the theme. They have two plans that you can choose from: an annual plan for $89 or a lifetime plan for $249. Buy the subscription you want to access your Elegant Themes account.
- Download the theme: Head over to the Downloads tab and search for Divi Theme. Click Download and you will have a zipped folder on your device with the theme.
- Upload the theme: Next, head back to your WordPress dashboard. Click Appearances in the sidebar and click Themes. Next, click Add New. Click Upload Theme and select the zipped folder from your device.
- Activate the theme: After choosing the right file, click Install Now and Activate theme when prompted.
- Authenticate the Elegant Themes subscription: The last step is to authenticate your account. In the sidebar, click Divi and Updates. Add your API keys and username, which can both be found on the Members Area of Elegant Themes.
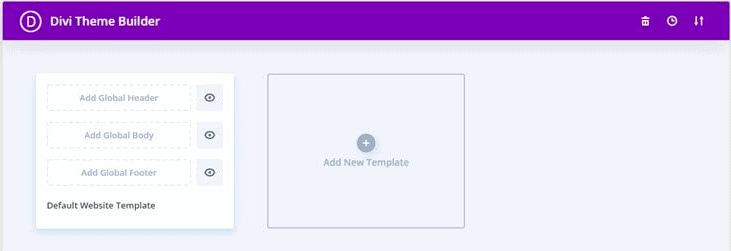
This will install the Divi theme to your WordPress site. You’ll notice Divi has been added to your sidebar. Hover over it and click Theme Builder to launch it.
Now, let’s get familiar with the Theme Builder. The Theme Builder allows you to create templates for each page on your site. Every page is divided into three parts: the header, the body, and the footer. You’ll notice that the Default Website Template section, on the top left, has the same three parts. You can customise each of those sections with the Visual Builder. Just click and you’ll be redirected to the Visual Builder.
The Visual Builder is a space where you can live edit your page or template by adding elements and customising them. You can also preview and save the page before you go live. There are a few things to note about the Visual Builder:
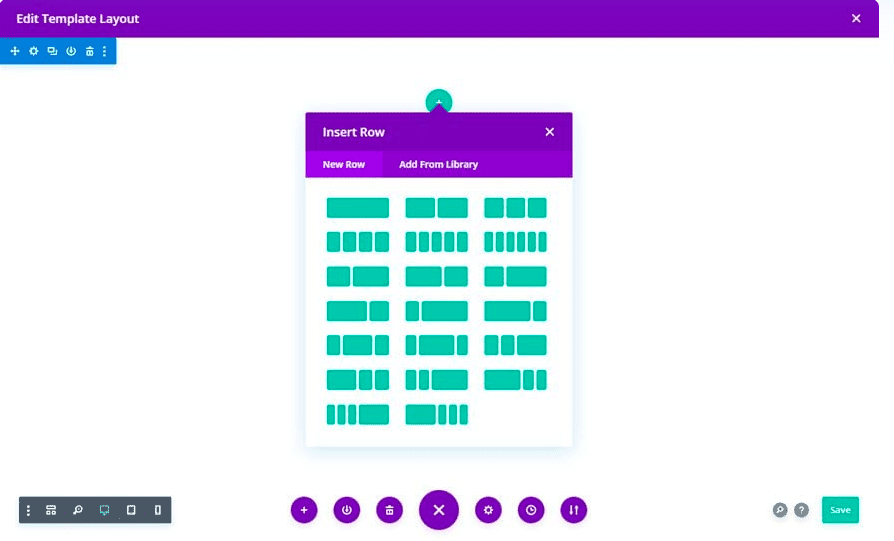
- A template is edited in rows and columns. Add a row using the + at the top and select the number of columns. We recommend you limit the number of columns to 2 or 3 per row.
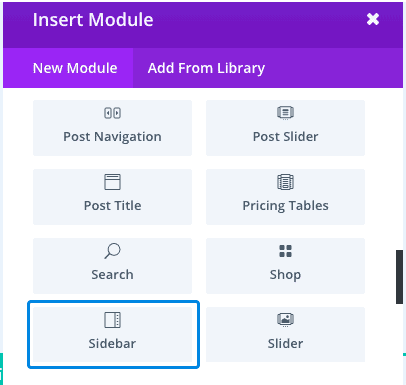
- A module is a widget or element that can be added to a column. Some commonly-used modules are text boxes or images. Only one module can go into a column in a row. Pick the number of columns in a row accordingly.
- Once you select a module, you can see its settings in the sidebar. With the text module, for example, you can change the font, colour, size, alignment, and more.
Once you’re familiar with the Visual Builder, you can go ahead and design your pages.
We recommend you play around with the Theme Builder to familiarise yourself with where everything is and how it works. Try dragging and dropping a few modules to see how they look in the layout, and check out each of the associated settings.
Customise pre-made Divi layouts
The easiest way to design a page for the first time is to edit a premade layout. It is predefined, so all the essential elements are already in place. All it needs are a few tweaks. This section is all about accessing the Divi library and using premade Divi layouts.
Full page layout
The first thing you need to do is create a new page, and then access the layout library from the Theme Builder. Once you’ve done that, you can tweak the settings.
- Add a new page: Create a new page by clicking Pages in the sidebar and Add New. Then, name the page something appropriate like Home, for example.
- Edit with the Divi Theme Builder: Click Use Divi Builder. This will prompt you to make a choice between creating a layout from scratch or using a premade template. You can then click Browse Layouts and access the library.
- Choose a template: Browse all the designs and pick one that best suits your requirements. Filter the layouts by categories to make it easier to find something that works for you. Click View Demo to see a preview and then click Use this layout. This will load the layout to your page on the Visual Builder.
- Customise the page: You can now replace the text and images and other elements with what your page requires.
Here are some great template options for the most popular pages:
- Homepage: Check out the Homepage 25+ Divi Layout Pack for great homepage template options. The designs are beautiful and minimalistic with very modern fonts and layouts.
- About page: The Divi About Us Section Pack comes with all the essentials for an about page like image, text, and social media links. It’s a great way to add important information about yourself in an eye-catching way.
- Contact page: This Free Divi Contact Pages Layout Pack comes with 5 stunning contact forms that you will absolutely love. Forms don’t have to be boring any more.
- Blog templates: This Classic Blog Layout template by Divi Cake is everything you need in a blog page. It also comes with a quick install and great support so you can build your blog page in minutes.
Pre-made header, footer, or body template
This method allows you to create beautiful pages in just a few minutes. It’s the fastest, most efficient method. But there are a myriad of customizability options you haven’t unlocked yet. So let’s start with the basics: using a premade template for only parts of your page.
This method allows you to create a page like you would solve a jigsaw puzzle: in pieces. Here are the steps to do so:
- Add a new template: Click Divi in the sidebar and then click Theme Builder. You can then click Header, Footer, or Body in the Default section. This will create templates that can be used site wide and is especially helpful for header and footer templates. Click Build From Scratch and this will open the Visual Builder where you can load a new template.
- Open template library: At the bottom of the page, you’ll see three purple dots. Click it and then click the + sign. This is the “Load from Library” button that lets you access the template library.
- Choose template: Pick your ideal template and click Use this layout. This will load it on the Visual Builder.
- Customise the template: You can then customise the size, colour, fonts or replace images, etc, using the module settings in the sidebar.
The same method can be used for saved templates. You can also open an existing page on the Visual Builder and replace existing content with a new template. To do that, click the Load from Library button, select the template and choose Replace existing content before you load it.
The number of options in the template library can be overwhelming. So let’s take a second to talk about how to choose one.
How to choose a pre-made template?
When choosing a pre-made template, there are things like cost, security, support, and aesthetic to consider. With Divi, the first three are taken care of. They have an amazing support team for any questions. They are constantly working on improving their product and you’ve already taken into consideration cost, if you’re at this step. This means that the biggest consideration is aesthetic.
Divi developers are constantly making templates for a wide variety of sites. You’ll notice that the library has a bunch of layout packs and layouts. Layout packs contain header, body, and footer options that all fit the same aesthetic. Look for ones that suit your brand and therefore require the least amount of tweaking. You can also find individual templates for headers, footers, and different types of body layouts.
In the library, you can browse all 250+ templates or choose one by using the filters in the sidebar. Each template falls into a category that fits a certain aesthetic.
Design your global elements with Divi Theme Builder
Once you’ve worked with a premade template, you get a sense of how things work with the Divi Theme Builder. As you get more proficient, you will find that any premade template is limiting. So now we’ll talk about how to build your own templates from scratch.
Create a global header
The header section of a site is typically the first thing a visitor sees. It usually has the navigation menu and site branding. It is an important part of your site, so it is good to spend some time customising it to be perfect for your brand.
In this section, we will walk you through the process of creating a global header. The global header applies to your entire site, which means every page will have it. We’ll be using the Menu module to design it.
- Open the editor: Click Add Global Header and click Build Global Header. Click Build From Scratch to open the editor.
- Add the menu: First, add a row. Then, search for the Menu module and select it. This is a unique module available specifically for Header templates.
- Customise menu settings: In the menu settings, you can decide the content and look of the menu.
- In the content tab, you can add your logo and select which menu to use. There are also boxes to check, so you can show your shopping cart and search icons.
- The design tab allows you to customise the look of the menu. You can decide on your menu alignment and dropdown menu direction in the layout section. You can also change other things like the font and size of the menu text or the size of the logo.
- Fix the menu: By default, the header isn’t fixed. This means that it will disappear when you scroll. So, head over to the wireframe view at the bottom of the sidebar. Select the section settings icon (the gear icon at the top left) for your menu. In the Advanced tab, head over to the custom CSS section. The code snippet will need to be edited to say the following:
position: fixed;
width: 100%
top: 0p
This keeps it fixed at full width and with no space between the top of your browser window and the header.
- Increase the visibility z index: We recommend you increase the Visibility Z Index. Go as high as possible. This ensures that your menu will always be visible. The z index in CSS determines the position of an element. The higher the index, the higher it is in the order of what is visible. For example, if your header’s Z index is higher than that of your blog post, if the two overlap, the header will hide the blog post.
- Save the template: In the bottom of your sidebar, click Save to make sure you don’t lose the template. You can then exit the editor. Back on the interface, make sure to save changes again. Your global header is now ready.
A global header is a site-wide header. If you want a custom header for each page, click the hamburger icon beside the global header and click Disable Global. You can then design custom headers for each page. You can have custom headers for just some pages and global headers for the others. Your site can be a fully custom experience.
Create the global footer
The next thing you’ll need is a footer. A footer is a great place to have contact information, links to top articles, social media icons, and so on. It is a catch-all for everything you want on your site, but doesn’t fit in the main navigation.
- Create a new template: Back on the Theme Builder interface, click Add a Footer and click Build from Scratch. This will open a blank canvas with the Divi editor.
- Add content: This is where you add things like your contact information, address, and other details. You can also use the Social Media Follow module to add social media icons. Edit the content in the module settings sidebar.
- Add links to other pages: We recommend you also have a list of important pages like the About page and top articles. You can use a Text module to add the text and hyperlink to the page in your module settings. Click Save when you’re done.
Should you create a global body for your site?
In most cases, you wouldn’t want a global body because each page would typically have a custom layout and type of content. But if you do, you can click Global Body and create a body template. If you want to create a new template, click Add New Template and select which pages should include the template.
Create and customise body templates with Divi Theme Builder
With the header and footer taken care of, let’s look at the body. The body will vary depending on the type of page. We’ve looked at some of the most common pages and here are the tutorials:
Blog templates
Divi has amazing dynamic content and post content modules that make creating a blog page easy. A module is a placeholder for the actual content. So, while your template may have some stock text and images, your live blog page will be decided by what you add for that specific blog post.
- Add new template: Click Add New Template and select All Blog Posts in the popup. Click Create template.
- Add a row: Click + at the top and select the row with the appropriate number of columns.
- Add modules: Here are some examples of what modules you can use to create the blog page template.
- Post Content
- Post Title
- Featured Image
- Post Author Profile Picture
- Post Author
- Post Publish Date
- Customise the module: Select the module you want to customise, and use the settings on the right to change its size, colour, or font. Save the template once you’re done.
There are other modules like Post Categories and Post Comments that you can also add to different sections of the page.
Tips to create a great blog template
- Use easy-to-read fonts for the title, the headings, and of course the content
- Choose to include or omit the author’s name and photo
- Categories make posts easy to find and create a great user experience
- Include a publish date
Product templates
This section is specifically for those of you that have WooCommerce sites. Divi has WooCommerce modules that allows you to create custom templates for e-commerce pages. The product page is the page that your customer sees when they click on a particular product to learn more about it.
- Create a new template: Click Add new template and select All product pages in the pop-up that appears. Click Create Template.
- Disable global body: If you have a global body template in place, disable it by clicking the hamburger icon beside it, and clicking Disable Global. This makes it a custom template.
- Add a row: As we mentioned earlier, the editor works in rows. So select the type of row based on what you’re looking for. This will determine where each module will go.
- Use the Woo modules: The page that appears is a blank canvas so you can use the following modules to create the page:
- Woo Images
- Woo Title
- Woo Price
- Woo Description
- Woo Add to Cart
- Woo Rating
- Woo Review
- WooCommerce Related Products
There are more modules you can include like Woo Breadcrumbs. It allows a customer to track which category the product is in. You can use other image and text modules to complete the look of the site.
- Customise modules: Play around with size, colours, fonts, and positions to build the product page you want. Save the page once you’re done.
Tips to create a great product page template
- Must have product name, category, description, and price
- Showcase customer ratings and reviews
- Must have an Add to Cart button or the ability to buy it now
- Can include a wishlist button that lets shoppers favourite a product for next time
- Can have a “Related Products” section
Category page template
A category page gives your customer or reader the opportunity to streamline the content they want to see on your site. Everything they’re interested in is in one place—whether it’s a blog of a certain genre or shoes. Here is how you do it:
- Create a blank template: Click Add New Template and select Post Categories in the popup that appears. Click Create Template when you’re done.
- Add a row: Click + at the top and select the number of columns you’d like your row.
- Add modules: These are the modules that you will need to create a categories page:
- Blog: This module comes with the in-built feature called Posts for Current Page to automatically display posts for that category.
- Post Slider: This creates a dynamic slider that creates a better user experience.
- Text: Add a text module and change the settings to make it the post/archive title type of dynamic content. This means that the title will be pulled directly from the post. You can do so by heading over to your text settings and clicking the dynamic content icon in the Body section. Then, click Post/Archive Title.
- Customise the module settings: You can play around with the size of images or text colour and font. You can also change the positions. Save once you’re done.
Tips to create a great category page template
- Requires you to have created categories for your posts or products in advance
- Can focus on the most popular post or product in the category
- Have sneak peaks of the product or blog post
404 error page template
A 404 error page implies that the server can’t find a requested page on your site. While this is a poor experience for a site visitor, many sites use a custom 404 page to steer the visitor in the right direction and flip the experience to a positive one.
- Add New Template: On the Divi Theme Builder interface, click Add New Template. Then, include only the 404 error page in the popup that appears. Click Create Template. This will create a new page template with a header, footer, and body.
- Delete global body templates: If you have a global body template set up, disable it so you can create a custom one.
- Hide footer and header: The 404 error page doesn’t need a header or footer. Click the eye icon and hide them.
- Edit the custom body: Open the custom body template and add a variation of the following text:
404
Page not found
- Get creative: You can add fun images or designs. Or change the text to be a little funny. The options are endless.
Tips for designing a great 404 error page
- The header and footer are optional elements
- The page has to mention that it’s a 404 error
- It should also explain what the error means
- It is good to include next steps the visitor should take, like reach out to customer support or go back to the homepage
How to manage your custom templates on Divi Theme Builder
The Divi Theme Builder was designed to make your site designing process easy. Creating or even customising premade templates is a great way to optimise the process. You can reuse templates across different pages, without having to create them from scratch each time.
The next step to using templates effectively is to manage them.
Here are some ways you can manage them from the Divi Theme Builder interface:
- Hide and reveal templates on your site: When you’re using the interface, you’ll notice that there is an eye icon beside each one. This hides or reveals the template. This makes it easy to edit pages.
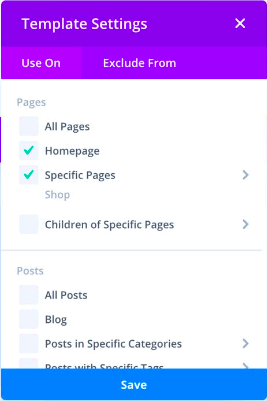
- Include or exclude template from pages: Hover over a page template and you’ll notice a gear icon pop up. Click to select on which pages to include or exclude the templates. It should be noted that the exclude settings override the include ones. So, if you’ve accidentally included and excluded the same page, it will remain excluded.
- Rename template: At the bottom of the page template section, you’ll notice the name. It’s either called default or determined by the pages it is included on. For example, if you’ve set the template for your homepage and the product page, it will be called either homepage or product page. Click the name to change it.
- Duplicate template: On the top left corner, you’ll notice two overlapping rectangles. This allows you to duplicate the entire page template: header, body, and footer.
- Export template: Beside the duplicate icon is the export icon. Click this to export your page template. This is useful if you want to duplicate these designs on a different site. A popup will appear when you choose the name.
- Import template: You can import a template by using the Portability icon at the top right. Click Import and then add the file.
- Disable template: If you click the hamburger icon besides the export icon, you reveal some options. You can not only duplicate and export again, but also disable that specific template.
- Duplicate header, body, or footer layouts: If you’d like to use a custom template that you’ve already created for a new page, you can drag and drop it to the new one.
Features of Divi and its Theme Builder
An Elegant Themes subscription comes with a lot of things that you should consider when talking about whether Divi Theme Builder is the right fit for you.
- Cost: Elegant Themes has two subscription options: a yearly one for $89 and a lifetime offer for $249. The subscription includes the Divi theme, the Theme Builder, a library of layouts, and an additional theme called Extra. It also contains the Bloom Email Opt-In plugin and the Monarch Social Sharing plugin.
- 100+ pre-designed templates: There’s a massive library of templates for you to choose from. They’re also fully customisable and responsive. Site design has never been easier.
- Ease of use: Divi is designed to build beautiful sites with no coding. Every aspect of your site design is customisable too so you have full control of your site. It will only take a few minutes to customise one of their many premade templates.
- Developer-friendly: While Divi doesn’t require coding, you can add code for further customisation.
- Import and export: You can quickly import or export a design to and from other sites. This is great for people managing multiple websites.
- WooCommerce-friendly: The Theme Builder has a wide range of WooCommerce modules for elements like add to cart, price, ratings, and reviews. Check out this article by Elegant Themes for more information.
- Great for agencies: The Divi subscription allows you to use it for an unlimited number of sites. So, it’s a great solution for those of you that manage a lot of sites at an agency.
Pros and cons of Divi Theme Builder
You now understand the features. There are a lot of benefits to using the Divi theme. But, what are some of the pros and cons?
| Pros | Cons |
| Real time edits | Slow loading for heavy videos |
| Intuitive interface | Lots of shortcodes |
| Fully responsive templates | No free version |
| Great support | No pop-up builder |
| 30-day money-back guarantee | Slow editing for larger pages |
| Regularly updated |
Alternatives to Divi
We’ve talked about the good, bad, and the ugly of Divi. If you’re unsure about Divi, here are alternative page builders you can use:
- Elementor: Elementor is an immensely popular page builder. It comes with a free version, and the pro licence is less expensive than Divi’s. It’s incredibly easy to use and works really well with WooCommerce sites. We have a few articles on the best themes and templates for WooCommerce as well as tutorials on how to use Elementor with WooCommerce.
- Beaver Builder: Another really popular page builder that prides itself on having a great support team, great software, and a helpful community of users and developers.
- SeedProd: It’s an easy to use drag-and-drop editor that also allows you to make editing a page easy. You can choose from 4 subscription plans starting from $39 for the most basic plan.
- Spectra: A new drag and drop website builder that integrates into the native block editor. It’s fast, easy to use and adds a range of useful blocks, templates, wireframes and block patterns. Spectra is designed for performance and will only load a block when it’s used on a page so you get maximum flexibility with negligible performance impact.
How to maintain your WordPress site well
Design? Taken care of. What’s next? Let’s talk about some of our recommendations on what else you need for your site.
- BlogVault: It’s a backup plugin that prioritises ease of use. It makes backing up or restoring your site a piece of cake. BlogVault also has external storage, a separate dashboard, and takes automated backups daily. It’s the best WordPress backup solution on the market.
- MalCare: There is nothing worse than losing your site to a malware attack. That’s why we recommend using a security plugin like MalCare. MalCare scans your site daily, clears it in just a few clicks, and protects your site with an advanced WordPress firewall.
- Google Analytics: The key to getting good traffic is to appease the lord of the internet: Google. Part of that regime is to understand your audience and their needs. Integrating your site with Google Analytics is a good way to get information about your audience and learn what works.
Final thoughts
Divi Theme Builder is the powerhouse of website design that you need. It’s packed with amazing modules that make it incredibly easy to build a site from scratch. It also comes with a tonne of pre-designed templates that give you something to work with. The world is your oyster…if you’re down to pay the subscription fee.
FAQs
Which is better: Elementor or Divi?
Elementor is better because it has a lot more pre-designed templates and resources, is cheaper, and has a free version. We have an article comparing the two that you can checkout,
What are some Divi alternatives?
Elementor, SeedProd, and Beaver are some alternatives to a page builder like Divi. Elementor is the most popular of those alternatives with a vast library of templates and an easy-to-use page builder.
What does the Divi Theme Builder do?
The Divi Theme Builder lets you create templates for different types of site elements. You can create templates for pages (like blogs or products) and for sections (like the header and footer). You create building blocks that make up your entire site.
How do I use the Divi Theme Builder?
Once you install Divi, hover over it in the sidebar, and click Theme Builder. Then you can select the type of template you want and either build from scratch or use one of their pre-designed templates.
What is the difference between Divi theme and the Divi Theme Builder?
The Divi theme is like any other WordPress theme. You install and activate it for a readymade site design. The Divi Theme Builder is an add-on package that allows you to create or customise templates for different pages and sections. With the Theme Builder, you can create a unique design and experience for your site.
Category:
Share it:
You may also like
Top 9 ManageWP Alternatives To Manage Multiple Sites Easily [Reviewed]
ManageWP is a popular name in the WordPress maintenance plugins market. People love how much you get for a free plan, how easy it is to set up, and how…

MalCare Proactively Defends Against Icegram Express SQL Injection Vulnerability
MalCare’s recent data has revealed numerous attempts to exploit a newly found SQL injection vulnerability in the Icegram Express plugin. Attackers commonly use this sophisticated SQL injection technique to extract…
Atomic Security’s Deep WordPress Integration Helps Protect Against Core XSS Vulnerability
The recent WordPress core vulnerability is a critical one, primarily because of two reasons. Firstly, it affects the WordPress core itself, which means that every WordPress site is vulnerable to…
How can we help you?
If you’re worried that your website has been hacked, MalCare can help you quickly fix the issue and secure your site to prevent future hacks.

My site is hacked – Help me clean it
Clean your site with MalCare’s AntiVirus solution within minutes. It will remove all malware from your complete site. Guaranteed.

Secure my WordPress Site from hackers
MalCare’s 7-Layer Security Offers Complete Protection for Your Website. 300,000+ Websites Trust MalCare for Total Defence from Attacks.


