How To Fix ‘503 Service Temporarily Unavailable’ Error?
by
7-layers of Security for Your WordPress Site
Your website needs the most comprehensive security to protect it from the constant attacks it faces everyday.
When your website is up and running, it can draw hundreds of thousands of visitors.
The more visitors you can draw, the more revenue you will collect.
But your website is throwing a 503 error and you don’t know what to do. Visitors are leaving. SEO is impacted. Revenue is dipping.
However, all is not lost. You can get your website up and running in no time.
Over the years, we have successfully helped many websites fix the ‘503 service temporarily unavailable’ error.
We will show you the exact steps you need to take, to remove this error from your site. And you’ll also learn how you can prevent the error from occurring again.
What Does 503 Service Temporarily Unavailable Mean?
Long answer short: Server overload causes your website to throw the 503 Server Temporarily Unavailable Error.
A server is where your websites are hosted. Think of it as a plot of land on which your house is built. If the house is heavy and the land underneath marshy, your home will collapse like a deck of cards.
Likewise, if you’ve built your site on a server that can’t handle the activities like a spike in traffic, it’ll throw an error.
This begs a question – your site was fine so far; so why can’t the server handle your activities now?
Let’s look at the possible reasons why your server could become overloaded:
- Updating or installing a plugin or theme, or even the core
- A sudden spike in traffic
- A misbehaving custom code snippet
1. Updating Or Installing A Plugin, Theme, or Core
When you are updating or installing plugins, themes, or core into your WordPress website, you are essentially asking your server to perform a task. If your server is already up to its neck with other tasks, it’ll become overwhelmed and stop responding. It’ll throw a 503 error.
2. A Sudden Spike In Traffic
The server can also throw an error if your site starts receiving way more traffic than it normally does. Perhaps someone mentioned your site somewhere and therefore people are flocking to your site. Or your website is under a certain type of hack attack called DDoS. In this type of attack, hackers send over fake traffic to your site to try and overwhelm your website.
Normally, every time a visitor comes to your site and opens a page, your server kicks into action and serves the page to the visitor’s browser. But if the server is overloaded with tasks, then serving a page to a visitor becomes challenging. It will take a while for the page to load. As a result, your visitors will experience a slow website.
When too many visitors land on the site simultaneously, the server becomes overwhelmed and throws the http 503 error.
3. Misbehaving Custom Code Snippet
Custom codes help you design a website in whatever way you want. But using a wrong custom code can throw a ‘503 Service Temporarily Unavailable’ error.
When you add custom code to your site, you are asking your server to present the data on your site in a certain manner. If the code is wrong, you are giving out wrong instructions. As the server tries to make sense of the code snippet, it becomes overwhelmed and throws an error.
How To Fix The ‘503 Service Temporarily Unavailable’ Error?
The 503 error can show up in a lot of different ways. Some of the 503 error variations are as follows:
- HTTP Error 503
- HTTP Server Error 503
- 503 Service Unavailable
- Error 503 Service Unavailable WordPress
- 503 Service Temporarily Unavailable WordPress
- Error 503 Maximum threads for service reached
- The server is temporarily unable to service your request due to maintenance downtime or capacity problems. Please try again later.
No matter what the error message is, the fix is the same.
Knowing the cause makes finding a solution easy. If you know what caused the error, go straight to the appropriate solution.
For instance, if an error appears just as you were installing a new plugin, then the plugin is the culprit. Jump straight to where we show you how to deactivate a plugin, even when you can’t access the admin dashboard.
If you don’t know what caused the error, start with this section.
If You Know The Cause Of the Error
1. Rollback The Update That Caused The Error
If you began experiencing the error, right after updating a plugin, a theme, or the core, then the update is causing the error.
If you have access to the admin dashboard, all you need to do is roll back the software to its previous version.
Install and activate the WP Rollback plugin. It’ll help you downgrade any plugin or theme to a previous version. To rollback the core, use the WP Downgrade plugin.
If you don’t have access to your admin dashboard, you need to roll back the update manually. This requires you to go to the backend and access your WordPress files. The following guides will help you do just that.
Please ensure that you are following the manual methods, not the ones where plugins are involved. You can’t install the plugins, remember?
After downgrading, open the site and check whether the error is gone. If not, then clear your cache and check again. If the problem persists, updates aren’t causing the error. Let’s figure out what is causing the error by jumping to this section.
2. Deactivate The Plugin or Theme That Caused The Error
If the error appeared right after you activated a new plugin or theme, then you need to deactivate it.
If you have access to the WordPress dashboard, deactivation is easy. It’s a matter of going to:
→ Plugins > Installed Plugins > Then clicking on the Deactivate button that appears right below the plugin, or
→ Appearance > Themes > Click on the Theme and then select Delete.
If the theme is active, then you need to activate a different theme on your site. And then proceed to delete the previously active theme.
But if you don’t have access to the site, then you need to manually deactivate the plugin and theme. Here’s how:
Step 1: Download and install Filezilla on your local computer. Open it and connect it to your website with FTP credentials.
If you don’t have your FTP credentials, then this guide and these videos will help you fetch them.
And if you have never used Filezilla before, and you are not quite sure how to use FTP credentials to connect to Filezilla, follow this video.

Step 2: Once the connection is established, the Remote site panel will start populating with folders. Using the panel, navigate to –
- public_html > wp-content > plugins
- public_html > wp-content > themes
If you click on the folders, you should be able to see all the plugins and themes installed on your site. Navigate to the one you want to deactivate, and take the following steps:
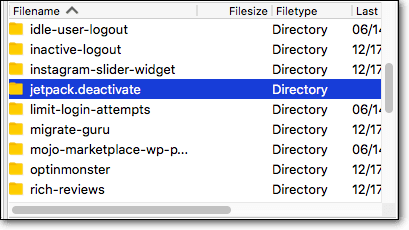
→ Right-click on plugin or theme and select the option Rename.
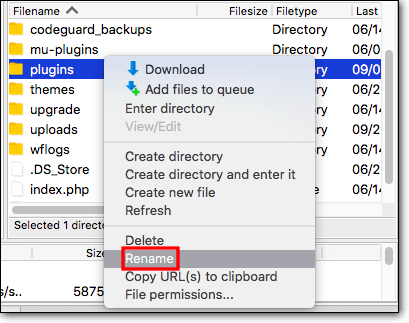
→ Add the text ‘.deactivate’ to the name of the software. Close the window. The software will be deactivated.
→ Now check your website to see if the error is gone. If not, then clear your cache and check again. If the problem persists, try out the solutions from the next section.
If You Don’t Know The Cause
1. Take Measures To Handle Spikes In Traffic
The ‘503 Service Temporarily Unavailable’ error could be caused by an onslaught of traffic on your site.
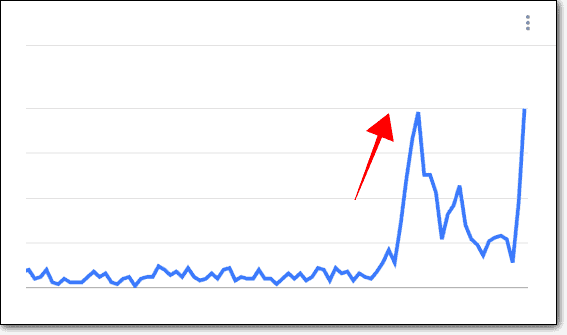
Check Google Analytics to see if your site is getting more traffic than it normally does. If it is then that’s the cause of the error.
Question is: Why is there a sudden spike in traffic?
> Hosting A Discount or Giveaway
Have you hosted some kind of a giveaway or irresistible discount which is attracting lots of people? Perhaps your website is experiencing a sudden surge in popularity due to a media mention, etc.
That’s great! But your server is letting you down here. To leverage this uptick in visitors, upgrade your hosting plan. A better server with more resources should be able to handle the traffic.
> DDoS & Brute Force Attacks
There are different types of hack attacks. In DDoS attacks, hackers send fake traffic to overwhelm your server which causes your site to shut down and throw the 503 error.
Generally, DDoS attacks are carried out to bring down big brands. But hackers also target smaller sites to extract a ransom. Only after the site owners pay up, do they stop the traffic. It’s worth checking if you have received a ransom email. That will help establish whether you are experiencing a DDoS attack.
To mitigate DDoS attacks, you’ll need this guide – How to Stop DDoS Attacks
Another reason you could be that hackers are trying to gain entry into your website. They have launched several requests on your login page to try different combinations of username and password, and thus caused the spike in traffic. This is called a brute force attack.
Learn how to prevent brute force attacks with this guide – WordPress brute force.
2. Deactivate Plugins & Themes One By One
The error could be a result of a plugin or theme. Generally, a plugin or theme will not cause an issue out of the blue. It’s only when you update them, or add a brand new plugin or theme, on your site that you face this type of issue.
If you have an activity log, you can figure out if someone installed new software or an updated one.
If you don’t, then deactivate all plugins and themes to check if they are the culprit.
You can’t access the WordPress admin area so you need to go to the backend of the site. The steps you need to take are:
> Disabling The Plugins
Step 1: Download and install Filezilla on your local computer. connect it to your website with FTP credentials.
If you don’t have your FTP credentials with you, then this guide and these videos will help you fetch them.
And if you have never used Filezilla and you are not quite sure of how to use the FTP credentials to connect to Filezilla, follow the instructions in this video.
Step 2: Once the connection is established, the Remote site panel will start populating. In that panel, navigate to –
- public_html > wp-content > plugins
Right-click on the plugins folder and select Rename. Rename the folder to plugins.deactivate. This will disable all the plugins on your site.
Step 3: Now go back to your site to check whether it’s still throwing the ‘503 error WordPress’. If it is, then clear your cache and check again.
If the issue persists then move on to the next solution, i.e. disabling themes.
But if the issue is solved, then we recommend that you figure out which plugin was at fault.
Step 4: Go back to the plugins folder and rename it back to plugins.
Step 5: Now open the folder and rename the first plugin. Just add ‘.deactivate’ to the name of the plugin.
Go back, and check your website. Was this the plugin causing the error? If not, keep renaming the plugins. At some point, the error will be gone. The plugin you renamed last was the one causing the error. To make sure you don’t encounter the error again, you may want to delete the plugin, look for a replacement, or if you can’t do without the plugin, write into their support.
Ensure that you rename the rest of the plugins to their original names, otherwise, they won’t work.
> Disabling The Themes
After ruling out the plugins, check the themes. The debugging process with themes is different from what you did with the plugins. Disabling all themes will leave your site without a theme, and will cause your site to throw an error: “ERROR: The themes directory is either empty or doesn’t exist. Please check your installation.”
So here’s what we are going to do:
- We’ll activate a default WordPress theme on your site
- Disable the previously active theme
- Restore the previously active theme
- Disable all other themes from your site
Step 1: Activate A Default WordPress Theme
→ Login in to your hosting account
From your cPanel, open PHPMyAdmin.
→ Select the wp_options table.
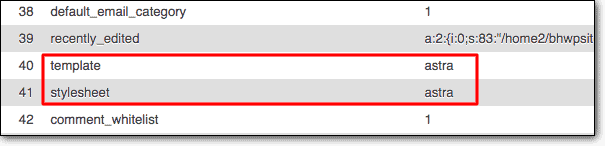
Look for template & stylesheet. It’ll show you the currently active theme of the site. Note down the exact spelling and casing of the theme, as you will need it later. In the image below, it is ‘astra’.
→ Next, you need to make a WordPress default theme as the current theme of the site. Double-click on template and change the theme to twentytwenty. Then double-click on stylesheet and change the theme to twentytwenty.

Step 2: Disable The Previously Active Theme
→ Now, open Filezilla.
And go to public_html > wp-content > themes. The theme folder will contain the previously active theme. Disable it by renaming it to something like themename.deactivate.
Now open your website and check if it’s still throwing the error. If it is, that means the previously active theme is not the culprit.
Step 3: Activate Previous Theme
→ Head over to PHPMyAdmin and rename the theme in the template & stylesheet section. Ensure that the name is exactly like you copied. Do not make any changes to the spelling or casing.
Step 4: Deactivate All Theme One By One
→ To find out which theme is the culprit, you need to disable one theme at a time. From Filezilla, start renaming each theme and checking your website.
Remember not to disable the active theme. We’ve already checked that.
If none of the themes are the cause of the error, then move on to the next solution.
3. Talk To Your Hosting Provider
Your hosting provider has allocated space on one of their servers. Based on your plan, there is an upper limit to the server resources your website can use. If your website needs more resources than the current plan allows, you will need to upgrade to a higher plan.
If you are hosting your site on a shared hosting environment, then it’s possible that the problem could lie with other websites on your server. They could be hogging all the resources from your server, leaving very little for you to work with. Your website is not getting its share of resources.
Another possible reason for the error is that your server is undergoing maintenance updates. Most hosting providers email you a day or two in advance, before taking the server down. It’s worth checking your email account, including the spam folder for these updates.
You need to talk to your hosting provider to learn what’s happening. Try ruling out causes like server updates and other sites hogging resources. If you need to upgrade your hosting plan, do that.
4. Limit the WordPress ‘Heartbeat’ API
The Heartbeat API enables 3 functions on your WordPress site:
1. Auto-save Posts & Pages: If you are working on a post or page and your browser crashes or you accidentally close the browser, WordPress will automatically save the latest version of your work.
2. Display Real-Time Data: E-commerce websites use plugins to display real-time data on the dashboard. This API enables them to do that.
3. Prevent Multiple Simultaneous Edits: On websites with multiple authors, you don’t want the same posts being edited by multiple people at the same time. If you are editing a post, the Heartbeat API locks it down and prevents anyone else from accessing it till you are done with it.
The API utilizes your server resources to carry out all of the functions we mentioned above. But too many requests from the API can overwhelm the server. As a result, the server throws a 503 Service Temporarily Unavailable.
Let’s find out if the API is causing the error.
Step 1: Open Filezilla. And navigate to public_htm > wp-content > Themes.
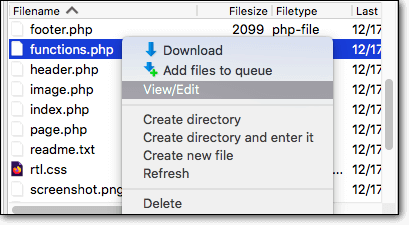
Step 2: Next, open the active theme and look for the function.php file. When you find it, right-click and select the view/edit option.
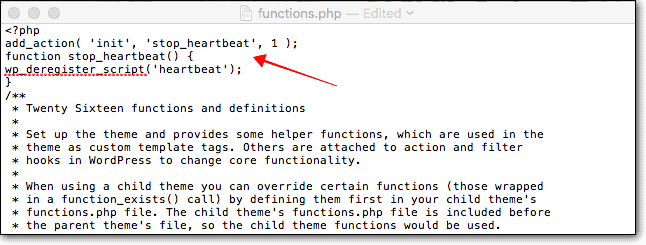
Step 3: Add the following code snippet into the file –
add_action( 'init', 'stop_heartbeat', 1 );
function stop_heartbeat() {
wp_deregister_script('heartbeat');
}
Save the files and exit.
Step 4: Check whether your website is still throwing the error.
If it is, the API is not the culprit. Go back to the function.php file and delete the code you just added. Don’t forget to save the file.
But if the error is gone, the API was causing it. Congratulations on finding the cause!
That being said, disabling the API permanently is not a good idea, because it enables some pretty important functions. However, you can reduce the number of times the API interacts with the server. Here’s how:
Step 1: Install the Heartbeat Control plugin.
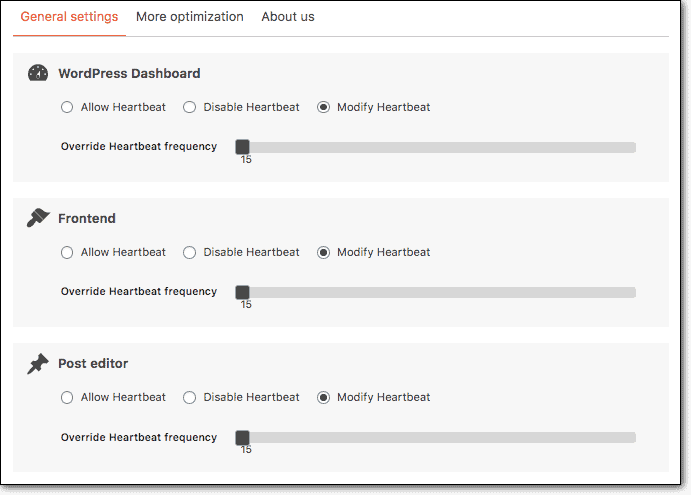
Step 2: On your dashboard, navigate to General Settings > Heartbeat Control.
Step 3: There are 3 options: WordPress Dashboard, Frontend, & Post editor Select. Select Modify Heartbeat for all 3 options and then reduce the frequency to the lowest.
Step 4: Now, open the function.php file and delete the code snippet.
That’s it, folks.
5. Talk to Your CDN Providers
On rare occasions, CDNs can cause 503 errors. This happens when there is a connectivity error between the CDN server and your website. If none of the solutions above worked for you, then chances are it’s a CDN issue.
Reach out to your CDN support and tell them that you have ruled out every other possibility. Keep your CDN credentials ready. You’ll need it when speaking to the support personnel.
That’s all folks. We are confident that one of the above solutions will help you get rid of the error.
But there’s no guarantee that it won’t occur again. The 503 error can spell disaster for your site. In the next section, we will quickly cover all the things that you stand to lose because of the error, and what can you do to protect your site from this error in the future.
Impact Of The 503 Service Temporarily Unavailable Error On Your Site
If the 503 error persists for a long time, it can have the following impact on your website:
- Visitors start bouncing off of your website. This will be noticed by search engines like Google. Google will conclude that your website is not meeting user expectations and lower your SERP rankings.
- Once ranking takes a hit, it will have a ripple effect. First, your traffic will decline, revenue collection will dip, then your monthly income will be affected. This is bad news for those of you who rely on their website to generate income.
- Even if you don’t rely solely on your site for income, your SEO effort will be squandered. All the time, effort, and money you’ve invested in building your website will have gone to waste.
- Your brand reputation will also be hampered.
Luckily this will happen only when the issue isn’t resolved instantly.
It’s best not to wait for the error to occur again and take preventive measures.
Install BlogVault Backup Plugin NOW, and rest easy knowing your site is safe.
Protect Your Site From The 503 Error In The Future
There are a couple of things you can do to prevent the error from occurring in the future. But before we get into those, we strongly recommend setting up a backup service that takes a complete backup of your website every day.
At times of crisis like this one, a backup is your safety net. You can quickly restore your site to normal and investigate the error later.
Backups are valuable, only when they are taken on a regular basis. Otherwise, you may have to restore an old backup and lose all the modifications made on your site after that.
Check out BlogVault’s WordPress Backup Service. It backs up your entire website automatically every day. Yes, every day. So at any given point, you stand to lose only one day’s work at the most. And it helps you restore your site within a few seconds.
Moving on…
1. Update or Add New Plugins & Themes On a Staging Site
As we’ve seen, updates or the addition of themes and plugins are one of the biggest reasons why the error occurs.
You can’t stop updating or trying out new plugins and themes, but you sure can be careful.
How?
Try using a staging site.
It’s an exact replica of your live site. Here’s how you can create one:
a. Install and activate BlogVault on your WordPress website.
b. Add your site to the BlogVault dashboard. And it will start taking a backup of your complete website.
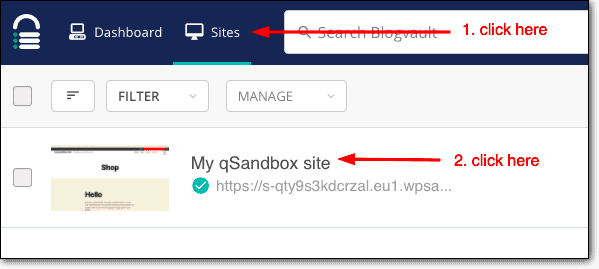
c. When the backup process is complete, on your BlogVault dashboard, click on Sites and then select your website.
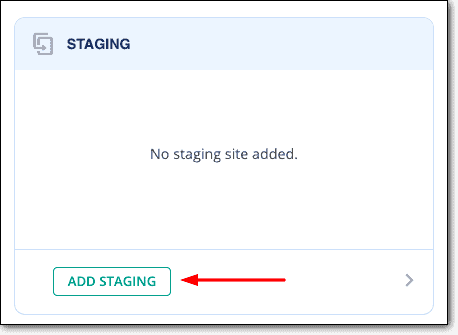
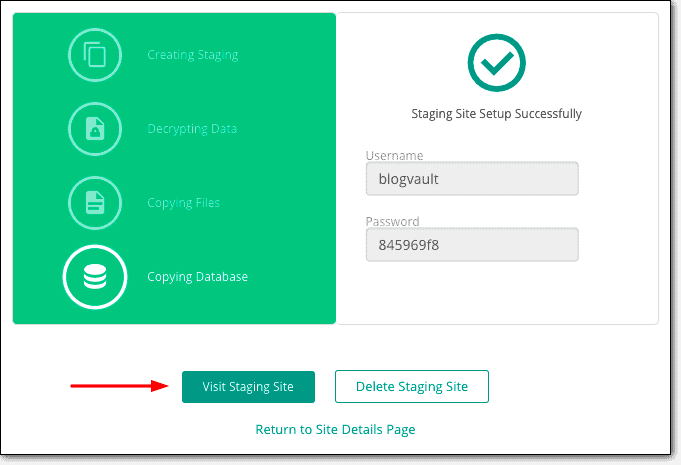
d. On the next page, scroll down to the Staging section and select Add Staging > Submit. BlogVault will start creating a staging site for you.
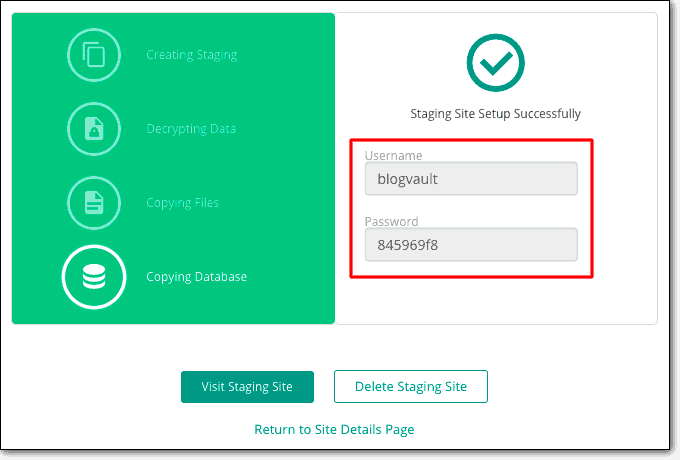
e. When the staging site is ready, you will be given a username and password. Note down the credentials, you’ll need them.
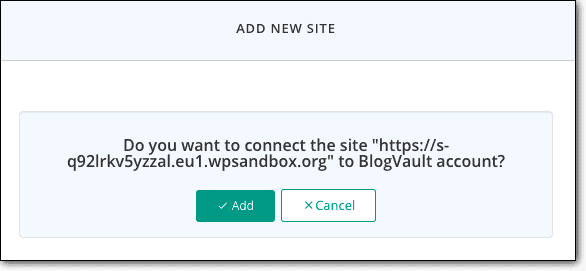
f. Now, open the staging site by clicking on the Visit Staging Site button.
g. The staging site will open in a new tab and you will be asked to enter the credentials.
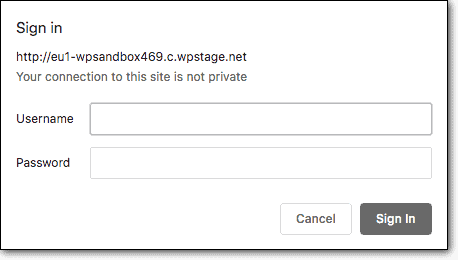
h. You will now be able to access your staging site. Just add /wp-admin/ at the end of your URL to open the login page. And login via the same credentials you use to log into your actual site.

The staging site has all the plugins and themes present on your original site.
Update or add themes and plugins.
If all goes well on staging, you can carry out updates and additions to the actual site. If an error occurs on the staging, it doesn’t affect your original site. Use the steps listed above to troubleshoot the staging site, just as you would with a live website, to find the cause and fix the issue.
After checking the themes and plugins on your staging site, you can merge your staging site with the original site, instead of updating or adding manually. Follow this guide: Merging Staging Site With Original Site.
2. Use a Firewall to Prevent DDoS Attacks
Firewalls help protect websites against DDoS attacks. But not all types of firewalls are effective in this type of attack. You need one that is cloud-based.
A cloud-based firewall sits between your website and the traffic. All incoming traffic is intercepted by the cloud firewall. It investigates traffic requests. If it finds that a request is a malicious one, then that traffic is blocked.
Therefore, when there is a DDoS attack, bad traffic hits the firewall before reaching the site. The firewall bears the burden of attack. Your website is left unharmed.
We’ve compiled a list of the best WordPress firewalls. Pick one to protect your website against DDoS attacks.
3. Upgrade To A Better Hosting Plan
Server overloading is the main cause behind the 503 error. Maybe you are experiencing more traffic which is great. You need a server with more resources to be able to serve all your visitors. You will need to upgrade to a higher hosting plan.
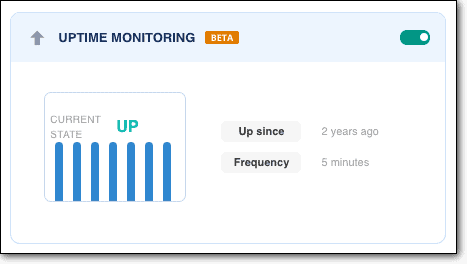
That said, let us ask you something – Is your site down often? Check your uptime monitoring tool for accurate data.
If your hosting server is often down for one reason or another, then you need to move to a better hosting service.
There are plenty of hosting services advertising great plans at low prices, but they often fail to deliver. We’ve compiled a list of the best WordPress hosting providers.
And once you’ve made the decision to switch, this guide will help you migrate: How to Migrate WordPress Site?
Pro Tip: If you are using BlogVault for backup and staging, then you can use the same tool for monitoring uptime as well.
What Next?
Errors are a part and parcel of managing a website. Don’t let them get the better of you. Our tutorials will help you overcome them all.
We have compiled a list of the common WordPress errors and their fixes. Bookmark this article and return to it when you need it: WordPress Troubleshooting Guide.
Category:
Share it:
You may also like
How to Fix the Deceptive Site Ahead Warning on Your WordPress Site
When Google shows a Deceptive Site Ahead warning to a site visitor, it means they think your website might be harmful due to malware, phishing, or other security risks. This…

How to set, get, and delete cookies in WordPress
Cookies are small pieces of data that make your web experience smoother and more personalized. Websites rely on these cookies for essential functions like remembering your login details for future…

Top 9 iControlWP Alternatives: Manage Multiple Sites Easily
Of all the top WordPress management plugins we tested, iControlWP was definitely at the bottom of the list. It was difficult to set up and took over an hour to…
How can we help you?
If you’re worried that your website has been hacked, MalCare can help you quickly fix the issue and secure your site to prevent future hacks.

My site is hacked – Help me clean it
Clean your site with MalCare’s AntiVirus solution within minutes. It will remove all malware from your complete site. Guaranteed.

Secure my WordPress Site from hackers
MalCare’s 7-Layer Security Offers Complete Protection for Your Website. 300,000+ Websites Trust MalCare for Total Defence from Attacks.


